Table of contents
Related articles
Introduction
Planned requests are used to automatically create service requests or change requests for work that needs to be done on a regular or variable basis. They can be used to manage and plan preventive maintenance or equipment maintenance for; IT, Facilities Management, Biomedical Engineering or other teams. The requests generated from a planned request are internal to the department and cannot be queried or viewed by end users.
Examples:
- Checking on backups (IT)
- Checking the heating system (Building facilities)
- Preventive maintenance of a defibrillator (Biomedical)
A good knowledge of both Configuration and Reference data management modules will facilitate the understanding and configuration of the planned requests. If personalized assistance is required, please contact us and we will be happy to evaluate your needs and assist you in the implementation of this solution.
Basic Configuration
Planned requests can be configured in the Options and Reference data management, combined with specific configurations done directly in the Planned request module (detailed in the Planned Request Configuration section below).
Permissions
Specific permissions are required for users configuring planned requests. They can be granted from the Octopus' user file. There are two types:
- General
- Administer Octopus, to do the basic configuration from the Options and the Reference data management;
- Planned request:
-
Access the planned request module
-
Create a planned request
-
Delete a planned request
-
Modify a planned request
-
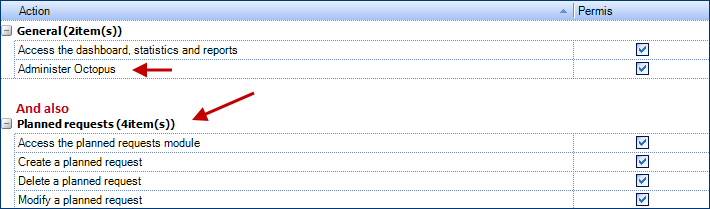
To control more efficiently access levels of Octopus, permissions to administer Octopus and to plan requests can be given to two different Octopus users.
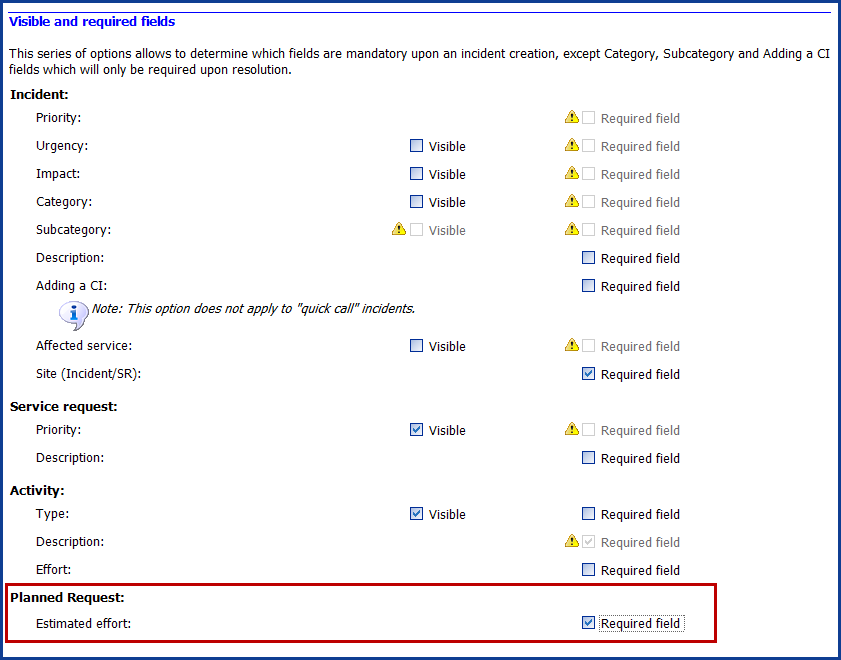
Options
From Tools > Options > 3 - Important general options menu.
- In Visible and required fields section, Estimated effort field needs to be checked to make it mandatory when creating planned requests. Otherwise, Planned effort breakdown chart cannot be visualized.
- Default values, specify a site and a user. Values will be used in requests issued by a planned request when they are not found in the system.

Reference Data Management
Some of the information necessary to the planned requests is configured from Tools > Reference data management menu.
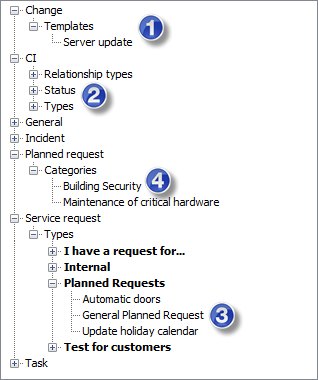
1. Change ⇒ Template
- A planned request can be based on a Change template. This template must already exist for it to be available when creating a planned request. Right click on Template to add a Change or click on an existing Change template to modify it.
2. CI ⇒ Types
- The group / assignee responsible for maintenance of a CI is identified in the Maintenance tab of the CI.
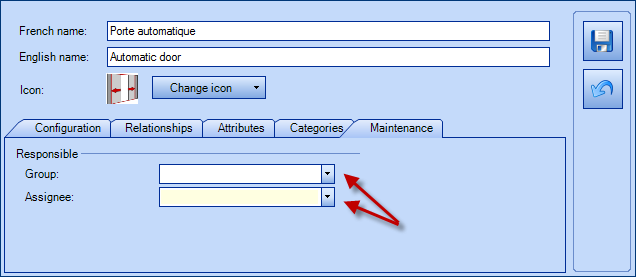
Group assignment is recommended as opposed to individual assigning to ensure that requests are still completed if the assignee is not available (vacation, absence) and to prevent from having to redo the configuration if the person changes functions.
3. Service request ⇒ Types ⇒ Planned request
- A planned request can be based on a service request. The service request template must already exist for it to be available when creating a planned request. Right click on Service request to add a new type of request or click on an existing one to modify it. For more information on the configuration of service requests, please consult the Service Request Types wiki.
4. Planned requests ⇒ Categories
- Use it to group requests of similar types to facilitate sorting of the work to be done, or to analyze data in a report. Once the categories are created, they can be selected from a list when creating a planned request.
Planned Request Configuration
- Go to File > Planned request management.
- From the Actions menu, select Create planned request to open the New planned request window.
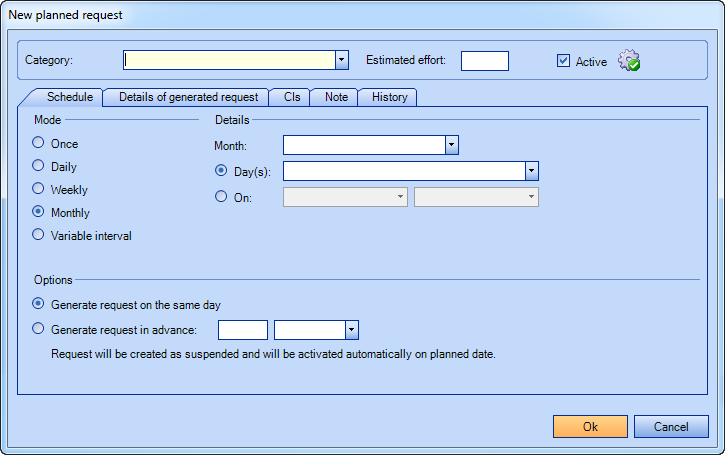
Upper Section

Category
- Select an applicable category from the list.
- Remember that categories must first be created in the reference data management - See the Reference data management section.
- Purpose:
- In some teams, there may be a large number of planned requests. Categorizing them will help to sort out the workload and/or analyze data through reports.
- Instructions.
- Here are some examples:
-
IT: IT security, Critical equipment maintenance, Equipment capacity.
-
Building facilities: Maintenance of beds and levers, Maintenance of heating / air conditioning systems, Building Safety.
-
Biomedical engineering: Minor, Major, Mandatory.
-
- The category for one or multiple requests can be modified from a list by clicking Modify category from the Actions menu.
- Use Category column in lists to sort or group the information by category.
- Here are some examples:
Estimated effort
- Specifies the estimated effort needed to complete this type of request (format hour:minute).
-
Purpose:
-
To be able to compare the estimated or allocated time to the actual time required to complete the request.
-
Allows to view the planned requests in the Planned efforts breakdown graph.
-
-
Instructions:
-
Add the estimated time in the required format, for example 00:30, if the time to complete the request is estimated to 30 minutes.
-
The estimated effort will not appear directly in the request, but it is visible from a list. Add the Estimated effort column under the Planned request to a list to see the value. To compare with the actual effort, add the Total effort column.
-
When a planned request does not contain any estimated effort, it cannot appear in the Planned efforts breakdown chart.
When this happens, the following message will appear under the title in the graph:
*** One or more planned requests do not have estimated effort ***
Active
- Checkbox that can activate or deactivate a planned request. Requests can also be activated or deactivated from the Actions menu.
Automatic activation/deactivation
- The
 button controls the date of automatic activation or deactivation of a request.
 -
Purpose:
-
To trigger the activation or deactivation of a request at a specific date.
-
-
Instructions:
-
Use the date in combination with the appropriate status (see the visual explanation below).
-
Note that a request that has been deactivated will no longer appear in the Planned requests list; but it will be in the Inactive planned request one.
-
For an automatic activation, the next planned date will be below the field.
Visual Explanation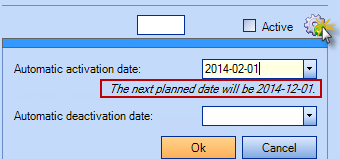

-
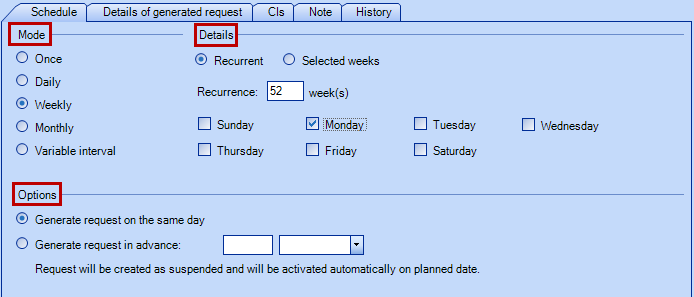
Schedule Tab
The Schedule tab is used to configure the time interval between requests generated from a planned request:
- The Mode and the Details work in combination to determine when and how many times a request will be generated.
- The Options indicate if the request will be created in advance or on the creation due date. When created in advance, the request will automatically be suspended with the reason Planned request created in advance. On the creation due date, it will activate itself and will appear in the list of new requests.
Once
The request will generate only once at the indicated date. (Note: the date cannot be in the past.)

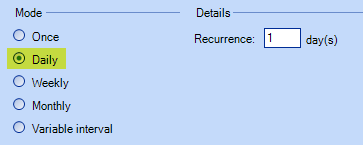
Daily
The request will generate according to the number or recurrence indicated in days. For example, 1 day will generate a request every day, 2 days will generate the request every 2 days, etc.
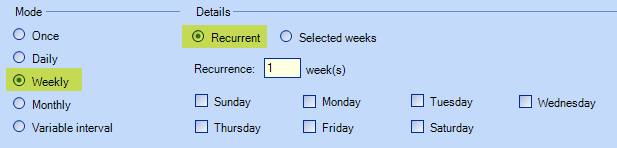
Weekly
The request will generate according to the number of recurrence indicated in weeks, on the specified day of the week. For example, recurrence 1 week - Thursday, will generate the request every Thursday. 3 weeks - Tuesday and Friday, will generate the request on Tuesday and Friday, every 3 weeks. For a request that needs to be created every 2 years, use 104 weeks.
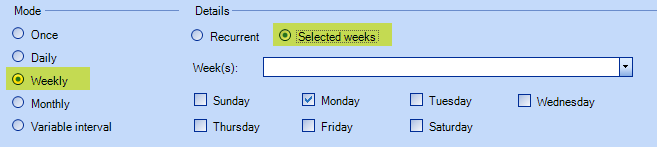
The request is generated on the day or days of the specified week or weeks. For example, it is possible to generate the request on the Mondays of the 5, 10, 15, 20, etc. weeks.
Weeks start on Sunday.
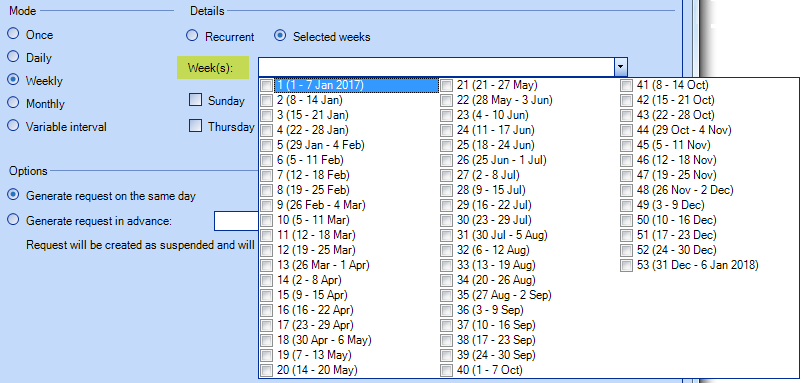
A year is 52 weeks and a few days and since January first does not always fall on a Sunday the weeks 53 and 1 of the next year can overlap.
This explains week 53 existence.
It is possible to select specific weeks. The number and date of the week is visible to help in the selection.
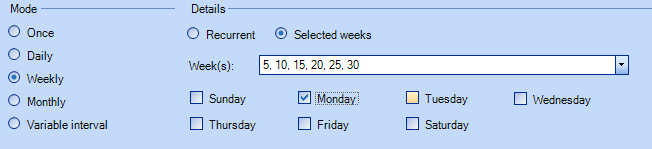
Results of the weeks selected.
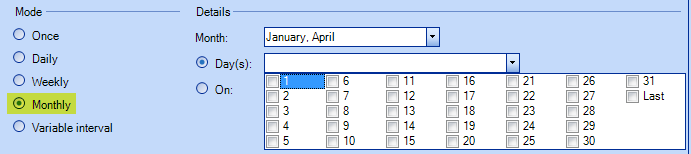
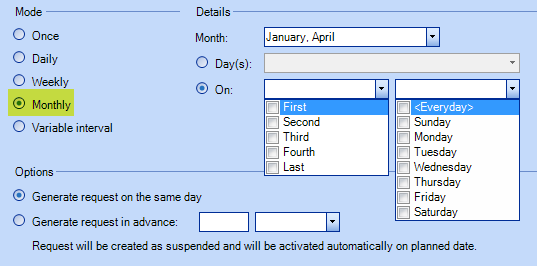
Monthly
The request will generate according to the month(s) selected, whether at fixed dates (the 15th of the selected month(s)) or on fixed days (the first Monday of the selected month(s)). It could give a combination like every second Saturday of March, July and October.
Variable interval
The variable mode can use two triggers: after the last completion or after the creation of the last request. Combined with the number of days/months/weeks/years, we could have a request created 2 years after the completion of the last request OR 6 months after the last created request.

Following a planning change, the system determines the next planned date according to the last completion date.
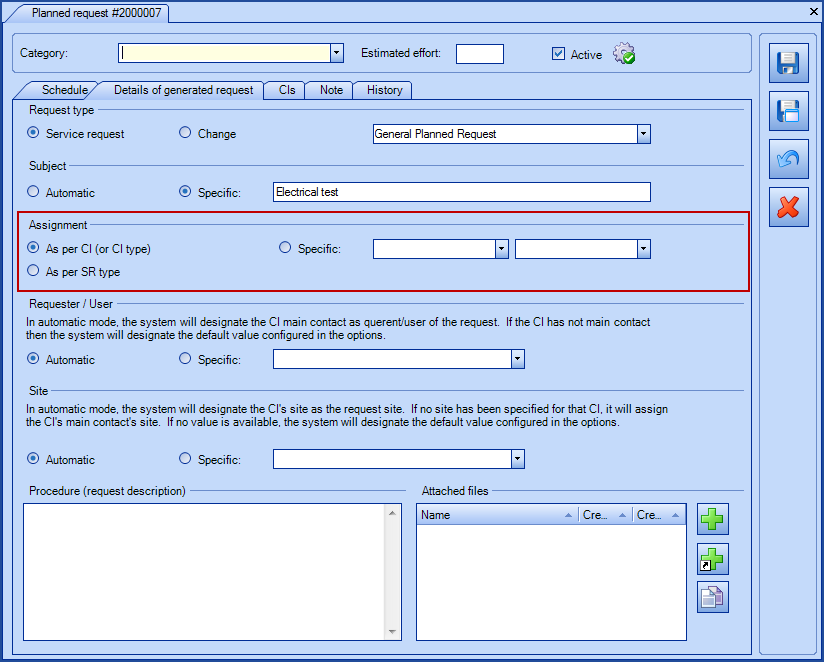
Details of Generated Request Tab
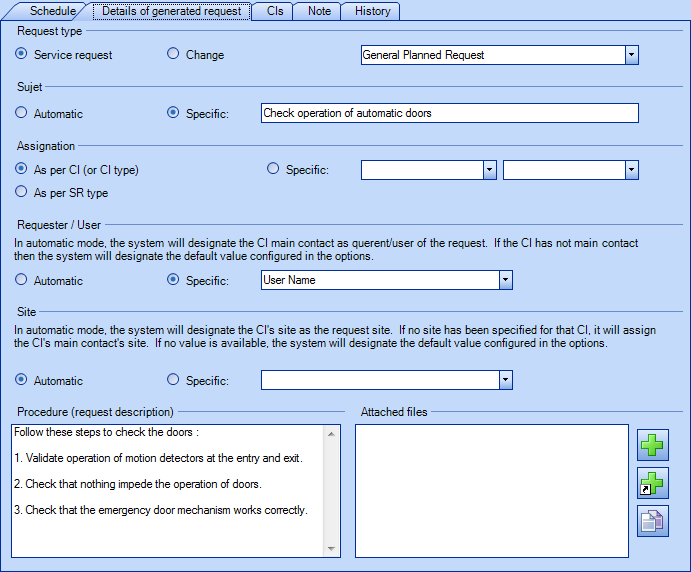
Request type
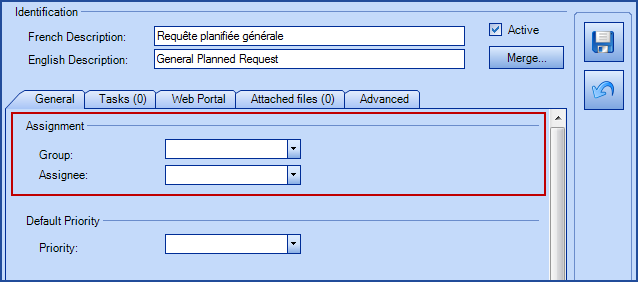
Planned requests can be configured to create a service or change requests. A service request named General Planned Request is selected by default. It is possible to add other types of service request or change request templates from the reference data management. It needs to be done by an Octopus user with the permission to Administer Octopus. (See the Permissions section).
Subject
- Automatic
- Specific
There are two options for the subject:
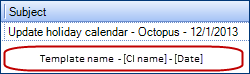
The specific subject will always be the same. But the automatic one will be composed of information from the planned request.
By default the information in the automatic subject are:
- The name of the template
- The CI Name
- The planned Date
Other variables are available to compose the automatic subject:
- CI Type
- CI Model
Contact the Octopus Service Desk to modify the default subject.
Specific cases
What if:
-
There is no CI.
-
This part will remain empty.
-
Template name - [Next planned date].
-
-
There is only 1 CI.
-
Template name - CI name - [Next planned date].
-
-
There are multiple CI in a common request.
-
Template name - Multiple CI - [Next planned date].
-
-
There are multiple CI each with its own request.
-
Template name - CI name - [Next planned date].
-
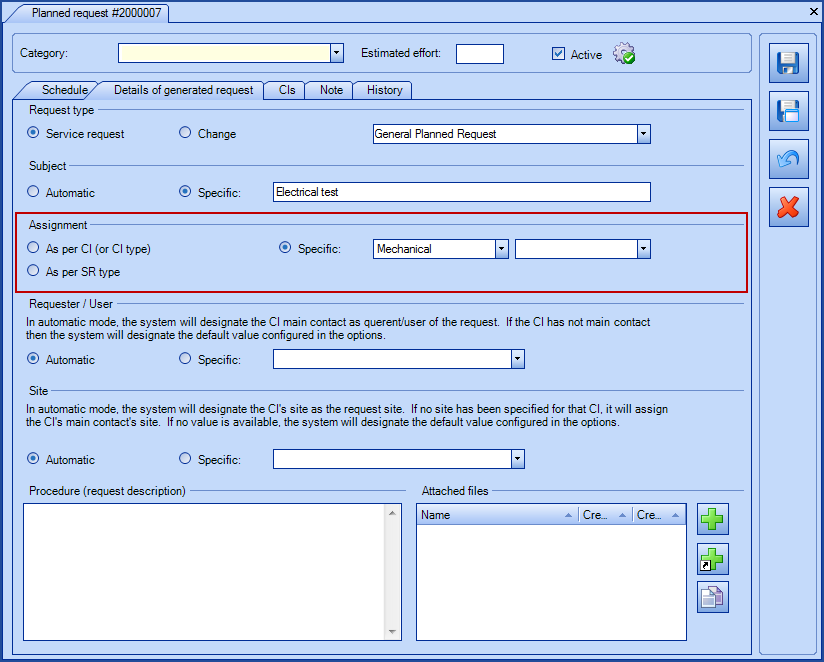
Assignment*
Planned requests have several assignment methods:
- As per CI (or CI type)
- This option will use the first available choice in this order:
- The group/assignee configured in the "Maintenance" tab of the CI type.
- If a group/assignee "Responsible" has been configured in the "Maintenance" tab of the CI, it will take precedence over the one configured in the CI type.
- Finally, if no responsible group/assignee are configured in the CI or CI Type, the system will assign the request to the Service Centre.
- This option will use the first available choice in this order:
-
As per SR type
-
This option will assign the request to the group/assignee defined in the SR type or to Service Centre if none have been identified.
-
-
Specific
-
With this option it is possible to specify exactly the group/assignee for the request.
-
Requester/User*
Two methods are available to select the requester/user:
- Automatic
- The system will pick the CI main contact as the requester/user of the request. If there is no main contact present, the system will use the default value configured in the Options
- Specific
- The requester/user for the request is selected
Site*
Two methods are available to select the site:
- Automatic
- The system will pick the CI site for the request. If no site is present in the CI, the system will use the site of the main contact. In the case where no value can be found in either of these places, the system will use the default value configured in the Options
- Specific
- The site for the request is selected
Procedure
The procedure can be automatically included in the planned request. This way it is possible to use the same SR type with different instructions.
Attached Files
One or more files can be added to the planned request if required.
*The examples mentioned above are linked to the option A request for each CI.
If the planned request is in the Common request for all CIs, the selection method for the assignment, the requester/user and the site will be the first value available from the CIs. The selection technique must return a value if there is a consensus for all CIs.
For example, the site considered will be the one shared by all the CIs. If it is not the case, then it will be the site of the main contact if the same contact is shared by all CIs. If no consensus is found, then the default values configured in the options will be used.
Please note that the date format displayed in the subject is the same as the Octopus server date format, but it can be modified via a setting accessible by our support team. If you would like to have this setting modified, please contact us to send a request via our Web portal.
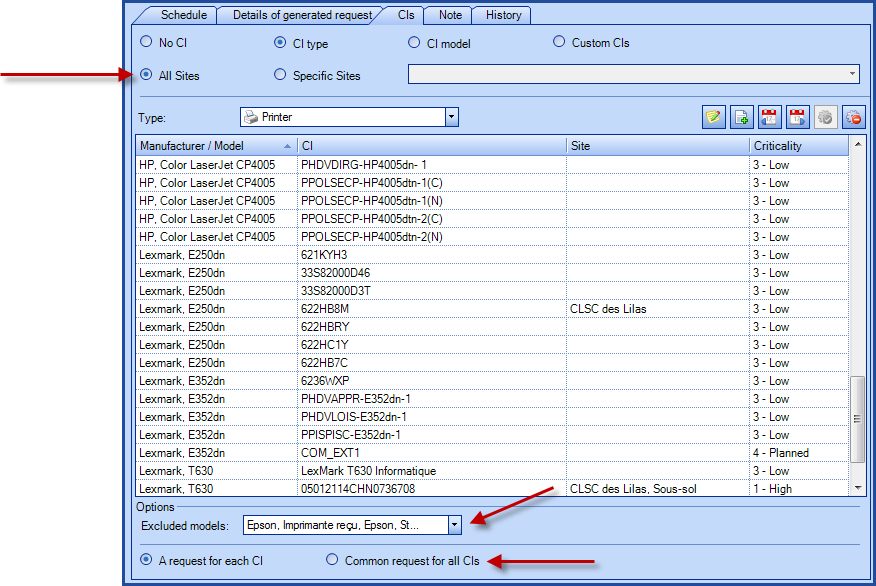
CIs Tab
CIs can be added to the requests generated from the planned request, from the CIs tab. Relating the CIs to the requests is important because it will make the interventions done on a CI visible from its record. Many options are available to offer a flexible solution to manage the planned requests:

With CI type and CI model mode only:
When new CIs are added, they automatically inherit the planned requests configured by type or model.
This is very practical and avoids forgetting CIs in preventive maintenance.
- No CI
- It can happen that a request generated from a planned request will not be linked to a CI; in this case, leave the default value of No CI.
- CI Type
- Usually similar equipment will require similar types of maintenance.
- It is possible to filter the CIs by site or sub-site. Adding a site implies that all the CIs from the site or sub-sites inherit the scheduled request.
- It is simpler in this case to create only one planned request for a CI type.
- It is possible to exclude one or more models of the CI type selected.
In an environment where CIs are filtered by site or sub-site is used, the CIs will inherit maintenance accordingly.
Any movement in the structure of the sites/sub-sites or modification of the CIs, will automatically adjust the planned requests of the related CIs.
- CI Model
- If a planned request is required only for one model of CI, the best method will be by CI models.
- If more than one models are concerned, then the CI type method would be best.
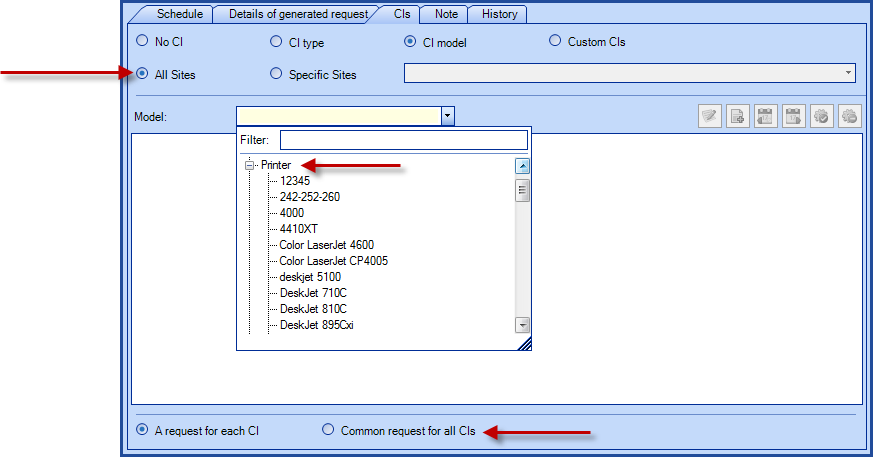
In an environment where CIs filtered by site or sub-site is used, the CIs will inherit maintenance accordingly.
Any movement in the structure of the sites/sub-sites or modification of the CIs, will automatically adjust the planned requests of the related CIs.
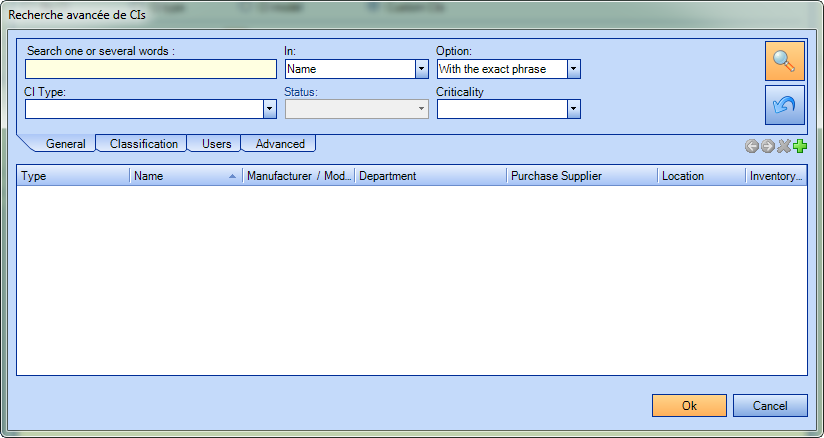
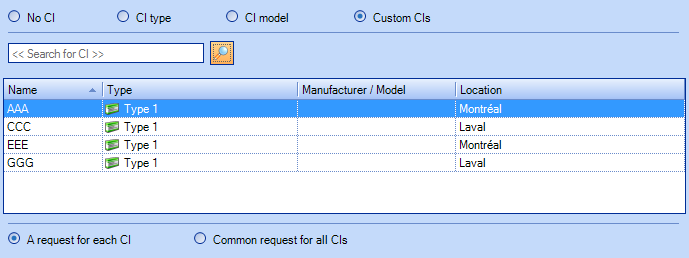
- Custom CIs
- It is possible to pick one or more specific CIs for a request.
- Use the advanced search button to find the CIs using multiple criterias.

- For example, to find a type of equipment from a specific site, add search criteria in the General and Classification tabs.
-
From the results found by Octopus, you can use the regular Windows techniques to make your selection (CTRL+Click, SHIFT+Click, CTRL+A) to add the CIs to the planned request.
- Number of CIs per request.
- In the bottom part of the window, the methods CI type, CI model and Custom CIs have two options:

If separate interventions are required or if parts are required, the best practice would be to have one CI per request.
Note that if the option for A request for each CI is selected, the Next planned date will remain empty, even if there is only one CI included in the request.
- Distinguish between types of requests.
- As it is possible to get regular types of requests as well as planned requests, to distinguish between the two types, add the Planned Request columns.
If the request is from a user, the field will remain empty.
- As it is possible to get regular types of requests as well as planned requests, to distinguish between the two types, add the Planned Request columns.
- Find CIs without planned requests.
- To find CIs that are not related to any planned requests, do a search from the CI module for the Number(Planned Request) field that is empty. This search can be saved as a list.


Data under the CIs tab cannot be modified as long as there is an active request generated by a planned request.
If you need to modify the relationship between the CI and a planned request, make sure all SRs and changes generated by this planned request are completed first.
To find out if there is still an active request generated by a planned request, add the Request column to the list of planned requests.

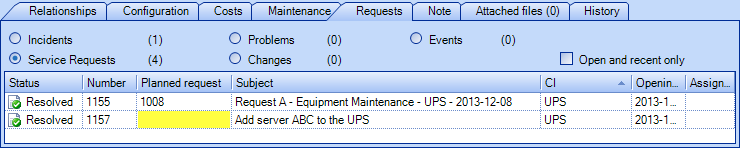
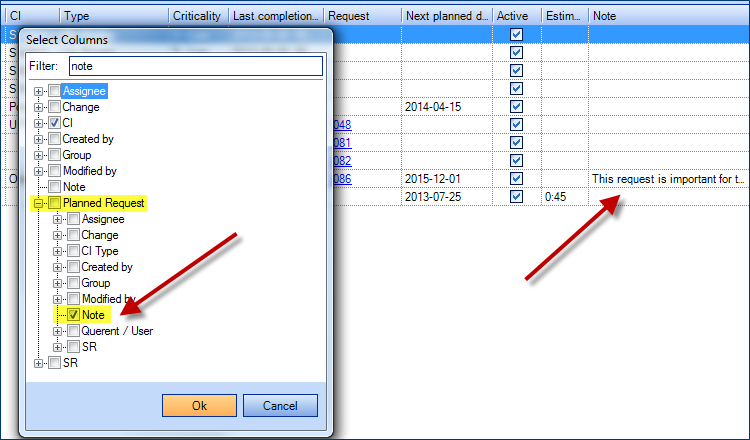
Note Tab
Specific information about the request can be added to the Note tab. Add the Note column under Planned Request to see the information, as shown in the illustration below:
History Tab
As in other modules, the History tab shows the changes made to the planned request from its creation, as shown in the illustration below:

If you have more than one Service Desk
Building Management is often managed around the physical sites and if you have defined your Service Desks according to the sites, the planned requests can automatically be assigned to the right group, as in the scenario below. Follow the link to find out more about how to configure more than one Service Desk.
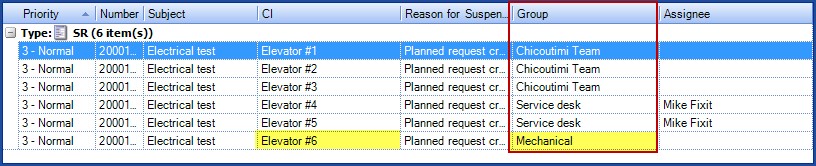
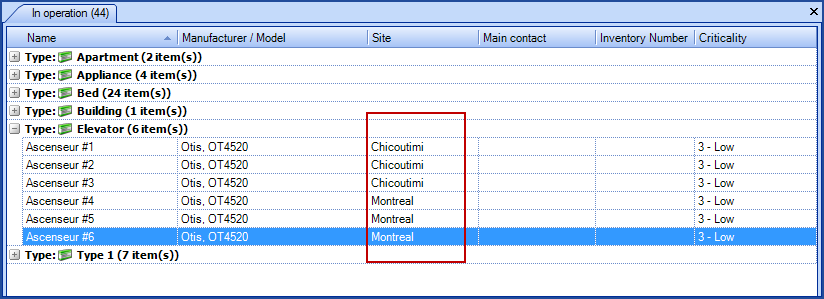
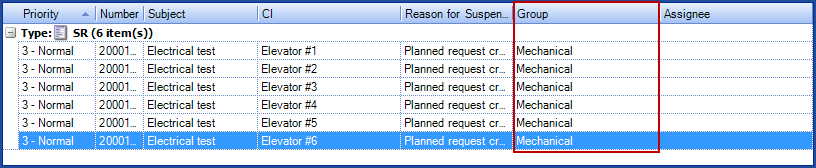
A company has 6 elevators, three in Montreal and three in Chicoutimi. The Chicoutimi site is configured to use the Chicoutimi Team as their service desk. In a planned request associated to the Elevator CI, the assignment will be done according to the service desk, unless another group is mentioned in the CI or the SR type.
- The #1, #2 and #3 elevators are associated to the Chicoutimi site.
- The #4, #5 and #6 elevators are associated to the Montreal site.
- In the CI file of elevator #6, it says that the maintenance group is Mechanical.
In our example, there is only one planned request for the Elevator CI and the option A request for each CI was selected. The SR used is the General Planned Request and this request type is not associated to any particular group. During the generation of the SRs the following results will be observed:
- If the assignment was As per CI (or CI type)
- Requests for #1, #2 and #3 elevators will be sent to the Chicoutimi Team group.
- Requests for #4 and #5 elevators will be sent to the Service Desk group.
- The request for elevator #6 will be assigned to the Mechanical group.
- If the assignment was As per SR type
- Requests for #1, #2 and #3 elevators will be sent to the Chicoutimi Team group.
- Requests for #4, #5 and #6 elevators will be sent to the Service Desk group.
- If the assignment was Specific
- All the requests will be sent to the selected group.
Example 1
Example 2


Example 3
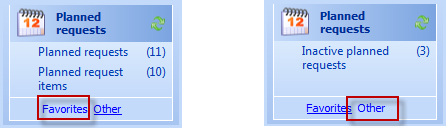
Predefined Lists
Three lists are available by default for the planned requests management:
-
Planned requests:
-
Displays all activate planned requests.
-
-
Planned request items:
-
Lists all planned items related to the planned requests.
-
-
Inactive planned request:
-
Displays all deactivated planned requests.
-
This section explains in detail the two available lists in the favourites and how to get the most of the them.
Planned Request Lists
It is from this list that you will be able to create, consult and modify your planned requests.
When you first use this list, you will have the following columns:
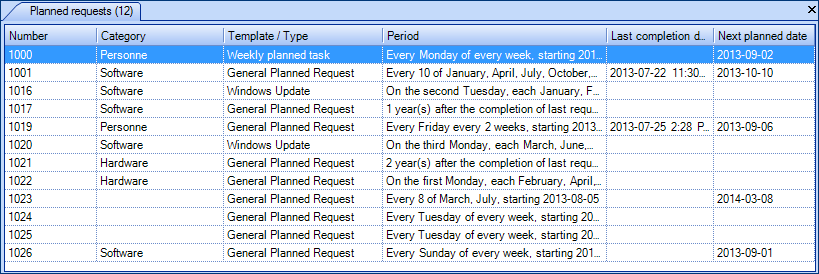
| Planned Request List | |
|---|---|
| Column | Description |
| Number | Represents the unique identifier of the planned request |
| Category | When used, categories group planned requests of similar type to facilitate sorting and grouping |
| Template/ Type | Indicates which SR type or change template the request will be created with |
| Period | Details the planning mode used for the planned request |
| Last completion date | Displays the date of the last completed request, if any |
| Next planned date | Displays the date of the next planned request, unless it is configured as A request for each CI. |
Other columns can be very useful in this list.
We suggest the following, but others can be added depending on the needs.
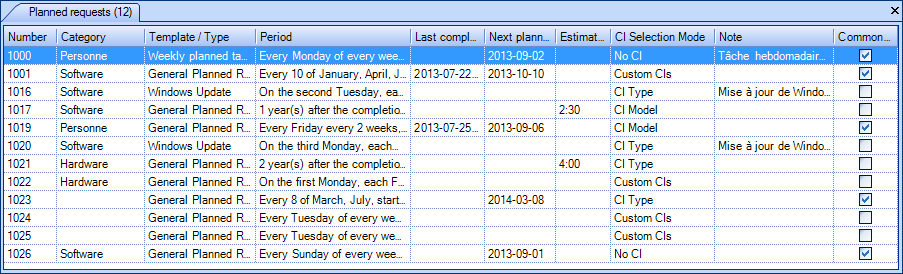
| Planned request list with additional columns | |
|---|---|
| Column | Description |
| Estimated effort | Used to indicate the estimated effort for the work |
| CI selection mode | Indicates the mode used in the planned request, either No CI, CI type, CI model or Custom CI |
| Note | Displays the content of the note for an item |
| Common request for all CIs | When checked, indicates that all CIs will be in the same request |
| CIs |
Displays the name of the CIs that are related to the planned request The name of the CIs are separated by a semicolon and Octopus only displays the first 100 |
| Number of CI | Displays the number of CIs that are linked to the planned request |
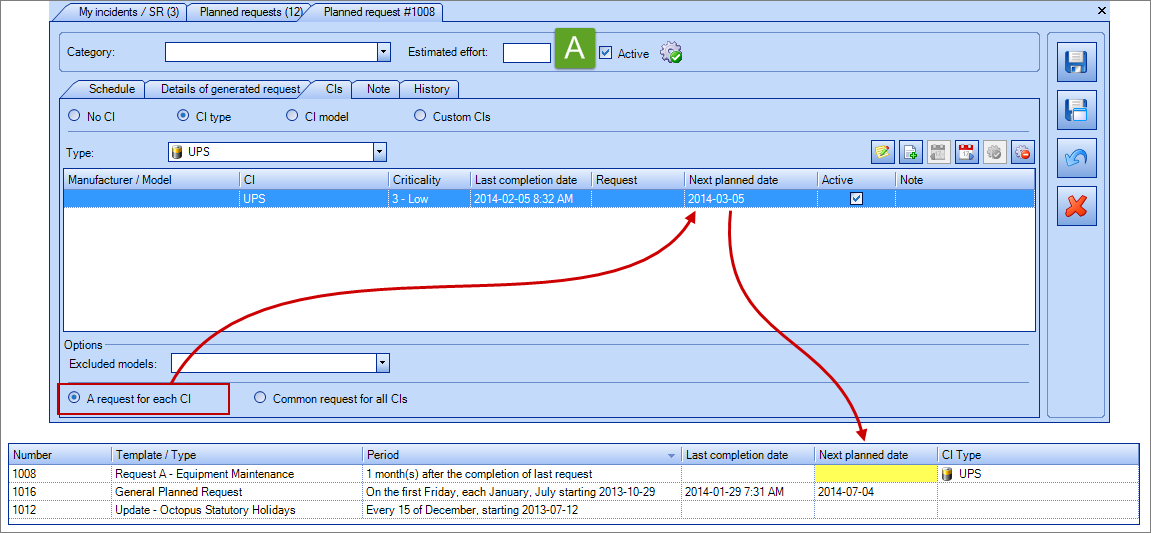
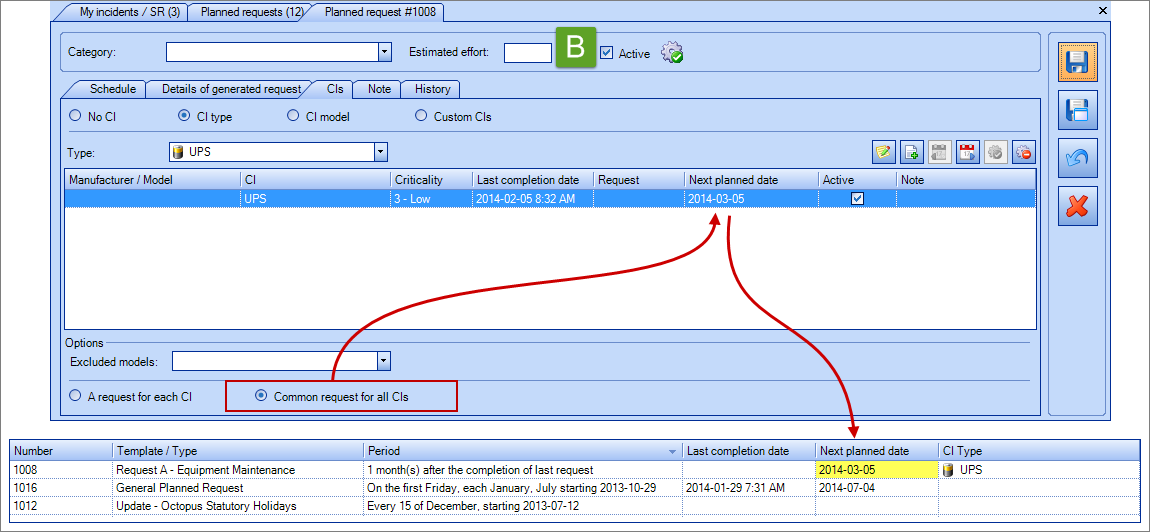
The Next planned date will remain empty in the list of Planned requests if the option A request per CI has been selected.
This is normal if many CIs are linked to the planned request, but it is true as well if only 1 CI is linked. If you want to see the date, change the type to Common request for all CIs.
See below for an example. Image A shows A request for each CI and image B shows Common request for all CIs.
Planned Request Items List
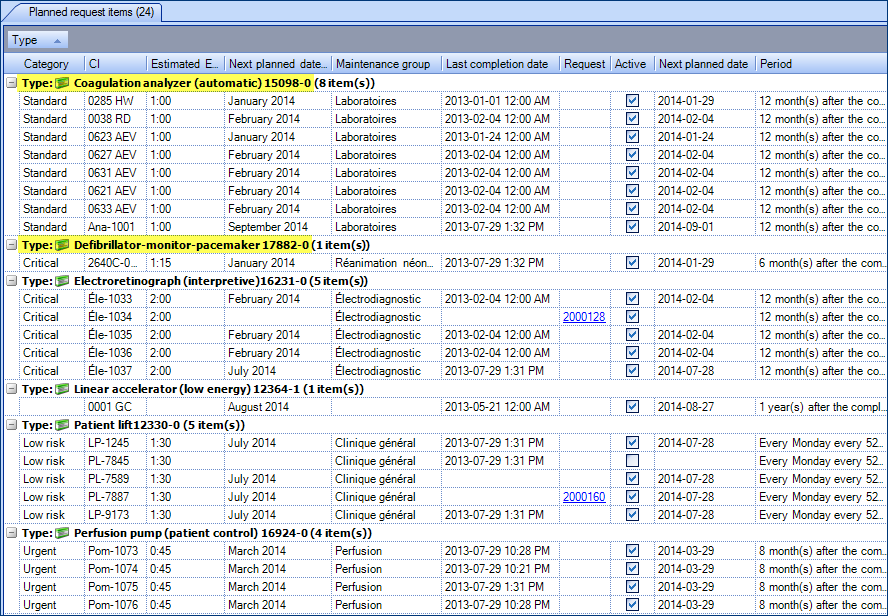
It is very important to understand how to use this list as it will become a useful tool to organize planned requests (or preventive maintenance (PM) as the department may call them).
One of the most interesting feature from this list is that CIs can be managed individually (deactivate a specific CI, change the next planned date, modify the last completion date, etc.).
Items in this list represent all the SR or change requests that will be created as per the instructions configured in the planned requests. The number of items related to a planned request depends on the CI selection mode.
| CI selection mode | Results |
|---|---|
| No CI |
Only one item will appear in the list Example
Planned request #1001
Result : 1 item in the list |
| CI type and A request for each CI |
As many items as there are CIs of this type (except if some models were excluded) Example
Planned request #1002
Result : 50 items in the list |
| CI type and Common request for all CIs |
As many items as there are CIs of this type (except if some models were excluded) Example
Planned request #1003
Result : 15 items in the list |
| CI model and A request for each CI |
As many items as there are CIs of this model Example
Planned request #1004
Result : 12 items in the list |
| CI model and Common request for all CIs |
As many items as there are CIs of this model Example
Planned request #1005
Result : 25 items in the list |
| Custom CI and A request for each CI |
As many items in the list as there are CIs selected in the planned request Example
Planned request #1006
Result : 5 items in the list |
| Custom CI and Common request for all CIs |
As many items in the list as there are CIs selected in the planned request Example
Planned request #1007
Result : 7 items in the list |
When you first use this list, you will have the following columns:

| Planned request items list | |
|---|---|
| Column | Description |
| Category | When used, the categories group the planned requests of similar type to facilitate sorting and grouping |
| Period | Details the planning mode used for the planned request |
| CI | Displays the name of the CI related to the planned request |
| Type | Displays the CI type related to the planned request |
| Criticality | Indicates the criticality of the CI related to the planned request |
| Last completion date | Displays the date of completion of the last SR or change request. If related to one or more CIs, this date will appear in their file |
| Request | Displays the number of the opened request |
| Next planned date | Displays the date of the next planned request |
| Active | Indicator to show if the item on the list is active or not |
| Estimated effort | When present, indicates the estimated effort for the work |
| Note | Displays the content of the note related to the item |
Other columns can be very useful in this list.
We suggest the following, but others can be added depending on the needs.
| List Planned request items with additional columns | |
|---|---|
| Column | Description |
| Number | Represents the unique identifier of the planned request (this number can be used the group items of a common planned request) |
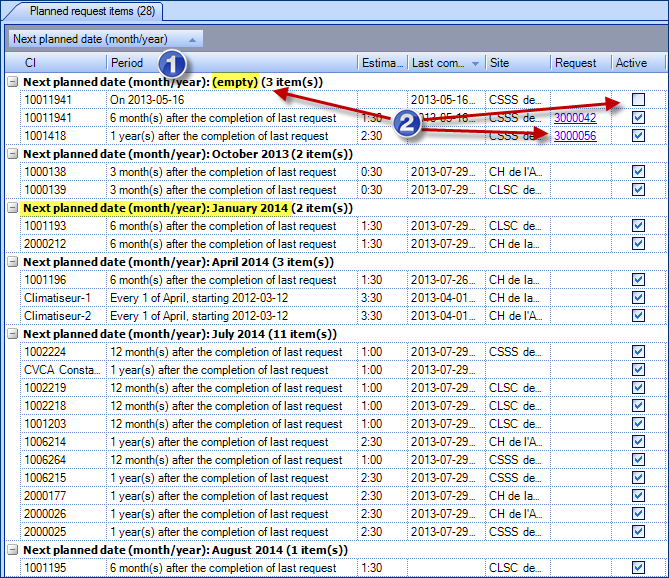
| Next planned date (month/year) | Displays the next planned date in the month/year format making it easier to plan by sorting and grouping with this column |
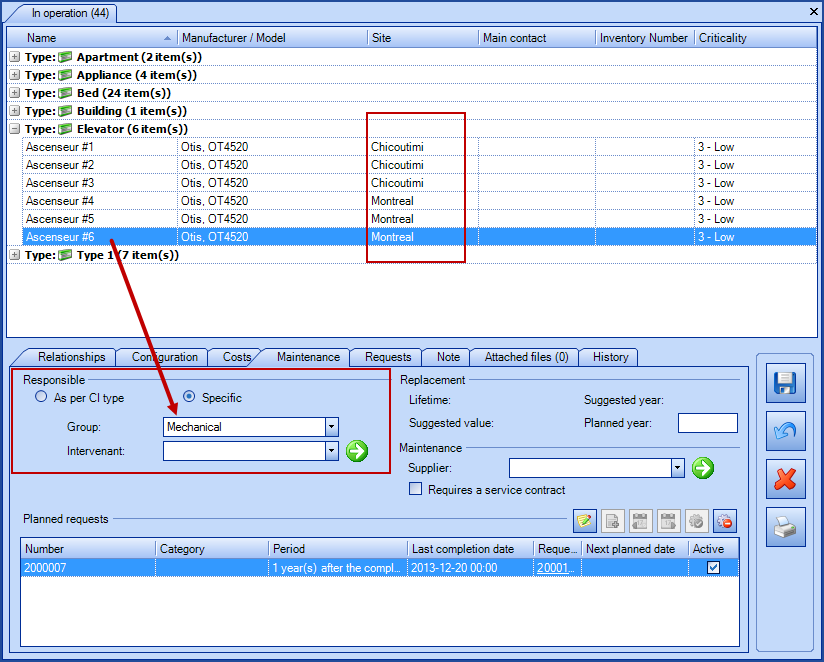
From the Planned request items list, double-clicking on an item will open its CI file as shown below.
Also, with a right click the following options are available: Open the planned request related to the CI, Open the CI.
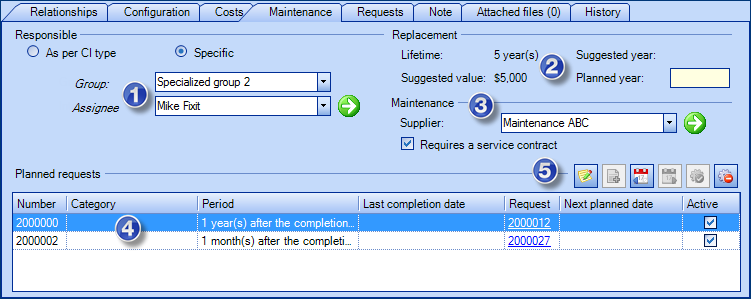
| Maintenance tab from a CI | |
|---|---|
 |
|
| Item | Brief description |
 |
If the assignment of the planned request is As per CI (or CI type), the request will be assigned according to the group defined in this section |
 |
The replacement information like the Theoretical Lifetime or the Suggested Replacement Value is defined from the CI type and with the help of the Date of Purchase documented in the Cost tab of the CI |
 |
Section that shows if a specific supplier takes care of the maintenance of this CI and if a service contract is required |
 |
When a CI is associated to at least one planned request, it will appear in this section |
 |
It is possible to change the behaviour of a planned request for a CI using the action buttons. The right column describes what each button does
|
| Planned request items list | |
|
|


Action Menu
The action menu can vary according to the list selected.
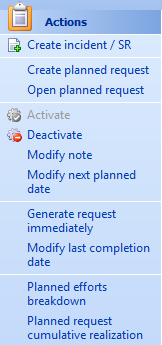
Common actions
- Create planned request.
- To create a new planned request. Can be used directly in the Configurations module, after selecting one of more CI.
- Activate.
- From the Inactive planned request list.
- To reactivate an inactive planned request.
- From the Planned request items list.
- To reactivate the creation of planned requests for 1 CI.
- From the Inactive planned request list.
- Deactivate.
- From the Planned request list.
- To deactivate a planned request.
- From the Planned request items list.
- To deactivate the creation of planned requests for 1 CI.
- From the Planned request list.
- Planned effort breakdown.
- Displays the distribution of the planned efforts.
- Planned request cumulative realization.
- Allows to compare the number of realized requests compared to what has been planned.
Action specific to the Planned request list
- Modify category.
- To select or modify the category for one or more planned request at once.
Action specific to the Planned request items list
The actions below can be performed on a multiple selection (aside from the Open action)
- Open planned request.
- Opens the planned request related to the item on the list. In this list, double-clicking an item will open the CI, not the planned request.
- Modify note.
- To modify the note for the selected item from the list.
- Modify next planned date.
- To modify the date when the next request will be created for an item (not available if a request is already open for this item or if the item is deactivated).
- Generate request immediately.
- To generate the request now (not available if a request is already open for this item).
- Modify last completion date.
- To change the completion date of the last request (available only for planned request with the variable interval mode combined with the after completion option).
Organizing the Planned Request Items List
Before you start
This list will help organize the work that needs to be done. Certain steps are important, especially at the beginning, to ensure that the requests will be created at the right time for the correct CIs (equipment).
Here are a few things that need to be checked before proceeding to the planning stage.
- Modify the next planned date (for one or more CIs).
- When a planned request is configured by CI model or type, all the requests will be created on the same date for those CIs. This step is important because it will help with getting the requests created at the right moment.
-
Modify the last completion date (for one or more CIs).
-
If the date of the last completion is known and the planning is based on the "x" time after the last completion parameter, this step is important, because it will enable the system to create the requests at the right moment. Note that the last completion date cannot be changed once a request has been created and resolved for this planned request.
-
-
Deactivation of the execution for items (due to lack of time, manpower or because the CI is obsolete).
-
With planned request based on CI type or model, new CIs of said type or model will automatically inherit the configured planning. However, there may be cases where this should not apply for all CIs. This is why a review of the items in the list must be done to confirm that all the CIs present in the list require the related planned request.
-
-
Add a category.
-
The category field is useful to group and show in a single glance, items from the same category.
-
Planning
Once a review of the planned request items has been done, the list can then be configured to fit the needs.
The IT examples are aimed at the Information technology teams, the BME examples are aimed at Biomedical engineering teams (or related to medical equipment) and the BF represents the building facilities department, technical services, etc.
| Group by | Details |
|---|---|
| Category | Since the category is configurable, it can be very useful to group planned request. In the following examples, the categories will be different from one team to the next because their needs are different |
|
IT Example
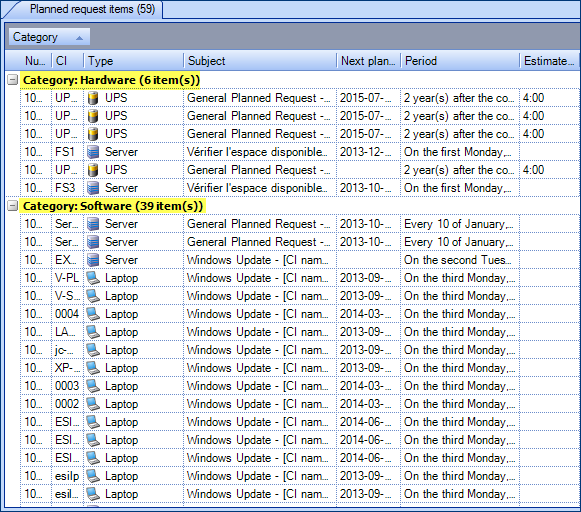
BME Example
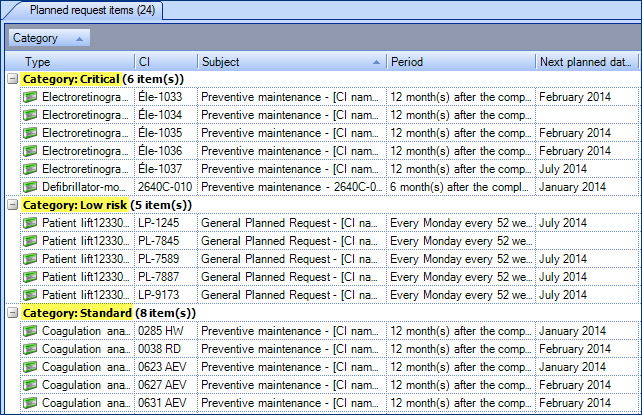
BF Example
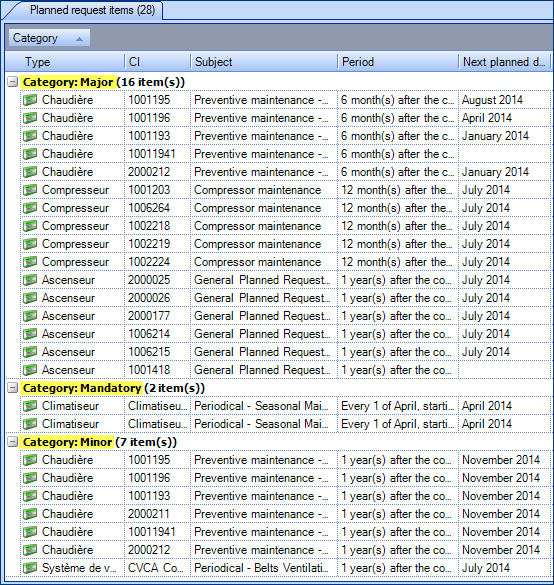 |
|
| Next planned date (month/year) | The Next planned date (month/year) column allows to group the planned requests to come by month and year no matter the day |
|
Example
|
|
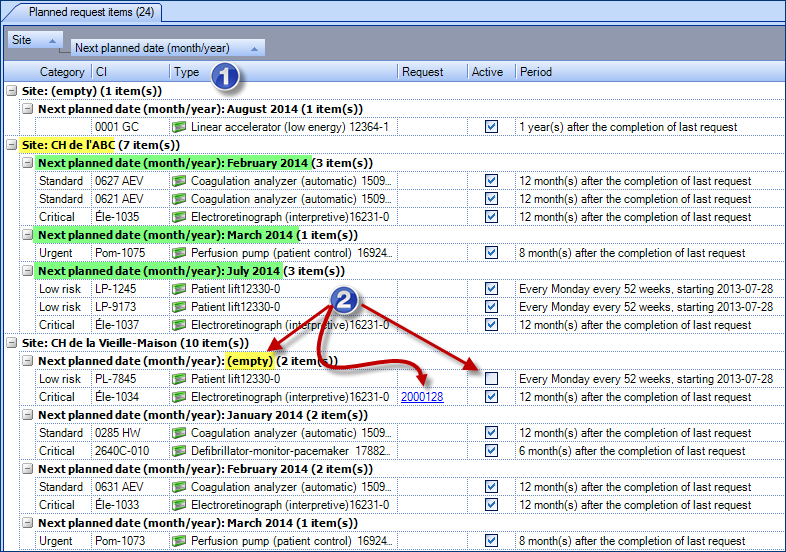
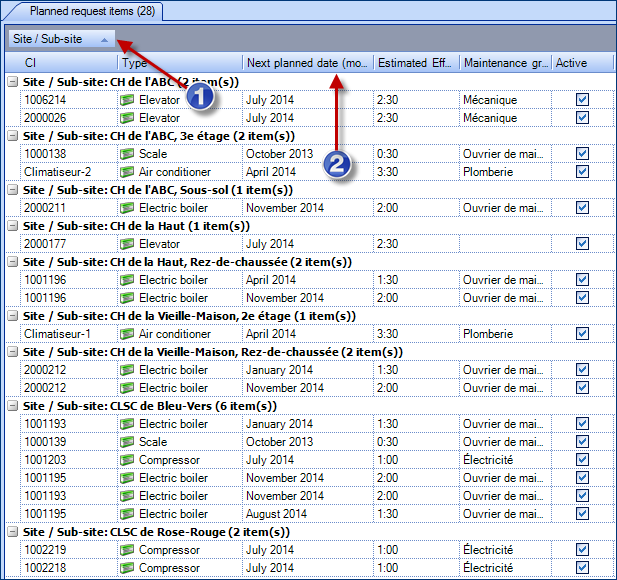
| Site or Site / Sub-Site |
When maintenance are on different sites or if they are on different floors, it could be good to group by this column. It is then possible to group or sort again with another column - the next planned date (month/year) for example |
|
BME Example
BF Example
|
|
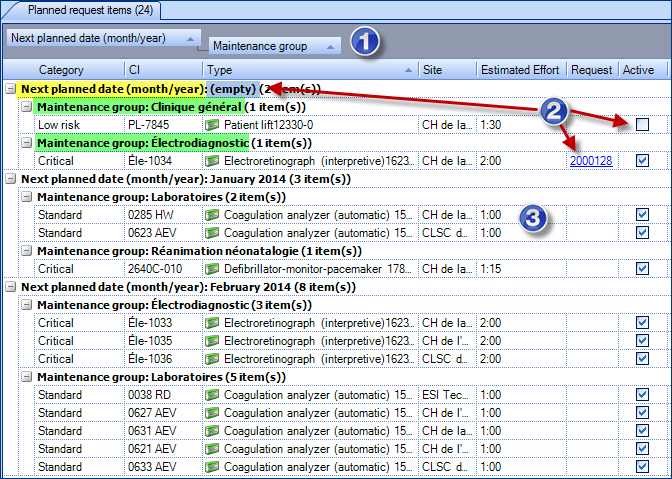
| By period or by group | To have an idea of the workload for the resources by group coming up, group by the following 2 columns: Next planned date (month/year) and Maintenance group |
|
BME Example
BF Example
|
|
| CI type | It may be useful to group the planned requests by CI type, when you validate them |
|
IT Example
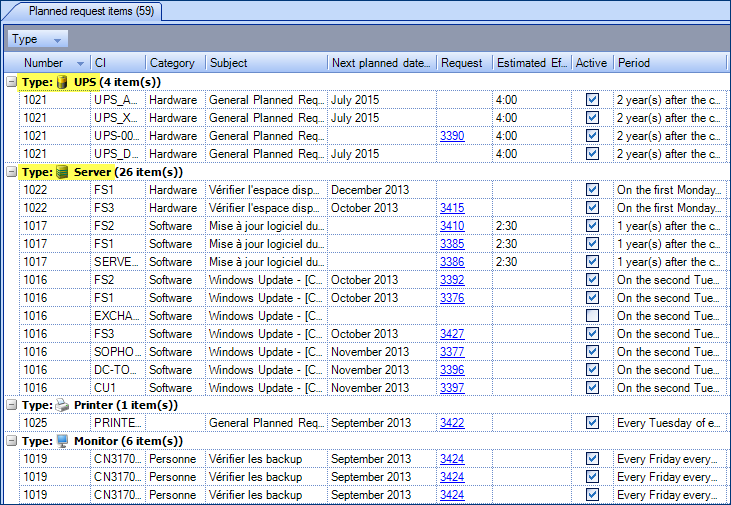
BME Example
BF Example
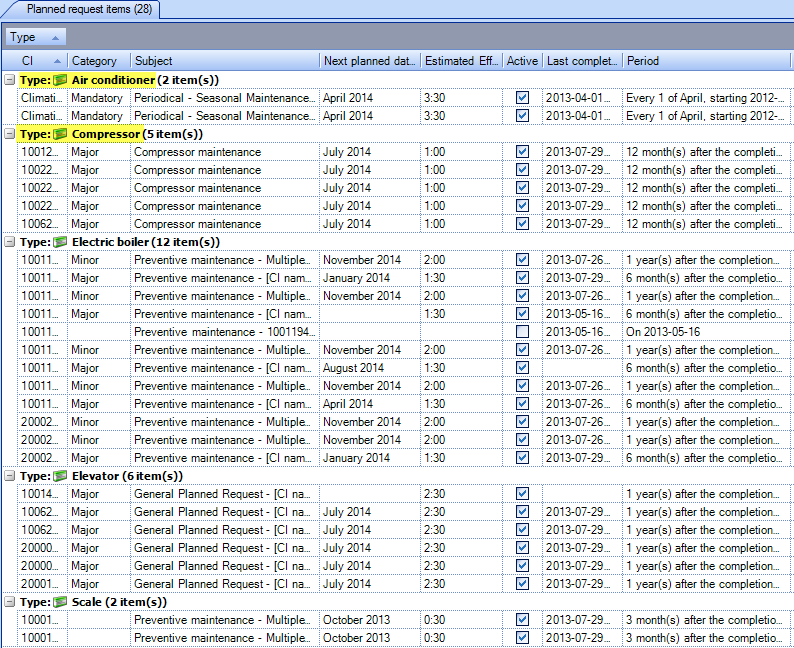 |
|

Planned efforts breakdown
The data processed in this report is from service requests created from a planned request and does not take into account changes created from a planned request.
The planned efforts breakdown presents the whole year, broken down in weeks. The graph is only available from the Planned request management (from the File menu) by clicking the Planned efforts breakdown action.
The subtitle of the graph shows the total efforts for each of the selected series (Completed (planned), Completed, Not completed or Planned). In the case where some of the planned requests do not contain estimated efforts, a message will indicate it under the title of the graph as planned request cannot be shown if they do not have estimated efforts.
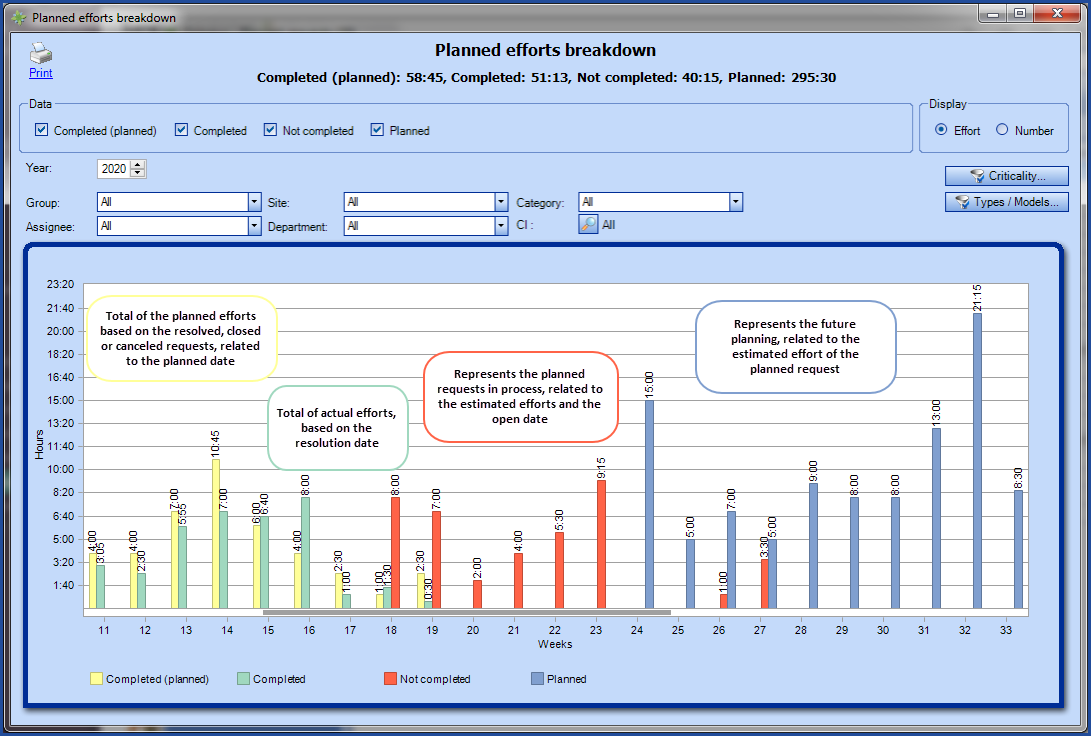
The graph can be opened in a side window if you use CTRL + Planned efforts breakdown action.
Data
Definitions of series represented by the generated report:
- Completed (planned)
- Represents the planned efforts of the resolved, closed or cancelled requests.
- Considers the planned dates of the requests.
- Considers the estimated efforts of the requests.
- Completed
-
Represents the closed requests excluding the cancelled ones.
-
Considers the resolution dates of the requests.
-
Considers the internal efforts of the requests.
-
- Not completed
-
Represents the opened requests.
-
Considers the open dates of the requests
-
Exception: Considers the reactivation date of the Suspended requests with the Planned request created in advance reasons.
-
Considers the estimated efforts that come from the planned requests.
-
- Planned
-
Represents the planned request items.
-
Considers the next planned dates as well as the next projected dates.
-
Planned: Next planned dates as specified in the planned request items
-
Projected: Next projected dates following the next planned dates according to the planning modes of the planned requests
-
-
Considers the estimated efforts of the planned requests.
-
The projected planned requests items displayed following the drilling of the Planned series, these cannot be modified.
-
Note: In the case of a planned request with a variable interval after completion with an opened request, the next projected dates are determined from the last planned date and calculated in fixed intervals.
-
Filter

- Data: Shows one or more options related to the previously explained series, Completed (planned), Completed, Not completed or Planned.
- Year: Allows to select the year of the data to display.
- Group and assignee: Allows the selection of the planned efforts by group.
- Site: Allows the selection of the planned efforts for a specific site or sub-site.
- Category: Allows the selection of one of the planned request's categories configured from the reference data.
- Assignee: Allows to target a particular assignee if necessary.
- Department: Allows the selection of the planned efforts for a specific department or sub-department.
- CI: Opens a search window to target one or more CIs based on various criteria.
- CI:
- Criticality: Allows you to filter the graph according to the criticality of the CI.
- Types / Models: Allows to filter the chart by the CI type manufacturers and models.
Contextual menu
- Display values: Shows the effort value per week. To show the total completed or planned efforts, right click on one of the bars and select Display values.
- Display data: Allows you to drill data for a particular week. To view the data for a particular week, right click the bar of the desired week in the chart and select Display Data. You can also double click on the week to view the result of the data.
-
Display horizontal lines: Allows to see (by default) or remove the horizontal lines in the graph.
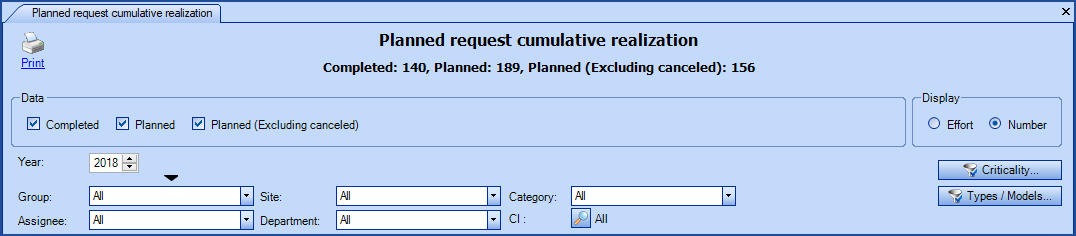
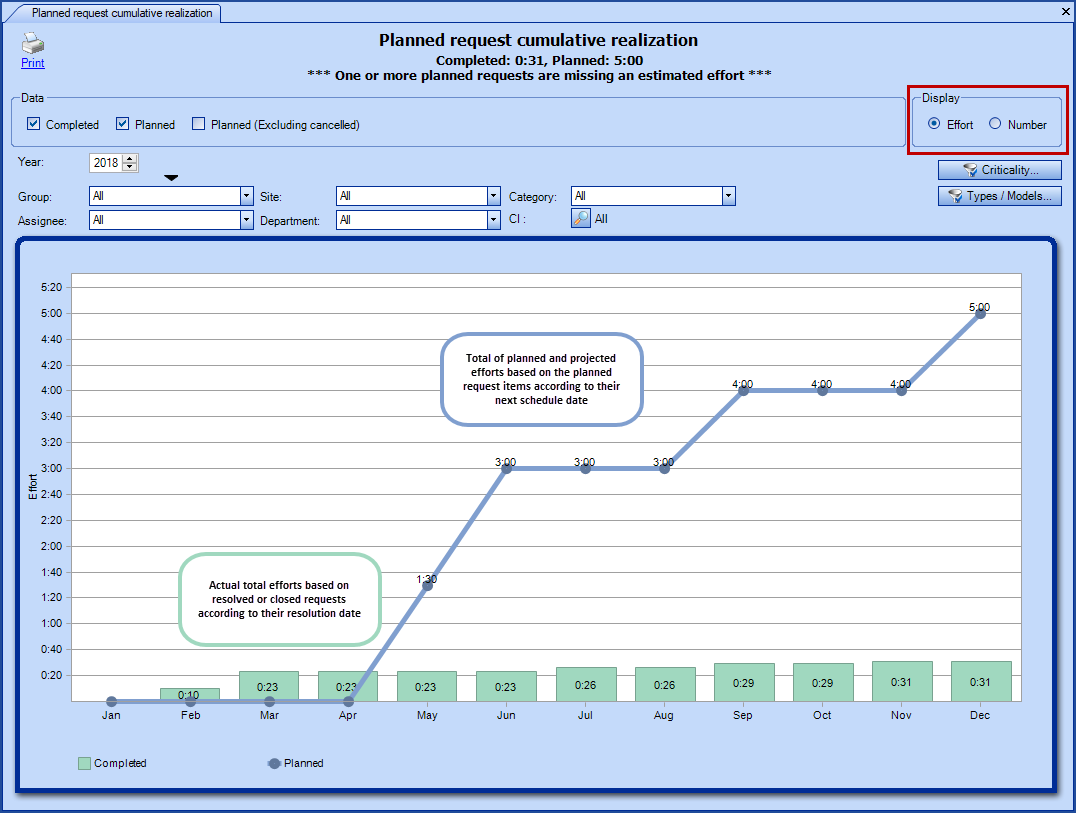
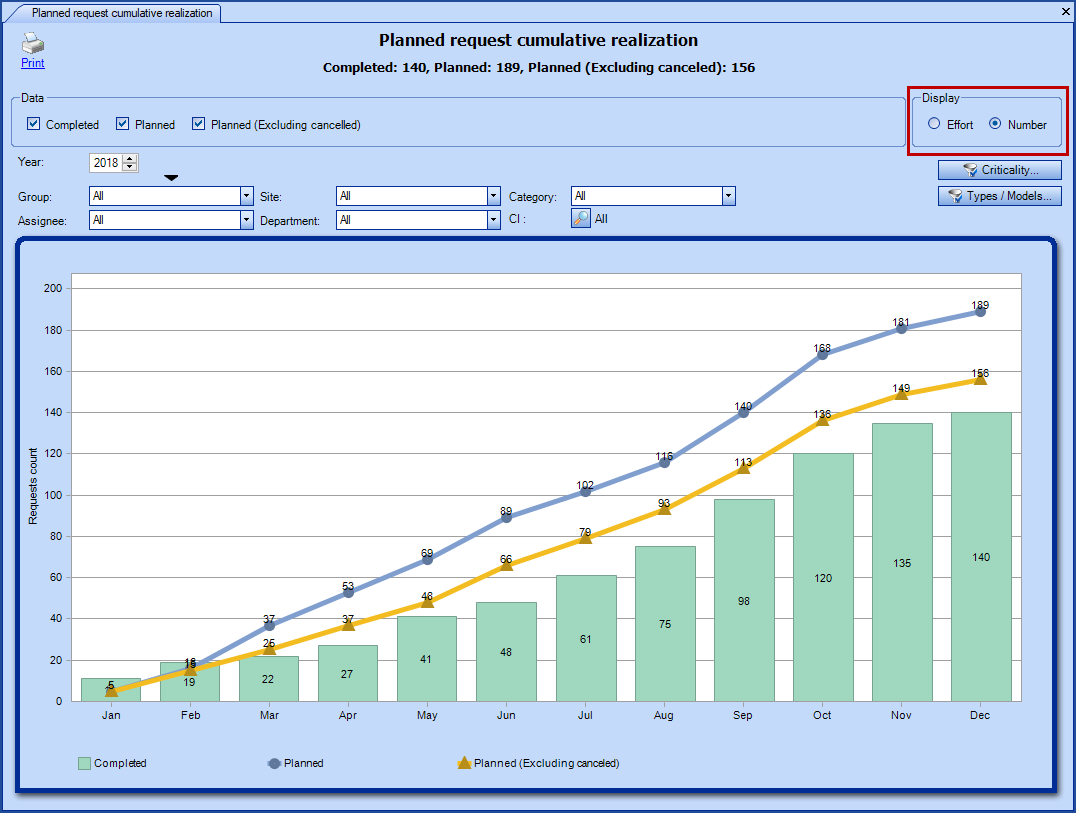
Planned request cumulative realization
The data processed in this report is from service requests created from a planned request and does not take into account changes created from a planned request.
The Planned request cumulative realization graph allows to compare by Effort; the actual effort in relation to the planned effort, or in terms of the Number of completed requests versus the number of planned ones.
This graph can be accessed from the Planned request management module (from the File menu) by clicking the Planned request cumulative realization.
The subtitle of the graph shows the total efforts for each of the selected series, either Completed or Planned. In the case where some of the planned requests do not contain estimated efforts, a message will indicate it under the title of the graph as planned request cannot be shown if they do not have estimated efforts.
Planned request cumulative realization - view by Effort
Planned request cumulative realization - view by Number
The graph can be opened in a side window if you use CTRL + the Planned request cumulative realization action.
Data
Definitions of series represented by the generated report:
View = Effort
- Planned
- Represents the Estimated effort configured in the planned requests.
- Combines the estimated efforts of planned request items (planned and projected) as well as the ones from requests that are open, resolved/closed or cancelled and were generated by a planned request.
- Considers the next planned date as well as the next projected ones.
- Completed
-
Represents closed requests excluding the cancelled ones.
- Considers the resolution dates of the requests.
- Considers the internal efforts of the requests.
-
- Planned (Excluding cancelled)
- Applies the same calculations as for the planned ones, but excluding those that have been canceled.
- When the two points are equal, it means that none of the planned requests have been canceled.
View = Number
- Planned
-
Combines the number of planned request items (planned and projected) as well as the requests that are open, resolved/closed or cancelled and were generated by a planned request.
- Considers the planned date of the planned items and requests.
-
- Completed
- Represents closed requests excluding the cancelled ones.
- Considers the resolution dates of the requests.
- Planned (Excluding cancelled)
- Applies the same calculations as for the planned ones, but excluding those that have been canceled.
- When the two points are equal, it means that none of the planned requests have been canceled.
Filter


- Data: Shows one or more options related to the previously explained series, Completed and Planned.
- View: Data is displayed in the graph by Effort or Number (number of requests).
- Period: Represents a whole year or a specific period (with start and end date) when clicking on the black arrow.
- Group: Shows the cumulative data for the planned requests for a specific group.
- Site: Shows the cumulative data for the planned requests for a specific site or sub-site.
- Category: Allows the selection of one of the planned request's categories configured from the reference data.
- Assignee: Allows to target a particular assignee if necessary.
- Department: Shows the cumulative data for the planned requests for a specific department or sub-department.
- CI:Opens a search window to target one or more CIs based on various criteria.
- CI :
- Criticality: Filters the graph by CI criticality.
- Types / Models: Filters the graph by manufacturers / models of the CI types.
Contextual menu
- Display values: Shows the effort or number of requests according to the selected display. To show the totals in the graph, right click on one of the bars and select Display values.
- Display data: Allows you to drill data for a particular month. To view the data for a particular month, right click the bar of the desired month in the chart and select Display Data. You can also double click on the month to view the result of the data.
- Display horizontal lines: Allows to see (by default) or remove the horizontal lines in the graph.
Since the data from the graph represents the cumulative of the planned requests, when drilling, all the data from the beginning of the selected period until the selected month will be displayed in the list. To help with the display and group information, two new fields have been added Resolution Date (month/year) and Planned Date (month/year).
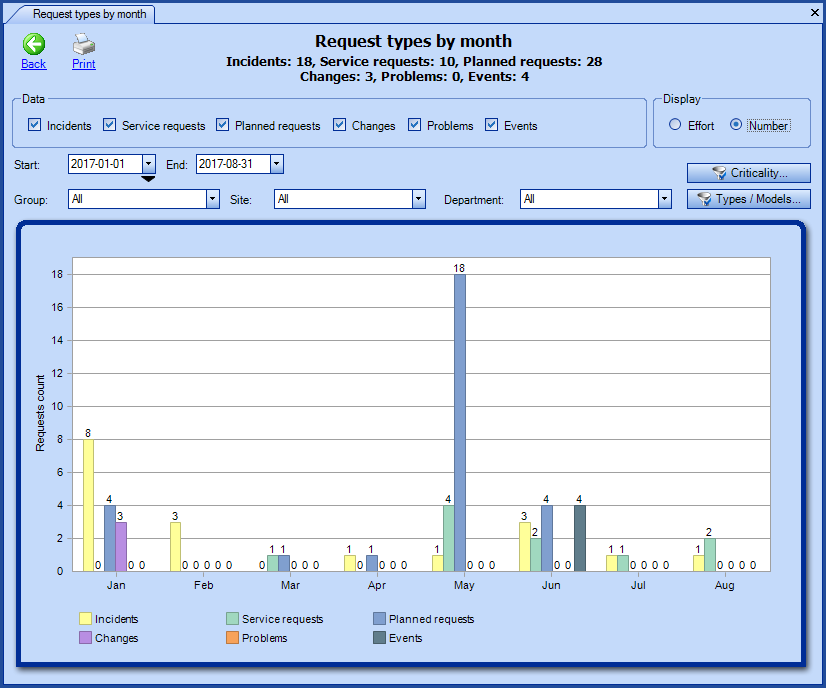
Request types by month
The following types of requests can be selected in the report :
- Incidents
- Service requests
- Planned requests
- Changes
- Problems
- Events
The data will be shown according to the display type selected:
- Effort
- Number
For all the details on this report, see the Request types by month section of the Reports and Statistics Module Wiki.
Tricks
In order to exploit the use of lists to manage the planned requests, it is recommended to read the List Customization article
However, here are a few quick tricks to help maximize the use of lists.
Adding columns
- To add one or more column, all you need is to right click on the list to modify and select Select a column from the menu.
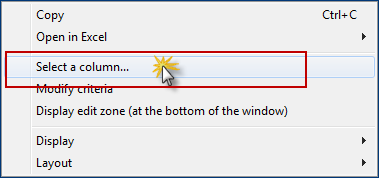
- To pick the required column place a checkmark in front of the field name or uncheck to remove, then press OK.
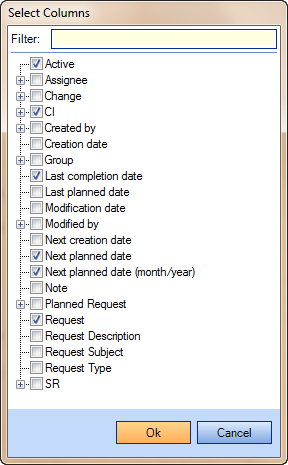
- To facilitate the search of a column, use the filter field.
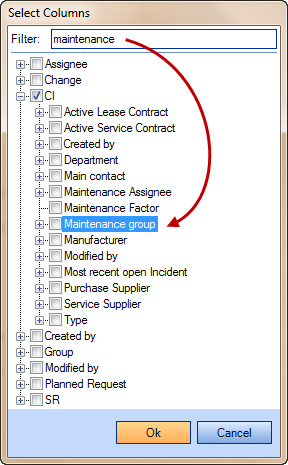
Note that the required field may be present in more than one node. It is important to select the right one.
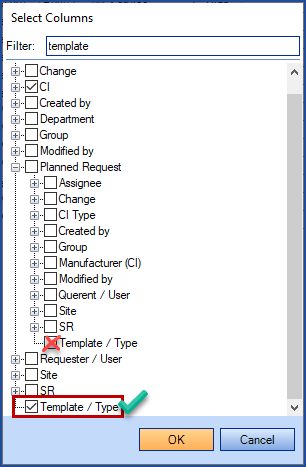
Special case - If you want to see the SR type or change template used in the Planned request items list, use the Template / Type column that is at directly the root of the choices and not the one under the Planned request node, as it may cause problems.
Group by
To quickly group using one or more columns, use the top section provided for this purpose.
- From the list that you want to group by, right click and select Display > Display groups header from the menu.
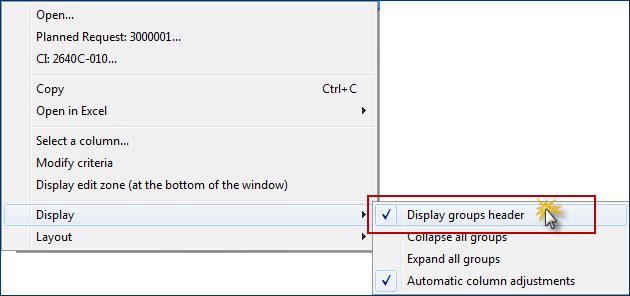
- An additional section will appear at the above the list:

- Then click and slide the column with which you want to group by.

Open in Excel
Thank you, your message has been sent.