Table of contents
Introduction
By default Octopus comes with a variety of options configured to meet the needs of most environments. Many of these options can be modified directly in Octopus.
But as each company / service has its needs, constraints and requirements, we also have several options that are available, but that can not be configured directly in Octopus.
In this article, we propose to list the hidden Octopus options that could be useful. This list will of course be updated as new options are added, so we recommand visiting this page often.
To request one of these options, the authorized Octopus administrator must make a request to our Service Desk with the Configuration / Data Modification template.
We will need the following information :
- The name of the environment
- It can be found in Tools > Display installation kit address.
- The name and/or number of the team
- The name of the option
The options presented in the table are all configurable by team, except when indicated.
Visual Support
To better explain the option in question, we sometimes add visual support:
|
Click the icon to see the picture
|
Click the icon to see the video
|


Resolution of variables in a task from a form
Allows you to specify whether variables of type Expression are resolved at the creation of a request.
By default, they are resolved at the creation of the query.
It is also possible that they are resolved on activation of the task.
- Option name
-
Incident.CreateTasksForNewSRFromTemplate.ShouldResolveFieldExpressions
-
| Description | |
|---|---|
Modify the Default Source of RequestsWhen a request is created directly in Octopus, by default, the source is Telephone. This choice can be modified for another as needed. It is also possible to leave the field empty by default, to force the Octopus user to make a choice when creating the request.
|
|
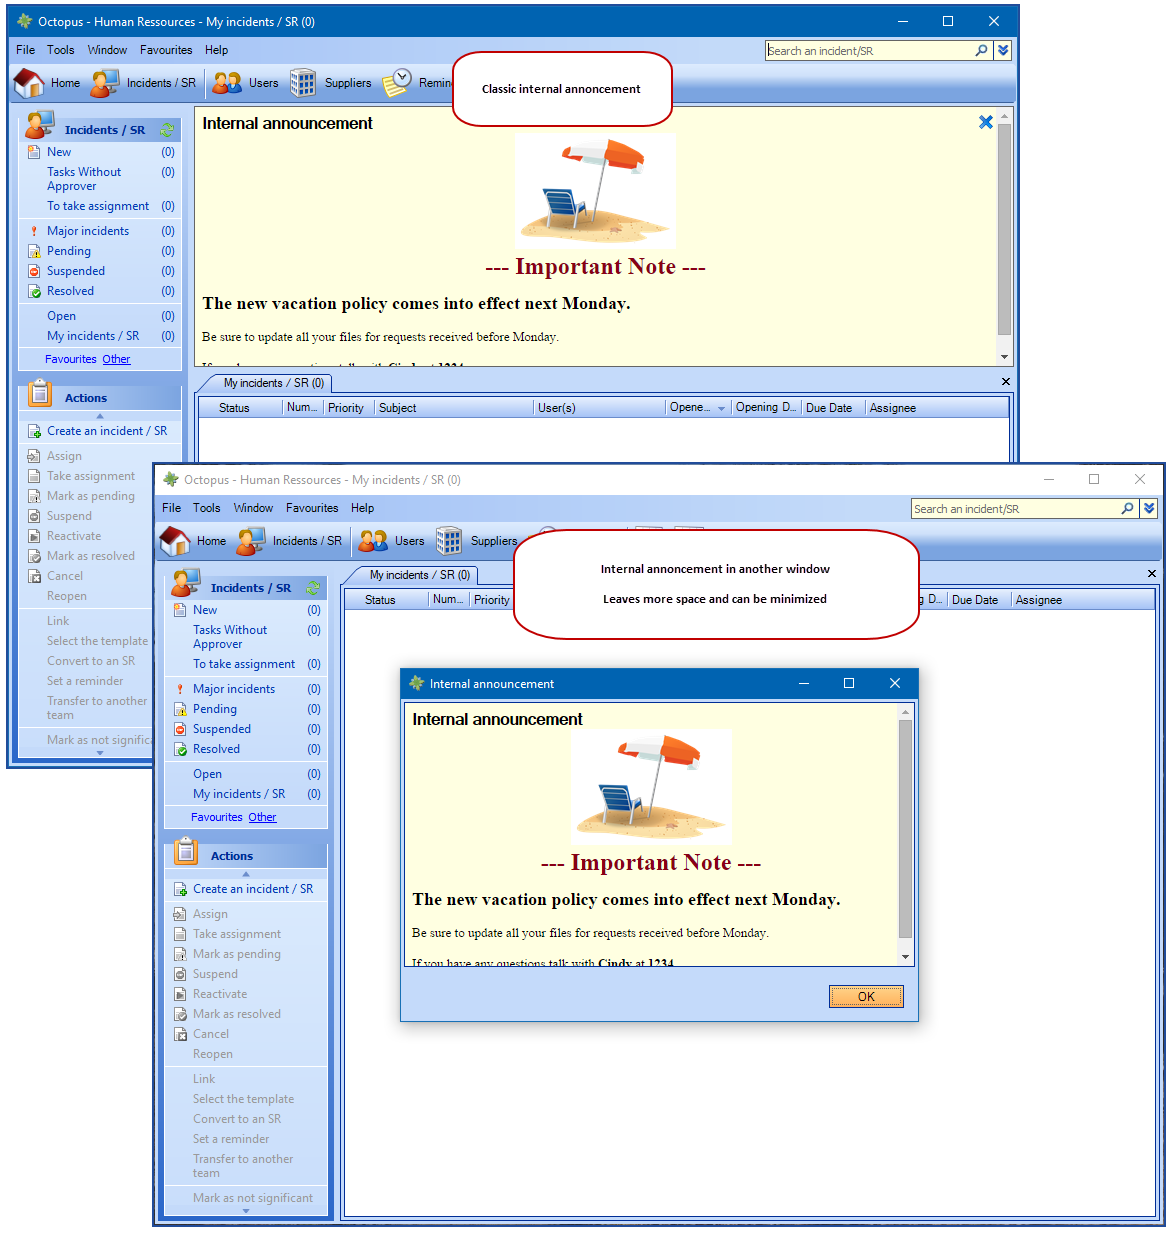
Open the Internal Annoncement in Another WindowBecause sometimes the messages are long or you want to keep them easily accessible, you can change the behavior of the internal annoncement to open in a separate window.
|
|
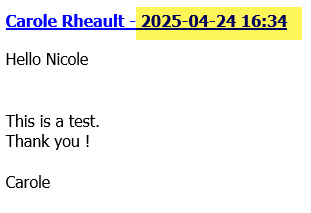
Date and time when sending an activity by e-mailOption to remove the date and time from the activity sent by e-mail.
|
|
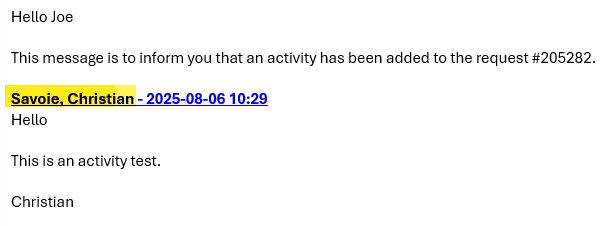
Assignee/user name when sending an activity by e-mailOption to remove the assignee/user name from the activity sent by e-mail.
|
|
Attached files hosted by OctopusOption that allows you to access the team's attached files from the Web. Warning! This option does not work with local environments. As this option has its own separate process, to enable this option, the authorized Octopus administrator must complete a I need to... > Hosted files.
|
|
External supportFor many companies, the services offered are intended not only for internal employees, but also for external people. To learn how this option works, see external support article. WARNING: This option affects all teams.
|
|
Owner team for a multi-team user groupA multi-team user group can be managed by all teams. However, with this option, it is possible to specify an owner team within the user group. The use of an owner team for a multi-team user group limits its management (adding and removing members) to Octopus users in the owner team. WARNING: This option affects all teams.
|
|
MailIntegration - Activities visible on the Web PortalActivities created by MailIntegration message processing are not visible on the Web Portal. However, if you are certain of the origin of the messages and their content is relevant to Web Portal users, then there is an option available to make all activities created by MailIntegration visible on the Web Portal.
|
| Description | |
|---|---|
Add a #ProviderReq. field for requestsAllows you to add the Supplier Request Number field to an Incident or Service Request. This is a text field.
|
|
Modify the Hours of the Deployment CalendarBy default, the week view of the deployment calendar displays deployments from 7:00 to 00:00. But it is possible to change these hours as needed.
|
|
Valid Approval Responses for EmailBy default, when a reply to an approval is received by email, Octopus accepts Yes, No, Oui, Non as an answer. But in some contexts we want to add other valid answers, such as OK, Alright. In addition to the option, note the answers to add.
|
|
Download the Database - GetDBAppIt is possible to manually download a copy of the Octopus database or automate the download. To find out more, see the GetDBApp: Downloading the Octopus database automatically article. WARNING: This option affects all teams.
|
|
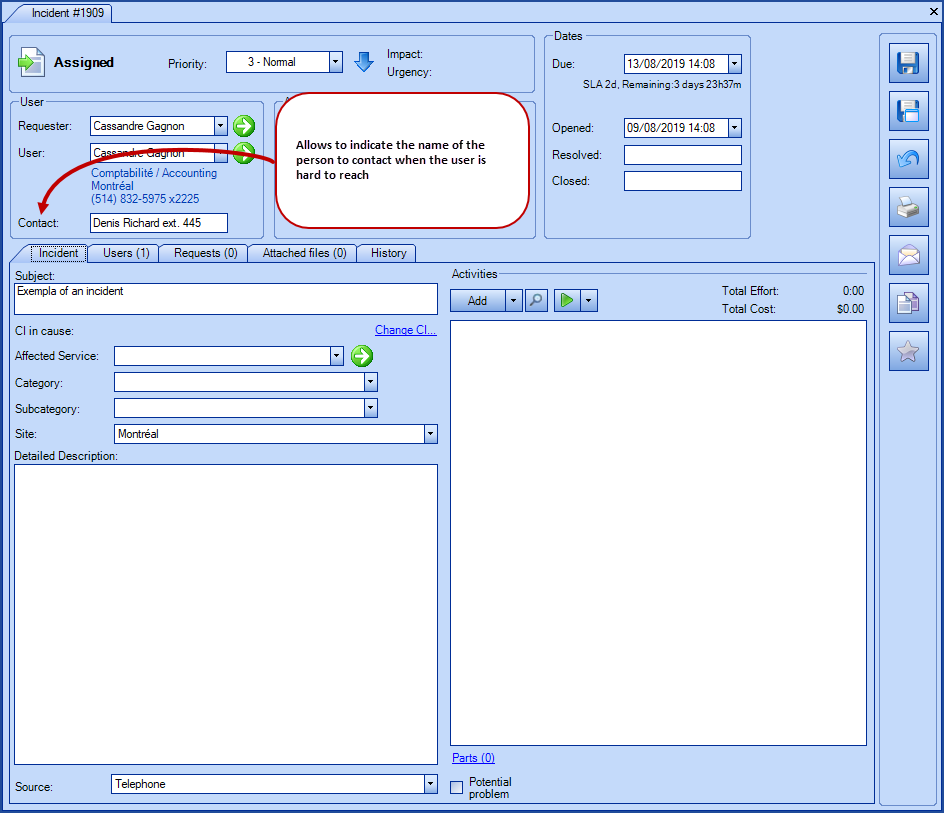
Add the Contact Field to Your RequestsRequests often drag on because the user is a difficult person to reach. Either he works on night or overnight shifts, weekends or is medical staff or travels frequently. Many times in these cases, there is another person who is aware of the request and could answer for the user. Adding the Contact field allows to put this person's name in the request and indicates that this is the person to reach for the request.
|
|
Adding the content of the internal procedure in the Detailed description fieldBy default, when a query is created and it has an internal procedure, the Procedure link must be used to consult it. An option is available to display the procedure in the Detailed description field as well as being visible through the Procedure link.
|
|
Parent-Child Incident - keep the CI involved in the child incidentBy default, when a child request is linked to a parent request, the child's CI is replaced by the parent's CI. In some contexts, we sometimes want to keep track of the child CI and therefore not have it replaced by the parent CI. An option is available to avoid this synchronization.
|
|
Create from ... for incident/SRAn option is provided to facilitate the creation of a query from another one to avoid re-entering information by copying some information from the source query. However, the copy does not include attachments or tasks, other than those already included in an SR type. The choice of fields to be copied must be made to implement this option from this Excel file.
|
|
Additional information when choosing a userWhen searching for a user in Octopus, some information helps to distinguish between different people. For example, the name of their site, department, their Windows username, etc. Some information is there by default, but it is possible to add, remove or change the order in which they appear. To find out how these options work, see the article Additional information when choosing a user.
WARNING: This option affects all teams.
|
|
Access managementGDA in Octopus is much more than a simple option. It is a project in itself that requires the support of an Octopus specialist to set it up. For more information on what can be done with Access Management in Octopus, see the article Automated Access Management Solution - Reference Document. Any request for Access Management is subject to an evaluation in order to prepare a submission for the project. It is therefore necessary to already have a plan in mind of what is to be implemented and to have planned to make a budget request.
|
|
Use of multiple criteria to establish impact and urgencyBy default, the Impact and Emergency fields are drop-down lists. But it is possible to establish the impact and/or urgency from several pre-established criteria. Warning: for the implementation, this may require assist from an Octopus specialist
Une fois l'option activée, la configuration se fait directement dans les données de références. |
|
Control assignment to resolution and reopeningAlthough it is recommended to reassign a resolved request to the Service Center, in some cases and especially in non-IT teams, it may be interesting to return the incident or the resolved service request to the resolution group. Two options are available to control assignment upon resolution and reopening
.
|
|
Maintain relationships between users and CIs after users are deactivatedBy default, when a user is disabled, their relationship with CI's is removed. But in some contexts we need to keep the relationships. This option preserves the relationship between CIs when the user is disabled.
|
|
Software managed or not by defaultWhen used with a WMIUpdater synchronization, Octopus considers that the softwares found by WMIUpdater is either managed or unmanaged. By default, they are managed and added to the list of software in the Configurations module. And every new CI found at the next WMIUpdater sync will be added to this list. There is an option to reverse this behavior and make softwares detected by WMI considered unmanaged. In this case, you can see on the CI Logiciel X which workstations it is installed on.
|
|
Search by the name of the Manufacturer and the Model of a CIParticularly useful in Facilities Management or GBM teams, this option allows you to add the possibility to search by the name of the Manufacturer and the Model of a CI.
|
|
Choosing a status other than Retired when a CI is no longer detected by ADSIWhen ADSI synchronization is used to scan computers, the system automatically sets PCs that are no longer present in AD to the Retired status. In some contexts, the process may require that the status of the CI be different when it is no longer in AD. There is an option to designate a status other than Retired, such as Recycled for example.
|
|
Delay reminder deadlines for approvalsThere are two types of reminders for approvals:
In both cases, the recall is sent 48 hours after the first notification of approval and continues every 48 hours thereafter, until the approval is completed. To make a change to both options, specify the name of the option to be changed and the desired time frame.
|
|
Delegate approvalsAllows you to specify whether the user can view the 'Delegates his approvals to' property in his Web portal profile at any time, without having to have an approval task assigned.
|
|
Add a Note Section to Printed RequestsSometimes in building management teams, workers must print requests and work on paper. An option (plugin) is available to add a section at the bottom of the printed request, where the worker can enter his notes. In addition, there is a second option which adds the CI note, when it exists, to the printed request.
|
| Description | |
|---|---|
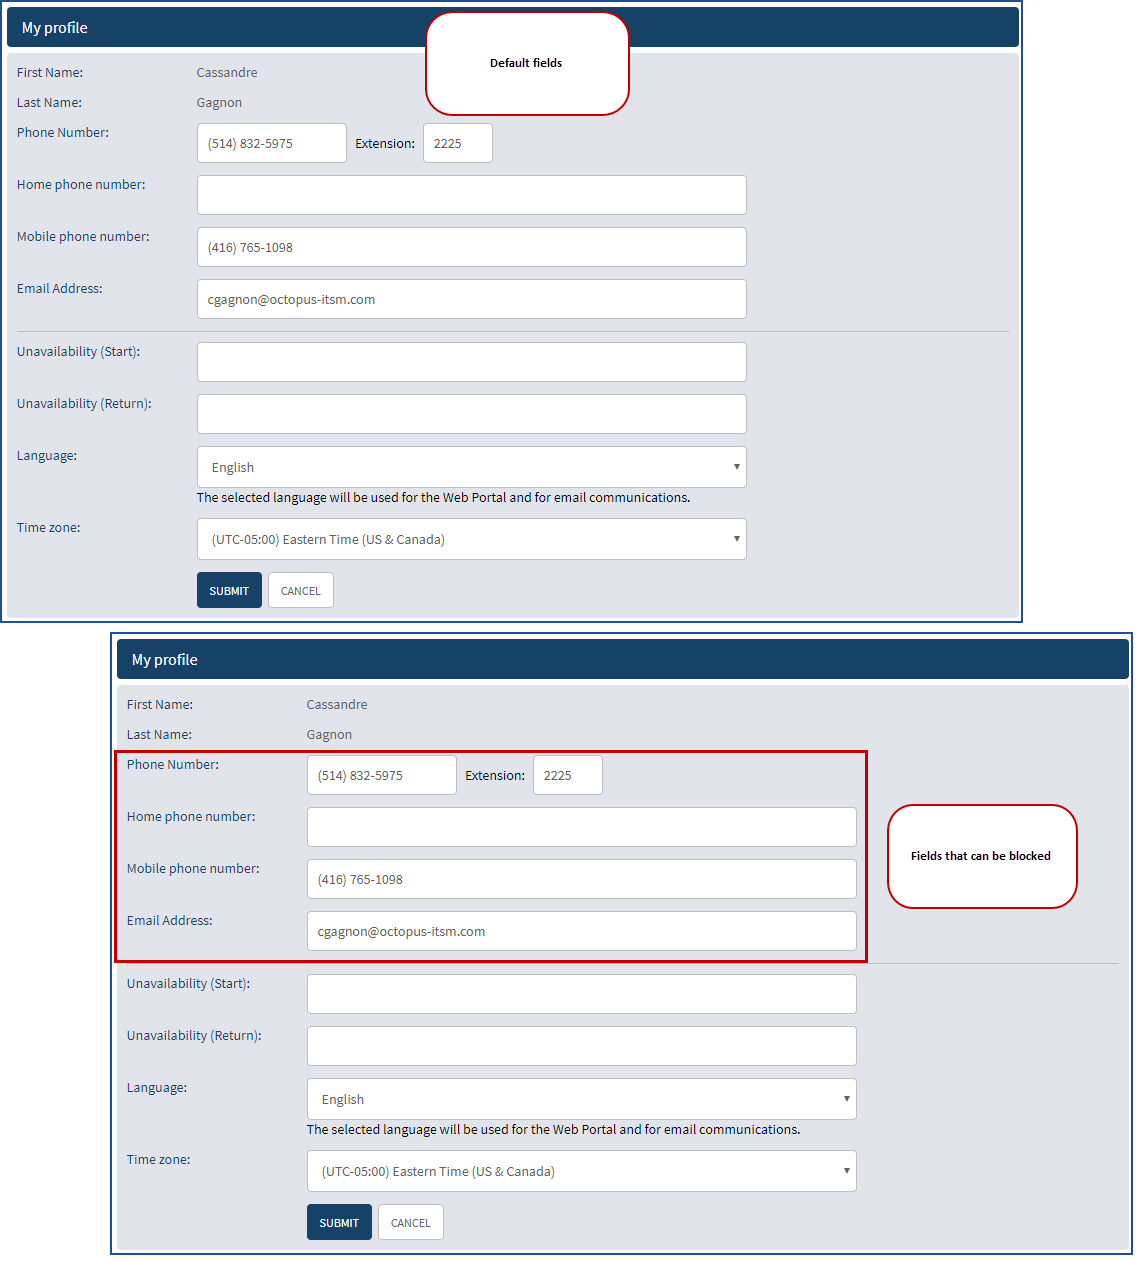
User Profile Modification on the Web PortalWARNING: This option affects all teams. By default when a user goes into his profile on the Web Portal, a number of fields can be seen and changed. It is possible to block the modification of certain fields. It is also possible to display the approval delegation fields at any time. And to make visible and editable some other fields.
For more information see the Additional information in the selection of a user article.
|
|
Activation of tiles on the portalTo facilitate the organization of requests on the portal it is possible to use tiles with an image to represent the categories of requests and teams, when there is more than one on the portal. See the article Web Portal - Setting up the modern mode for details of how it works.
Add or Remove the [Web] Prefix to the Request SubjectIn certain environments when a request is created from the Web Portal, [Web] is added to the beginning of the subject. For example: [Web] I lost my cell phone. But this prefix can be removed.
|
|
Link CI's to userPrevents displaying the option to link CI to user upon an incident creation is created.
|
|
Resolution date displayIt is now possible to display the resolution date in request list and requests form on the Web portal.
|
|
Register to this serviceIt is possible to invite external collaborators or suppliers to Register for the service in order to create their account and then allow them to access the web portal and make service requests or communicate essential information to an Octopus team. WARNING: This option affects all teams. For more details, click here
|
|
Report an incident anonymouslyThe web portal can be the gateway for reporting incidents anonymously, or for users who do not have an Octopus account and whose identity is not required. |
|
External authentication available in hybrid mode (Identity Federation - Microsoft Entra ID / Username and password)It is possible to invite external collaborators or suppliers to make service requests or communicate essential information to an Octopus team. WARNING: This option affects all teams.
|
|
Filters for displaying CIs on the portalWhen a user has to select a CI from on the Web portal, by default, they are presented with the CI(s) associated with it. But it is possible to present the choices in different ways.
To change the default seclection, request the next option indicating the desired option.
|
|
Displays the Due Date field in the web portalIt is now possible to display the resolution date in request list and requests form on the Web portal.
|
|
Displays the priority in the web portalIt is possible to display the priority in the request list and in the request on the web portal.
|
|
Modify the number of CIs displayed in the search resultsWhen you create a new incident and perform a search on the CI, you can specify to display X number of CIs. WARNING: This option affects all teams.
|
|
Display the name of the assignedControl whether or not assignee of the request is visible in the Web portal and add the column Assigned to.
|
|
Hide Copy this request buttonThe “Copy this request” button is visible by default when an Octopus database is delivered, for all teams. Note that the “Copy this request” action does not copy form values in certain situations. It is possible to hide this button to prevent a query from being copied. This button is visible in the Web portal, at the bottom of each query in the “Query list” section.
|
|
Send e-mail upon request creation via Web PortalThis option sends the creation confirmation to the requester even if the incident/SR was submitted via the Web portal. However, if the requester is a technician for the team where the request was created, this option will have no effect. For confidential requests, only the requester will receive a confirmation email.
|
|
Deactivate the Automated Site DerivationWhen a request is submitted from the Web Portal and the site is mandatory for a service, the requester must confirm the site before selecting a request. If the requester leaves the site presented to him by default, in this case his own, and continues his request but adds a user from another site, the system will automatically derive the site of the request to the site of the user who was added. An option allows to keep the site initially selected when a site is mandatory for a service.
|
|
Reopen a request on Web portalAllow the reopening of a request on the web portal.
|
|
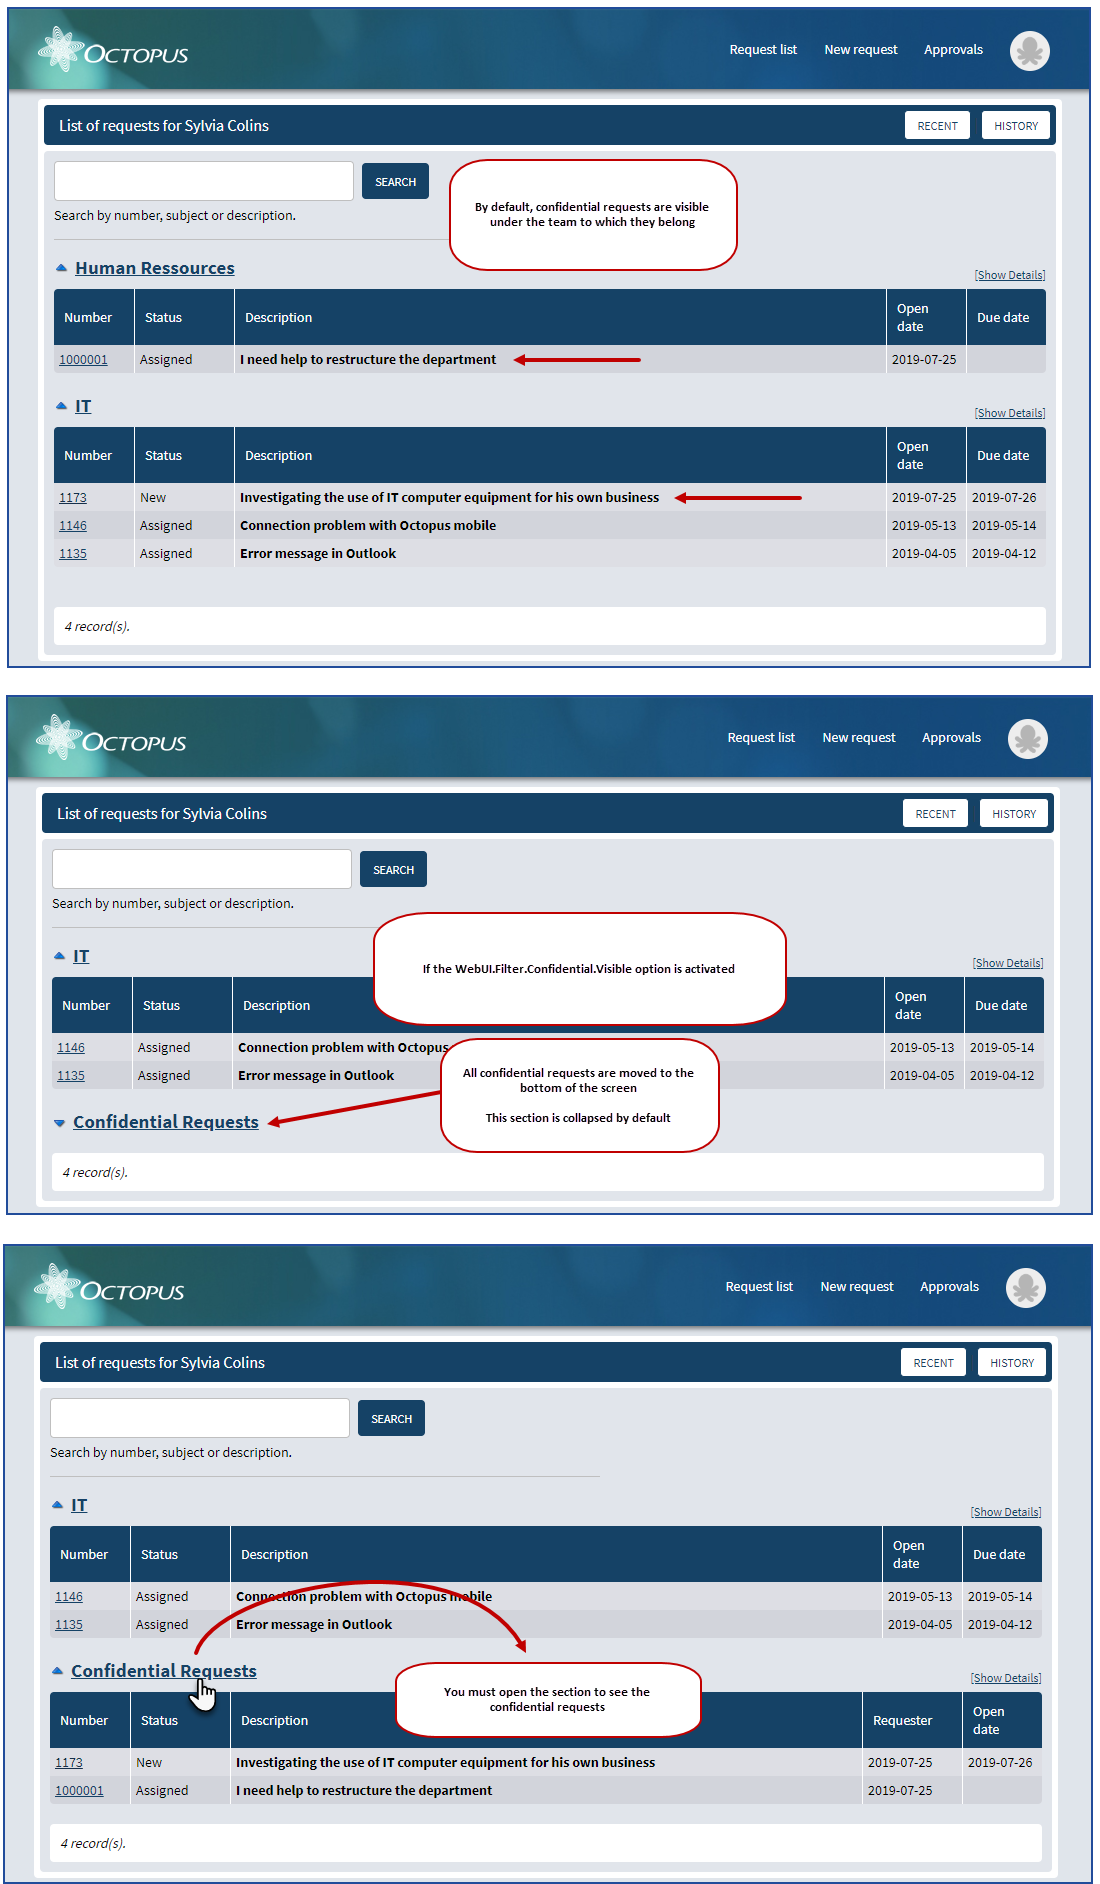
Discreet Section for Confidential RequestsA confidential request will always only be visible to the requester from the Web portal. But in some context, we want to add even more discretion to these requests. The following option adds a section at the bottom of the screen for confidential requests from all teams which is collapsed by default.
|
| Description | |
|---|---|
Resolve on Behalf of the Assigned Octopus UserBy default when a person resolves a request, the resolution activity will be associated with the user who did the action. But in some contexts, mainly for the building management department, the person who enters data into Octopus is not the person who did the work. It is therefore possible to associate the resolution of the request with the person assigned to the request rather than the one making the data entry.
|
|
Automatic Assignment by SiteThis option is very often used with the Building Management service, but it can be useful in other contexts as well. We configure where a type of request should go according to the site and then Octopus will assign the request based on that choice. Note that the automatic assignment based to the site associates a group, but not a specific Octopus user.
|
| Description | |
|---|---|
Enabling Service Targets for Initial Response DelayBy default, service targets (SLAs) in Octopus are intended to look at the resolution of incidents and service requests. But for those who follow these closely it's possible to also activate the initial response SLA.
Once activated, the configuration is done directly in the reference data, service request, select template, general tab. |
|
Exclude Lunch from the SLABy default, if the hours of a service are from 8:00 am to 4:00 pm, there are 8 business hours, as there is generally minimum staff to provide service during the lunch break. But for contexts where all people eat at the same time and the service is not available, we can exclude lunch hours from business hours.
Add the start and end time for this option. |
|
Include Weekends to Calculate SLABy default, business days are from Monday to Friday. But it is possible to add Saturdays and Sundays to the work week.
|
| Description | |
|---|---|
Keep Links Between CIs After the RetirementBy default, when a CI is removed, its links to other CIs are cleared. But in some contexts we need to keep the link active. This option keeps the links between CI during the retirement.
|
|
Keep Links Between CIs and Users After a user deactivationBy default, when a user is disable, their relationship between this user and his CI'S are remove. But in some contexts, it is necessary to keep the link active. This option preserves the links between CIs and user deactivation.
|
|
Link the Request Site to the CI or the UserBy default, when creating a request, the request site is associated with the CI site when there is one and if there is no CI, to the user's site. But it is possible to associate the site of the request with the site of the user at all times.
|
|
Ignore the Criticality of the CIBy default, when creating an incident, the criticality of the CI will be derived towards the Impact field. But it is possible to remove this link.
|
Thank you, your message has been sent.