Table of contents
Introduction
The Access Management Solution provides a frame of rules and principles that lead to sound management of accesses to informational assets. It helps to formalize, in Octopus, the accesses granted or revoked, either as part of the arrival of a new employee, a departure, or simply in a request to add one or several accesses to an existing employee.
There are many benefits, here are some of them:
- Can identify users having an access to a system or an application
- Can list all the accesses for a specific user
- Prove that access has been formerly requested, approved and granted
- Properly manage the access revocation for an employee departure
- Be proactive by being informed faster of the arrival or departure of an employee
- Respond better to the requirements of external audits
- Centralized tool for all types of access requests, improves customer service
- Protection of the informational assets of a company
- Other
This solution requires preparation that goes beyond the simple configuration of Octopus, mainly because it involves people that are not part of the IT department. Indeed, certain accesses are approved/granted by IT, while others are the responsibility of application specialists who belong to other departments or services in the company (they are sometimes called "Super Users" in certain areas of business). The solution must take into account their interventions if we want the Access Management to be complete and efficient.
- Special support is required for customers who wish to introduce the Access Manangement in their organization, to properly address all the challenges and ensure the success of an agile and well-rounded implementation.
- For any information or to activate the module, you must make a request to the Service Desk.
- This special support includes the preparation, configuration, communication and training of the people involved. Some prequisites are essential to the delivery of the project; an assessment will be made to establish the criteria for delivery. Contact us for more information. The Octopus Service Desk will be glad to inform you on how to proceed.
Concepts
Octopus' Automated Access Management Solution is based primarily on the "Configurations" module, as well as on the configuration of SR types that will accommodate accesses in tasks and in forms. When a profile or an access is selected in a form, Octopus will create a task and assign it to the group responsible to grant the access. Once the request is completed, Octopus will automatically create a relation between the access given and the user. The opposite process applies when an access is revoked.
In addition, the solution extends its potential when a link is established between Octopus and an external data system (HR System), that allows the process to start immediately when a change is done in the HR system. Everything has been thought to make the experience pleasant to the person submitting the request and the one doing the work.
Here is an overview with a graphic representation of the concept. Access profiles are created, which have been associated to:
- A set of default accesses
- A set of optional accesses that can be selected by the requester
In our example, Alain, Claire and Bruno are part of PROFILE A, PROFILE B or PROFILE C. We can see what each one has default and optional accesses.

In Octopus, "Profile" and "Access" are CI types that are related. It's therefore possible to see the accesses given to a user or see the users associated with an access.
The figure below shows an example of the two (2) aspects.

How It Works
The figure below summarizes very well the process of the Access Management from the entry of a new employee in the HR system. The main advantage to have Octopus linked to the HR system is that the immediate supervisor will be advised to fill in the appropriate request form; this way, IT will receive the requests much faster, instead of being advised on the morning that the new employee starts, or even six months after the employee's departure.
Note that it is not essential to have this link to automate the access requests. In this case, the immediate supervisor will not be advised by email to fill in the form, and he will have to create the request and select the employee profile himself. The user's record not existing at this point in Octopus, you will need to generate a task to create the user's file in Octopus before the access tasks are generated. The Octopus Specialist who will be supporting you in the creation of these forms will guide you on the requirements to make the solution work.

Requirements
To implement the Access Management Solution, you must:
- Be familiar with the "Configurations" module and its possibilities
- Have the Web Portal deployed - The solution depends entirely on the Web Portal for the automatic generation of approval/granting access tasks
- Use tasks in service requests - The solution automatically generates the tasks assigned to the responsible workgroups
- Raise awareness with the internal and external assignees to use the tool as required to optimize the solution
Structure Preparation
The Access Management Solution is applied to an Octopus environment with a plug-in. This module automatically creates the basic required structure in Tools > Reference Data Management... > from which the Octopus Specialist and the customer will work.
Basically, the module introduces the following elements:
- Two (2) types of CI: "Access" and "Profile". The profile corresponds to the role (Title) of the employee in the organization, for example, Accountant, Administrative Assistant, Sales Rep, etc.
- Specific attributes for the "Access" CI type, such as :

- Two (2) new bi-directional relationships types, that will be used to establish the relation between the "Access" and "Profile" CI types
- Gives access to / Is given by - When an access is linked to a profile, this type of relationship defines the Default accesses associated to a profile
- Optionnally gives access to / Is optionally given by - This type of relationship defines the Optionnal accesses associated to a profile
- Three (3) types of service requests:
- New Employee, with a Web form minimally containing the following fields: "Title", "Work Location", "Start Date" and "Access (by profile)"
- Access Change, with a Web form minimally containing the following fields: "Access Change (by category)"
- Permanent Departure
- New columns "Departure Date", "Start Date" and "New employee notice sent" for personalized lists
- Two (2) email templates that will be used to generate the message sent to the immediate supervisor for new hires and departures (the personalization of the templates must be done by the Octopus Specialist) - see examples below.

Email template for a new hire

Email template for a departure
Octopus Configuration
Once the structure is in place, you need to:
- Enable 'external assignee' option in the user files for people who will be involved in access tasks
- Create external assignee groups in the General > Users Group section in Reference Data Management
- Add (or import) in the "Configurations" module the accesses and their attributes, the profiles and the relationships that exist between the accesses and the profiles (the relationships identify the default and the optional accesses for each profile)
- Revise/add the SR types and their form.
To do this, some data needs to be prepared. If the access list is exaustive, it is more convenient to prepare the data in a file and import it in Octopus with our DataImporter program.
(see the DataImporter : Data Import From An External Source article for more information).
Step 1 - Establishing the Access, Access Profiles, Relationships and Attributes in Octopus
| Steps | Comments |
|---|---|
| 1. List all accesses to be managed in Octopus | There may be more than one access for a given system or application (ex.: Standard Access, Administrator Access). |
| 2. Define the profiles | Profiles are built of default and optional accesses for a specific job type. Profile definition may require some time and effort. Profiles contribute to better structure the many accesses, simplifies the request for the user and the work of the assignees. |
| 3. Establish the relationships between profiles and accesses | Identifies default and optional accesses for each profile. |
| 4. Identify External Assignees and modify their user file | External Assignees are regular end users that can be invoked in a task for a service request. The External Assignee is identified in his Octopus user file, in the "Octopus Account" tab. Note that a small licence fee of $10.00/month is billed for each External User. |
5. Establish and configure the Approval, |
|
| 6. Establish the attributes for each access |
The "Access" CI type contains a set of attributes that will intervene when the access tasks will be created. They consist of:
|
| 7. Consign the accesses, access profiles, relationships and attributes in an importation file and proceed | In order to help you with this importation, we have established a model of Excel and xml files. Ask your Octopus Specialist about it. |
The approval task generated as part of access management is a direct approval task and it cannot be configured to auto-approve.
Step 2 - Creation of the SR types involving accesses
Once you have imported the accesses, profiles, relationships and attributes in Octopus, they are ready to be used in the SR types with access requests. By default, the extension module creates these (3) types of SR:
- New Employee
- Access Change
- Permanent Departure
You can rename and modify them as you wish, or create new ones with tasks and personalized fields relating to accesses. These must be configured precisely, so that the request for access automatically generates and sends the tasks to the groups that approve/grant these accesses.
- A form that shows accesses by profile will be configure in the following manner:
- A standard task in the SR type with @Access Management as a subject
- A personalized field with Access (by profile) as type
- A form that shows accesses by category will be configured in the following manner:
- A standard task in the SR type with @Access Management as a subject
- A personalized field with Access (by category) as type (note that an access with no specified category will automatically be classified in an "Other" category)
The figures below embody the configuration and the results of the two approaches described above.
Access (by profile)
The following figures show the configuration applied to an SR type for a "New Employee" form, and the results of this configuration in the Web form.

"New Employee" SR type configuration (example)

"New Employee" Web form configuration (example)

"New Employee" Web form, results of the configuration(example)
Access (by category)
The same concept applies to the accesses by category, exept that you need to specify the access type to be "Access (by category)" when you build the Web form. The result will be to present the choices by categorie in (note that the accesses that have not been defined by category will be placed in am "Other" section)

Web form - Access (by category)
Filter Access by Category
By default Octopus will show all the accesses that exist grouped by category. But in a context where there is a very large number of accesses, one can limit the number presented to the requester using different methods.
There are two methods to filter access by categories:
- Filter with the Access type.
- Fitter with the Category.
The following video shows you examples of choices available with the default category and with the use of filters.
Note - The information in the background is in French, but the explanations are given in English.
 See video
Options
Confidential Service Request
This option enables you to configure, if required, certain service request types as confitential. Please read the What is a Confidential Request? article for information about how to use this option and what effect it will have.
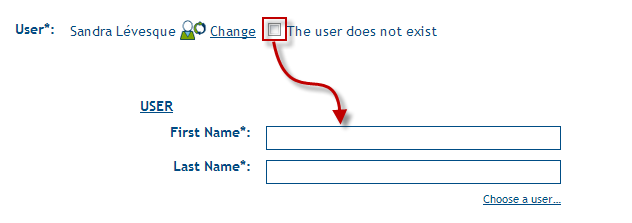
The requester can create a new user
This option can be useful in the context of filling out a "New employee" Web Form, now allowing the requester to create the user (Firstname, Lastname) that would not yet exist in the Octopus database.
In the context of the GDA, this option must be combined with the "The requester must choose a user different from himself" option.
The requester must choose a user different from himself
This option can be useful when the requester submit the "New emloyee" Web Form. The system requires to specify a user different that itself. In the context of the GDA, this option must be combined with the "The requester can create a new user" option.
Thank you, your message has been sent.