Table of contents
Related Articles
- MailIntegration - Create Incidents or Events from Emails
- MailIntegration - Testing the POP3 connection
- Creation of a service request
- Octopus email sending module
- Create customized forms in Octopus
Introduction
This feature acts as an interface between two systems to allow the creation of service requests from an email received from an external source or from an Octopus notification task.
High level operation:
- Create a new email address to receive the SRs.
- Create a new configuration file for MailIntegration.
- Configure the source system to send the email in the correct format to the new email address.
- Configure a new Windows task with MailIntegration to process messages received in this mailbox.
|
Warning:
|
Knowledge Required
- Octopus administration
- Mastery of the MailIntegration tool
- Mastery of the administration of service requests
- Mastery of task management
- Mastery of Web forms
Configuration of MailIntegration to Create a Service Request From an Email
Using the POP3 Mode
Use this XML configuration file and modify only the sections in yellow. These tags are explained in the next section.
<?xml version="1.0" encoding="utf-8" ?>
<MailIntegration>

<MessageProcessorTypeName>ESI.Octopus.MailIntegration.EndUserNewSRMailMessageProcessor, ESI.Octopus.MailIntegration</messageProcessorTypeName>
  <Server>
    <GatewayTypeName>ESI.Octopus.MailIntegration.MailKitMailboxGateway,ESI.Octopus.MailIntegration</GatewayTypeName>
    <ServerName>SERVER</serverName>
    <Port>110</port>
    <UseSsl>FALSE</useSsl>
    <UserName>MAILBOX</userName>
    <Password>PASSWORD-CLEAR-TEXT</password>
  </Server>
<IncidentSource>Email</IncidentSource>
<NewSRBodyEnclosingToken>CreateSR</newSRBodyEnclosingToken>
<IncidentFallbackSiteName>FALLBACK-SITE</incidentFallbackSiteName>
<IncidentFallbackUserLogon>FALLBACK-USER</incidentFallbackUserLogon>
<IncidentPriority>PRIORITY</IncidentPriority>
<incidentGroup>ASSIGNED_GROUP</incidentGroup>
<IgnoredAttachments>FALSE</ignoredAttachments>
<IncludeRawMessageAsAttachment>TRUE</IncludeRawMessageAsAttachment>

</MailIntegration>
Explanation of the Tags
- <ServerName>SERVER</ServerName>
- Name of email server.
- Replace SERVER with the name of the email server
- Name of email server.
- <UseSsl>true</UseSsl>
- When this tag is set to TRUE the system will use the SSL protocol.
- <UserName>MAILBOX</UserName>
- Username of the mailbox account.
- Replace MAILBOX with the user account name used to authenticate. Normally this does not include the domain part of the public email address.
For example, you would indicate newrequest here, not newrequest@mycompany.com.
- <Password>PASSWORD-CLEAR-TEXT</Password>
- Mailbox account password
- Replace PASSWORD-CLEAR-TEXT with the password of the mailbox account.
- Mailbox account password
- <IncidentFallbackUserLogon>FALLBACK-USER</IncidentFallbackUserLogon>
- Generic username to be used in cases where the email address of the sender is not recognized by Octopus.
- Replace FALLBACK-USER by the windows username of the generic user.
- This must be the same value as recorded in the Windows Username field of the user's file in Octopus.
- The value must be identical to the name recorded in the Windows username in Octopus.
- If an email is received from an address that is not recognized by Octopus, the system will use the fallback user indicated here as the request's Requester and User.
- Generic username to be used in cases where the email address of the sender is not recognized by Octopus.
- <IncidentFallbackSiteName>FALLBACK-SITE</IncidentFallbackSiteName>
- This tag will be mandatory only when the site is mandatory in Octopus.
- See the Tools > Options > section 3 - Important general options > Visible and required fields menu.
- Replace FALLBACK-SITE with the name of a site that exists in Octopus.
- When the program runs it tries to find the Octopus user based on the email address of the sender. If that sender is not recognized or if the user has no site, the system will use the site indicated here.
- If the site is not mandatory in the options, this tag can be removed.
- This tag will be mandatory only when the site is mandatory in Octopus.
- <IncidentPriority>PRIORITY</IncidentPriority>
- This tag is not mandatory. It allows to add a default priority to incidents/SRs created from MailIntegration. Note that this tag will take precedence over the default priority of the options and those of SR types.
- Replace PRIORITY with the name of an existing priority in Octopus.
- If according to the best practices, the priority is evaluated at the reception of the request, the tag will not need to be changed, remove this line from the XML file.
- This tag is not mandatory. It allows to add a default priority to incidents/SRs created from MailIntegration. Note that this tag will take precedence over the default priority of the options and those of SR types.
- <IncidentGroup>ASSIGNED_GROUP</IncidentGroup>
- This tag is not mandatory.It indicates the name of group that differs from the service center during the incident creation. This option is usually used if mailintegration is configured for more then one mailbox.
- Replace ASSIGNED_GROUP by the name of the group that would be assigned to requests from this mailbox.
- To assign requests to the service center by default, remove this line from the XML file.
- This tag is not mandatory.It indicates the name of group that differs from the service center during the incident creation. This option is usually used if mailintegration is configured for more then one mailbox.
- <IncidentSource>INCIDENT_SOURCE</IncidentSource>
- Indicates the request creation source.
- Leave Email in this tag to indicate that the request was created from an email.
- For another source, it needs to previously have been configured in the reference data management of Octopus.
- Indicates the request creation source.
- <NewSRBodyEnclosingToken>CreateSR</newSRBodyEnclosingToken>
- The default string of characters that will serve as the start and end delimiter.
- The content between these delimiter will be the content of the service request.
- If you want to use another value, replace CreateSR by the string of characters to use.
- <IgnoredAttachments></IgnoredAttachments>
- This tag is not mandatory. It is used to ignore some attached files. For example: a logo.
- Indicate a comma-separated list of files to be ignored, including the extension.
- This tag is not mandatory. It is used to ignore some attached files. For example: a logo.
- <IncludeRawMessageAsAttachment>True</IncludeRawMessageAsAttachment>
- This tag controls if a copy of the email message in EML format will be attached to the created request.
Once the tags have been configured with the proper information, save the file to the Octopus folder with the .xml extension. For example, SR-Email-Integration.xml.
We recommend keeping a copy of this file somewhere other than in the Octopus directory, because if the program is reinstalled, the file could be overwritten.
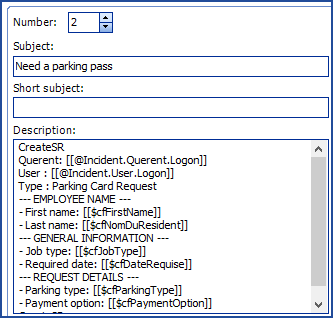
Configuration/Structure of the Source Email
The email sent needs to respect the predefined format.
Example:
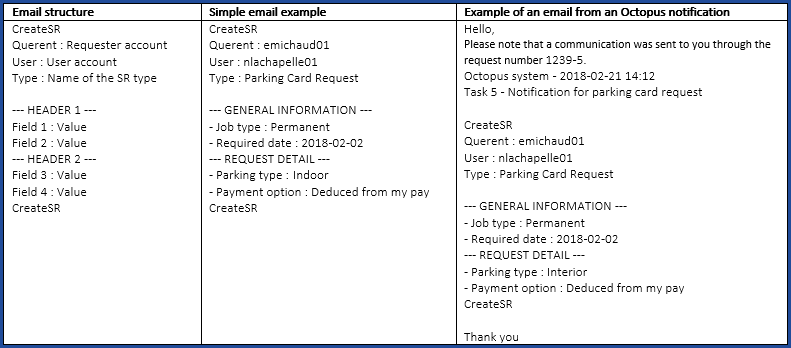
Detailed Explanation of the Email Content
- CreateSR field
- This field is mandatory and makes reference to the newSRBodyEnclosingToken tag explained above.
- This value must be the same as the one configured in the XML file.
- Querent and User
- These fields are mandatory.
- Windows user name written in Octopus.
- Supports multiple Windows username as emichaud01;domain\emichaud10 or email address.

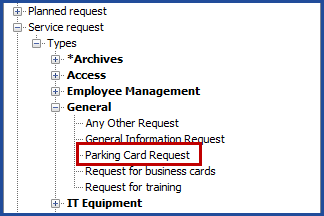
- Type
- These fields are mandatory.
- Name of the SR type to use. It can be found in the Tools > Reference data management > Service request > Types.
- It is recommended to use a unique SR type name, once the application allows to have different SR types with the same name.
- HEADER field
- This field is mandatory if present.
- Corresponds to the Header type field of the form.
- There can be many of them depending on the form.
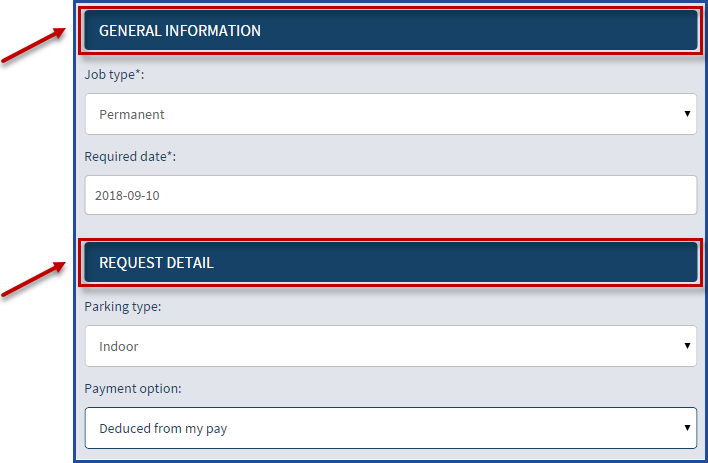
- Value fields
- This field is mandatory if present.
- Corresponds to each value field in the form, this is where you need to fill the appropriate information.
- Text fields will capture the input between the column and the end of line.
- Long text fields will capture the input starting on the next line, until the next field delimiter (either a single or a triple dash, followed by a space).
Process of the Email by MailIntegration
- Validation of the email format.
- Only one language must be used.
- MailIntegration will first attempt to read the simple text portion of the email, before attempting to convert HTML. It is recommended to use simple text if you are able to do so.
- The identification process will start with French, then it will proceed to English.
Example
Warning:
It is important to respect the spaces between the columns ":" the simple dash "-" and triple dash "---"
- Validation of the NewSRBodyEnclosingToken tag at the start and end.
- If the type if not found, see the section:
Default process for error during the email processing.
- If the type if not found, see the section:
- Validation of the service request type.
- Identification of the service request.
- If the type is not found, see the section:
Default process for error during the email processing. - If the service request is restricted and the requester does not have access to this type, see the section:
Default process for error during the email processing. - If the request is compliant and validated, it will be created according to the SR type specifications.
- Validation of the requester and user.
- Identification of the requester and user.
- If the requester is not found.
- The FALLBACK-USER will be used.
- If the user is not found.
- The FALLBACK-USER will be used.
- Identification of the site.
- The site is the one of the user.
- If it is empty in the user's file
- The FALLBACK-SITE will be used.
- Validation of the email content.
- Each line is analyzed.
- If a line corresponds to a valid condition to a task, the task will be created.
- If the line corresponds to values added to a task content, the values will be added.
- Each line is analyzed.
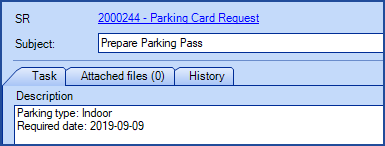
- Last step.
- The content of the email will be copied to the detailed description of the request.
- This part represents the form for the SR type.
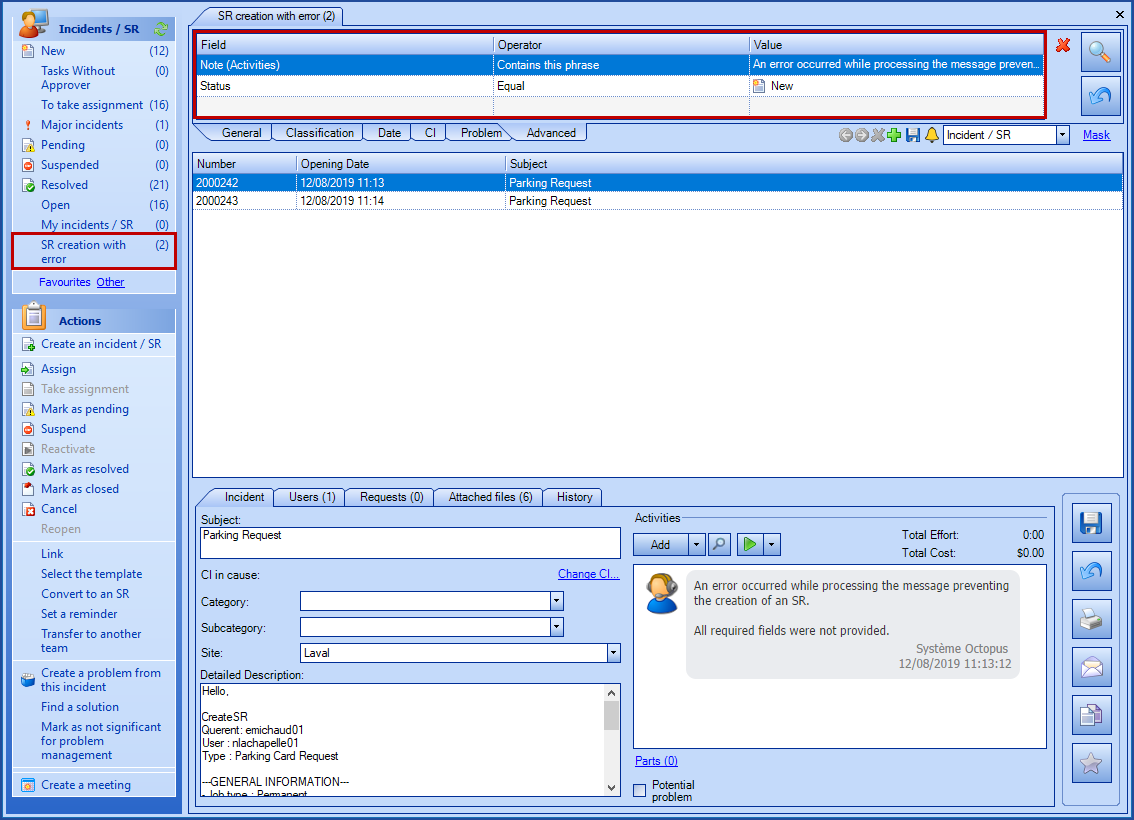
Default Process for Error During the Email Processing
If an error is detected while processing, the standard Incident Creation process with MailIntegration will be executed.
- An incident will be created with the same process as when receiving an incident:
MailIntegration - Create Incidents or Events from Emails.
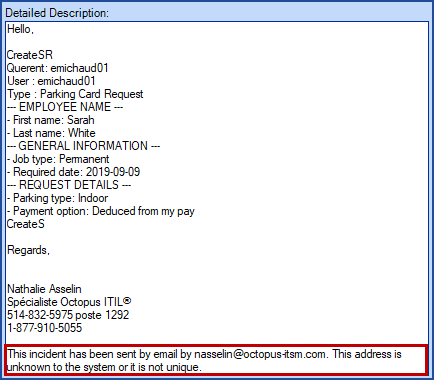
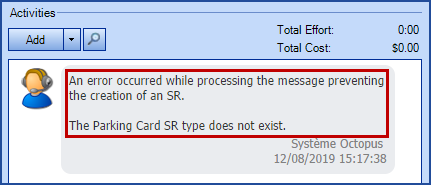
- The contents of the email will be copied into the detailed description with a note advising that there has been an error during the process.
- Ignore the note since a clear error message will be added to the incident in the form of an activity.
- Ignore the note since a clear error message will be added to the incident in the form of an activity.
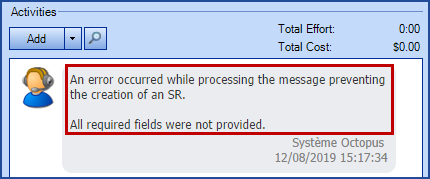
- An activity will be added to the incident advising that there has been an error during the process indicating the reason for the error.
- Error in the email format.
- Error in the name of the service request type.
- Error in the name of the requester or user.

- Error in the email format.
Tips and Tricks
How to Obtain the Correct Structure to Use With the Source System
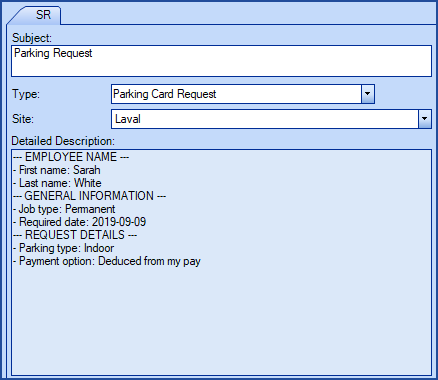
From the destination team of Octopus:
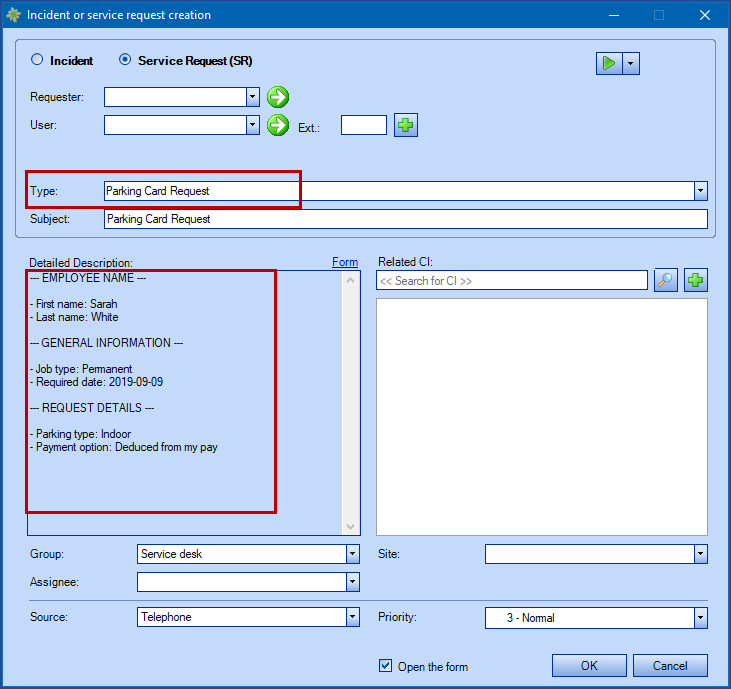
- Create a service request and complete all the available fields.
- Once completed, the format to use from the source system will be identical to the detailed description obtained.
- This information will be the canvas to use in the source system.
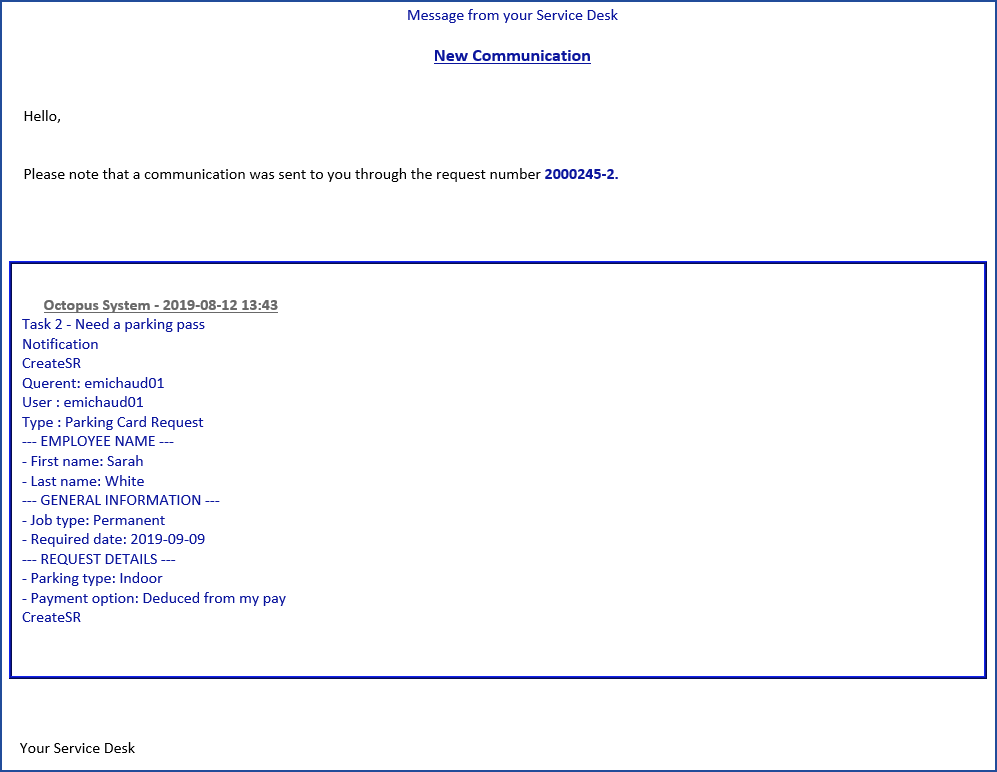
From the source team. In the following example the source is an IT team in Octopus:
- Create a notification task.
- Write the basic information in the description.
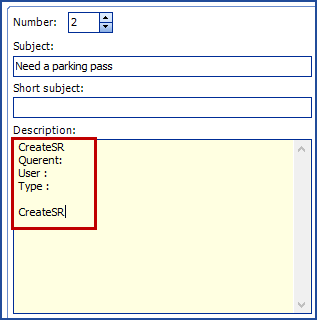
- Write the name of the service request type.
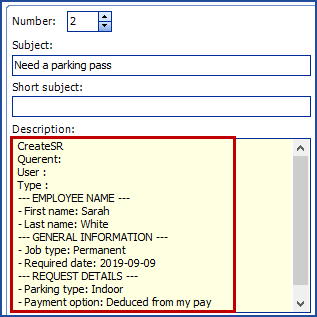
- Paste the content from the detailed description obtained from the source system.
- Allows to respect the structure and format, including the spaces.
- Allows to respect the structure and format, including the spaces.
- Complete or replace the information with the variables from the source system using the F3 key.
How to Follow Up on Service Request With Errors
Creation of a Custom List
Prepare and save a custom list that targets Incident / SR with the following criteria:
|
Field |
Operator | Value |
|---|---|---|
| Note (Activities) | Contains this phrase |
An error occurred while processing the message preventing the creation of an SR. |
|
Status |
Equal | New |
Example
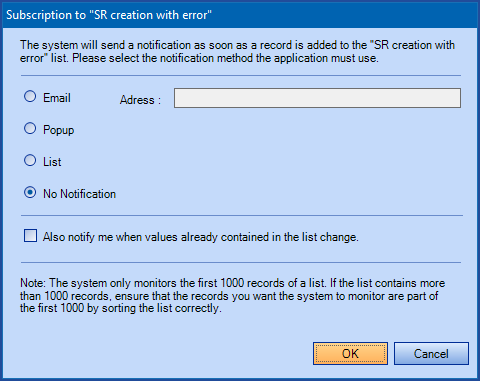
Subscribed to the List to Receive Notifications of New Error
Use the subscription option in order to receive a notification when a new request has an error.
Example
Thank you, your message has been sent.