Table of contents
Content
This article explains in detail how to configure the email sending module of your Octopus environment.
* These configuration options are available in the application to our customers with a hosted database.
Audience
This documentation is primarily intended for your infrastructure or telecommunications team that is responsible for managing your domain. However, as an Octopus Administrator, you will be able to obtain the necessary information to pass on to the team that takes care of your domain to properly configure it.
What is Octopus' email sending module?
This module allows your Octopus environment to send communications, by email, to all your users. To achieve this, Octopus needs an email server to relay emails to your email service (Microsoft Exchange 365 for example). There are various components needed for email to work properly:
- Email Sending Domain
- Email referrer addresses (the "From" field of an email)
- A server that will be able to relay email (also known as an SMTP server)
- Set up of your domain (if applicable)
- Authorizing email to be sent on your behalf (SPF record)
- Outgoing Email Signing (DKIM)
All of the above topics are involved when sending an email from Octopus to the inbox of users and technicians in your Octopus environment.
Email Sending Domain
The domain of sending email is very important, as some DNS entries need to be adjusted and added. The sending domain is the portion to the right of the @ in an email address. For example, for the support@mycompany.ca address, the domain will be demo.mycompany.ca.
Email sender addresses (the "From" field of an email)
Octopus primarily sends its communications from your Service Desk address. This address often takes the form of support@mycompany.ca or octopus@mycompany.ca. If you have MailIntegration set up, the sending address is the one of the mailbox that is monitored by MailIntegration.
Some communications from Octopus use an unmonitored address to send emails. This often takes the form of noreply@mycompany.ca.
A server that will be able to relay email (also known as an SMTP server)
Octopus-ITSM uses MailGun's services to send email communications from its servers. You can find more information about this provider by visiting their website.
Setting up your domain (DNS)
Authorizing email to be sent on your behalf (SPF record)
The SPF (Sender Policy Framework) allows you to specify which servers are authorized to send emails for a domain, in order to prevent identity theft. It enhances security by validating the legitimacy of senders, allowing your server to trust emails sent through Octopus.
If your domain uses an SPF record, you'll need to allow Octopus' servers to send email. To do this, you need to adjust the SPF record of your domain's DNS. A network administrator or the person responsible for your infrastructure will be able to make this change. Note that Octopus is not able to help you with this change.
Add the following snippet to your SPF record :
include:smtp.octopus-itsm.com
For more details, please refer to our article on setting up an SPF record.
Octopus Outbound Email Signing (DKIM)
DKIM (DomainKeys Identified Mail) adds a digital signature to emails, allowing the receiving server to verify that the message has not been tampered with and that it is coming from the sending domain.
MailGun requires email signatures via DKIM for all emails sent through its servers. The new Octpous client configuration window for Windows will assist you with these steps.
Configuring email sending from the Octopus Windows client
The Administer Octopus permission is required to access the control panel of the email system.
The configuration window is available via the menu: Tools > Configure email delivery...
The Octopus app offers three (3) different modes for sending email
- Generic addresses via Octopus-ITSM servers
- Personalized addresses via Octopus-ITSM servers
- Personalized addresses via your own SMTP server
Generic addresses via Octopus-ITSM servers
This configuration is the one that comes by default when creating a new Octopus environment. Octopus will send communications from the following address:
- noreply-[Your Octopus environment]@mailoutbound.octopus-itsm.com
In this configuration, this address cannot be changed and all email communications sent will come from this address. Also, you will not be able to configure MailIntegration to monitor the response to emails sent by Octopus. This configuration is basic and allows for one-way communication.
Also note that Octopus-ITSM servers have an attachment limit of 25Mb. If the size of the attachments exceeds this threshold, they will be removed from the email and a message will be displayed in the body of the email to notify the recipient.
Personalized addresses via Octopus-ITSM servers
This configuration allows you to use your own domain name to send Octopus communications.
This gives you control over the addresses that are used by the application when sending the various communications. In addition, emails will be signed with DKIM keys that will be unique to you.
- support@mycompany.ca
- noreply@mycompany.ca
Please note that Octopus-ITSM servers have an attachment limit of 25Mb. If the size of the attachments exceeds this threshold, they will be removed from the email and a message will be displayed in the body of the email to notify the recipient.
Steps to follow
Access the email configuration module
-
The Administer Octopus permission is required to access the control panel of the email system.
-
The configuration window is available via the menu: Tools > Configure email delivery...
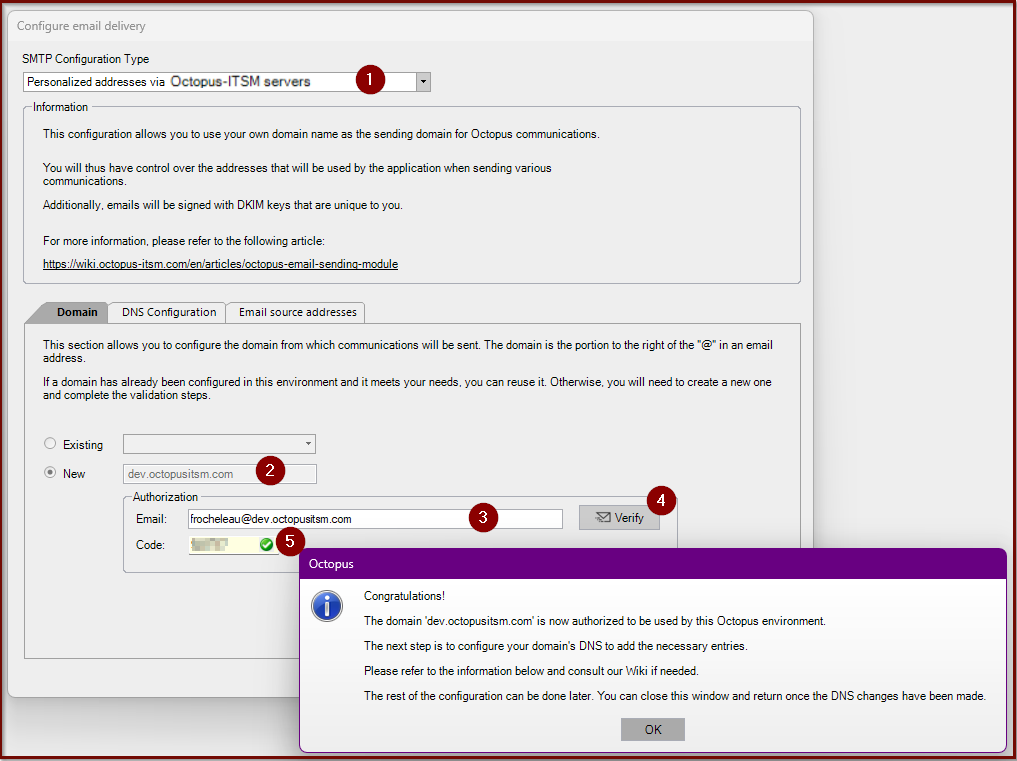
Adding the domain
This step only needs to be done once per environment. If you set up other teams or come back to this screen later, you won't have to complete these steps again.
- Select Personalized Addresses via Octopus-ITSM Servers in the SMTP Configuration Type field
- Enter your domain in the New field
- Enter an email address that belongs to this domain in the Email field under the Authorization section
- The purpose of this step is to verify that you really have an address in this domain
- Press the Check button
-
You will then receive an email containing a six (6) digit code. Please enter these six (6) digits in the Code field
-
- Once the correct code has been entered, you will receive a message confirming that the domain has been successfully added to your environment. You can then continue the setup process.
For diagnostic purposes, verification of the sending of emails to the source addresses can be carried out at any time, validating the email sending process and the source addresses previously configured.
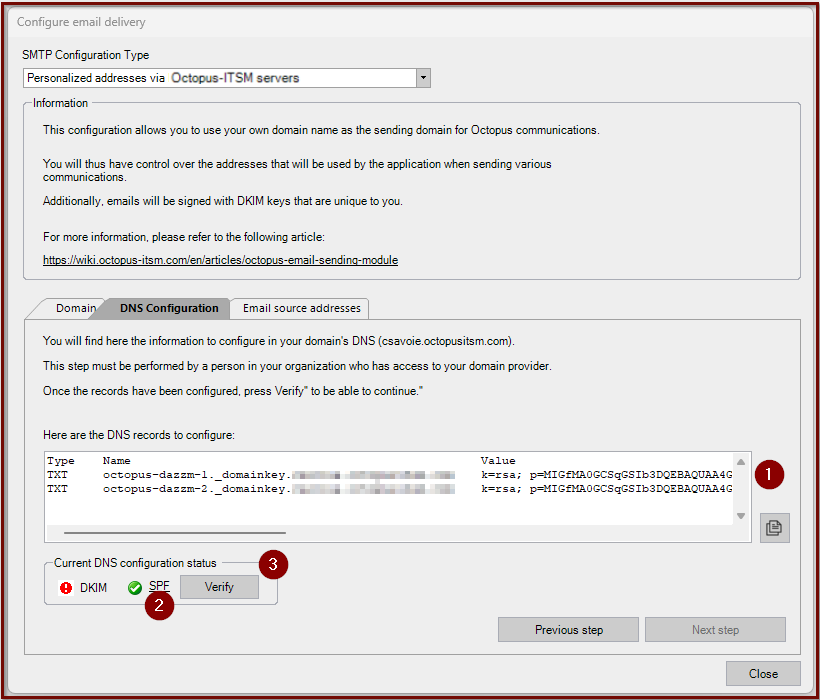
Configuring your domain's DNS entries
This step only needs to be done once per domain. You'll need someone in your organization who has authority over the domain to do this setup. This screen can be closed at any time and you can return to it to continue the setup.
Octopus requires three (3) valid registrations to use your domain.
- DKIM
- Copy the text containing the information about the DKIM keys to use. Please use the "Copy" button to avoid errors.
- SPF
- Your record might already be correct. If it is not, please see our article on how to adjust this record.
- Verify the configuration
- Once the DNS records have been set up correctly, you can force the check by pressing this button. Note that there may be some delay before our provider detects a valid configuration. If, despite the DNS records being saved, the check does not pass, you can close this window (without losing any configuration) and come back a bit later.
-
If after 24 hours the verification still does not work, please contact us.
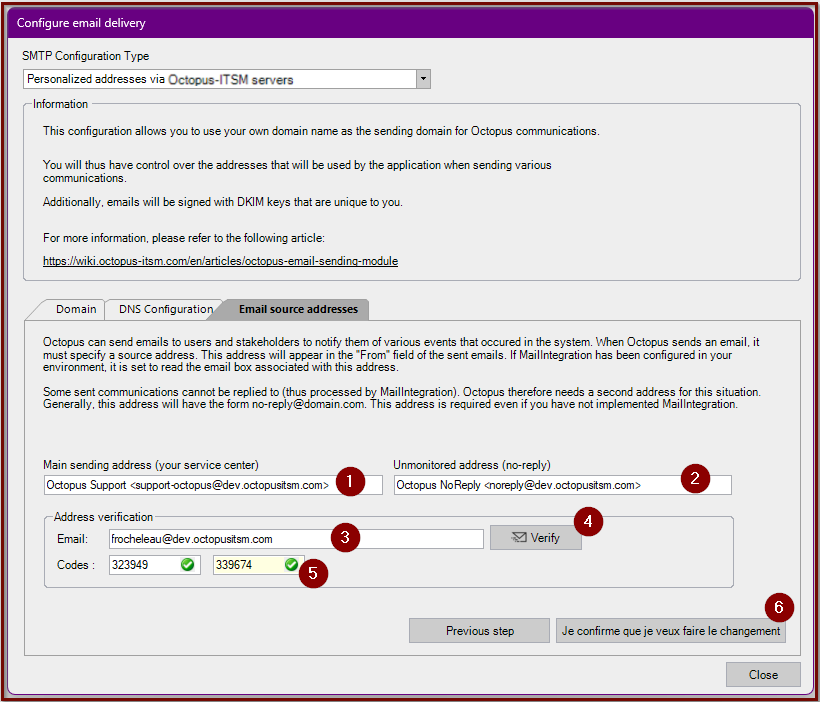
Setting up email sender addresses
This is the last step before you can save your new configuration. It allows the email sending system to be validated before the changes take place in production.
- Main sending Address
- If this address belongs to the @octopus-itsm.com domain, you can change this address without fear of service interruption
- This field supports entering a display name (Display Name <adresse@domain.com>)
- If this address belongs to your domain, it may already be valid and in used in your environment. It should probably NOT be changed.
-
WARNING !
If you have MailIntegration in place, this is the address that is used. If you change the address in this configuration window, you will cause a service interruption with your MailIntegration. Be very careful if you need to change this configuration.
- Unmonitored address (no-reply)
- You can enter whatever you like in this field
-
This field supports entering a display name (Display Name <adresse@domain.com>)
-
Enter an email address that belongs to this domain in the Email field under the Address Verification section
-
The purpose of this step is to verify that you can receive emails, using our provider and the addresses configured in the steps above.
-
-
Press the Verify button
-
You will then receive two (2) emails, each containing a six (6) digit code.
-
-
Please enter these two (2) six (6) digit codes in the Codes fields
-
Order doesn't matter
-
-
Once both codes have been properly verified, you will be able to save this configuration and emails will be automatically sent from our new server.
For diagnostic purposes, verification of the sending of emails to the source addresses can be carried out at any time, validating the email sending process and the source addresses previously configured.
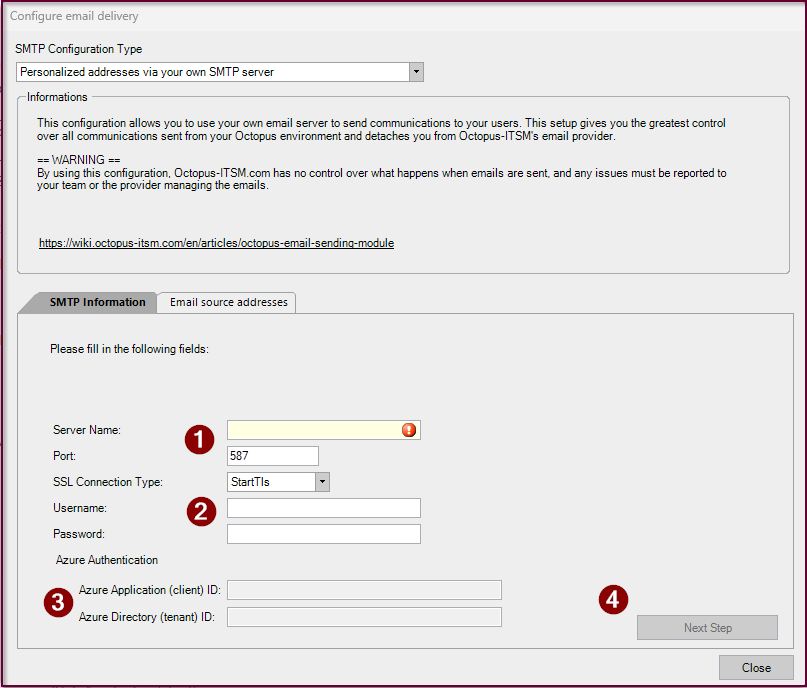
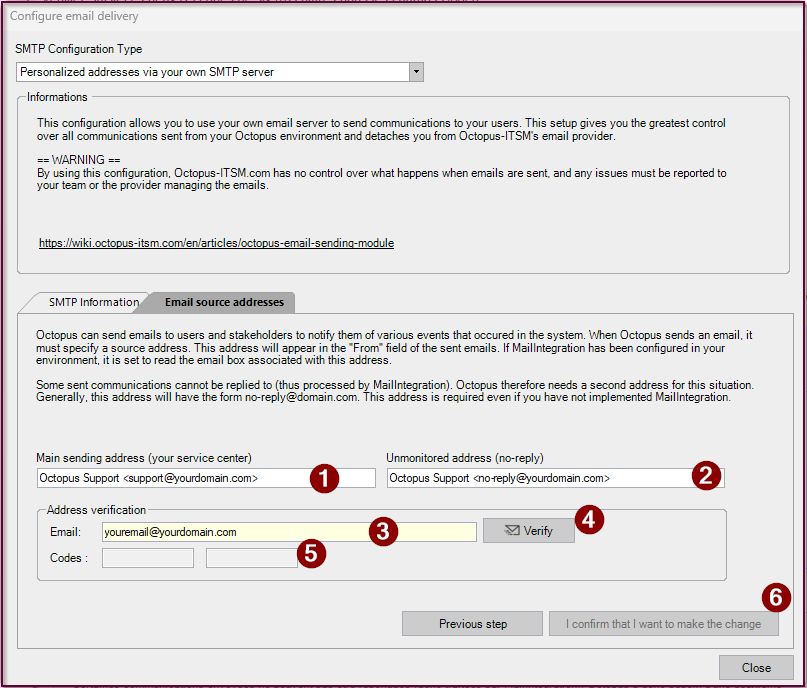
Personalized addresses via your own SMTP server
This configuration allows you to use your own email server to send communications to your users. This configuration gives you the most control over all communications sent from your Octopus environment and detaches you from Octopus-ITSM email provider.
Octopus does not have control over your smtp provider. Any problem that occurs with sending mail from Octopus must be reported directly to your email's provider.
Access the email configuration module
- The Administer Octopus permission is required to access the control panel of the email system.
- The configuration window is available via the menu: Tools > Configure email delivery...
- Select Personalized addresses via your own SMTP server
SMTP Information
- Required Information
- Server Name
- Port
- Optional Information
- SSL Connection Type
- Username
- Password
- Azure Authentication (with Microsoft Entra ID)
- If your SMTP server is Microsoft Exchange Online 365 (smtp.office365.com), you must configure OAuth2 authentication. You will need to set up a corporate application in your Microsoft tenant and configure Octopus to use that application.
- SMTP.Send authorization
- API name: Microsoft Graph
- Type: Delegated
- Don't forget to grant administrator consent
- Configure the application to Allow public client flows
- This configuration is available in the Authentication section of the application registration
- Once the application has been created in Microsoft Entra ID, fill in the fields in Octopus
- Application ID (client)
- Directory ID (tenant)
- Once the necessary information has been filled in, press “Next step” to
Setting up email sender addresses
This is the last step before you can save your new configuration. It allows the email sending system to be validated before the changes take place in production.
- Main sending Address
- If this address belongs to the @octopus-itsm.com domain, you can change this address without fear of service interruption
- This field supports entering a display name (Display Name <adresse@domain.com>)
- If this address belongs to your domain, it may already be valid and in used in your environment. It should probably NOT be changed.
-
WARNING !
If you have MailIntegration in place, this is the address that is used. If you change the address in this configuration window, you will cause a service interruption with your MailIntegration. Be very careful if you need to change this configuration.
- Unmonitored address (no-reply)
- You can enter whatever you like in this field
-
This field supports entering a display name (Display Name <adresse@domain.com>)
-
Enter an email address that belongs to this domain in the Email field under the Address Verification section
-
The purpose of this step is to verify that you can receive emails, using our provider and the addresses configured in the steps above.
-
-
Press the Verify button
-
You will then receive two (2) emails, each containing a six (6) digit code.
-
-
Please enter these two (2) six (6) digit codes in the Codes fields
-
Order doesn't matter
-
-
Once both codes have been properly verified, you will be able to save this configuration and emails will be automatically sent from our new server.
For diagnostic purposes, verification of the sending of emails to the source addresses can be carried out at any time, validating the email sending process and the source addresses previously configured.
Thank you, your message has been sent.