Table of contents
Overview
The ADSIReader program (ESI.Octopus.ADSIReaderApp.exe) allows importing users, computers (workstations and servers) and printer queues stored in your Active Directory.
The user import can include, among others; first name, last name, Windows username, title, department, phone numbers (with the phone extension), while import of computers includes only the computer name.
It is possible to use the WMIUpdater program (ESI.Octopus.WMIUpdaterApp.exe) to obtain the technical configuration of computers (operating system, memory, processor type, installed software, etc.).
Regarding print queues, we suggest excluding them with the /NoPrintersDetection parameter during import for two reasons:
The imported name is not always significant
There can be more than one queue per printer
Instead, it is recommended to do a single import with the DataImporter program and then manage the printers directly in Octopus.
How ADSIReader Works
When ADSIReader is executed, based on parameters used, it will import from your Active Directory all users, computers and print queues. Parameters are very important to control what is imported. Also, a mapping file defining the relation between Octopus and Active Directory properties is available in your installation folder (see file ADSIReaderLDAPMappings.xml).
Prerequisites
- Creation of an Octopus System account to run the above mentioned task. See the Octopus System Account article.
- A good understanding of the impact of ADSIReader on computer asset management in Octopus. Please refer to the ADSIReader - Impacts on computer asset management article.
- Name of domain(s) needing to be explored and which OU(s) need to be excluded (if applicable).
ADSIReader program usage
ADSIReader is a command line (DOS) type program. It has been designed to be easily automated (the Import Automation section will describe how to automate recurring imports).
- The complete program name is: ESI.Octopus.ADSIReaderApp.exe
- It is located in the local Octopus directory, either (C:\Program Files\Octopus) or (\%homepath%\AppData\Local\Octopus)
- Examples of directory where Octopus can be located:
- For Windows 7 and more: C:\Users\slevesque\AppData\Local\Octopus
- For Windows XP : C:\Documents and Settings\Slevesque\Local Settings\Application Data\Octopus
ADSI import from a command line
The AD import from a command line allows to use different parameters that can prevent from importing non desired data in Octopus.
To run the ADSIReader executable, you need to open a DOS window and go to the Octopus folder. Then, you need to enter the following command line:
ESI.Octopus.ADSIReaderApp.exe /login:system /password:octo /domain:MyDomain /team:1
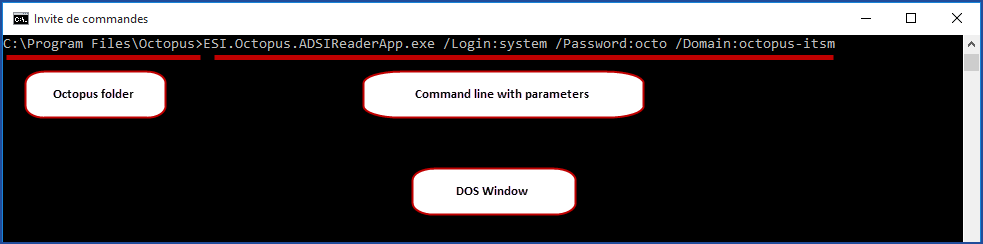
Example of a DOS command line
Before you run the command, it is recommended to validate the required parameters.
Examples
- Import active users only and computers, but without the print queues:
ESI.Octopus.ADSIReaderApp.exe /login:system /password:octo /Domain:Octopus-itsm /team:1 /NoPrintersDetection /ActiveUsersOnly
- Import from AD without updating the database while modifying the log file name and location:
ESI.Octopus.ADSIReaderApp.exe /login:system /password:octo /Domain:Octopus-itsm /team:1 /NoDbUpdate /OutputFileName:MyFile.log
What you need to know:
Each time the program is run a .LOG file is created in this format; ToolName_YYYYMMDD_HHMMSS.log
- For example ADSIReader_20190618_105242.log.
Use this file to see the results of the command execution and errors if there are any.
Also see the Octopus Tools | Maintenance of log files article about the importance of the log file management.
It is possible to generate an encrypted password and hide the password at runtime, see this article for details.
Parameters
There are 21 parameters available, of which 4 are mandatory to execute ADSIReader.
Mandatory Parameters
- /Login
- Octopus username
- /Password
- Octopus password
-
/Team
-
The number of the team to be updated if the user is part of a multiple teams environment. By default, the IT team has team number 1.
-
- /Domain:DomainName
- This parameter is the name of the domain to import.
- For the whole domain:
- The import will manage CI retirements (a computer no longer found in the domain will have its status set to "Retired"). You can control this behavior with the /NoStatusUpdate parameter.
- The import can manage user retirement. You can activate this behavior by using the /DeactivateUsers parameter
- For a specific OU:
- The import will not manage CI retirement.
- The import will not manage USER retirement.
Optional Parameters
- /DomainUserName
- Specifies the Windows username to use if you are importing from an untrusted domain.
- By default, ADSIReader will use the user context from which the command was invoked.
- /DomainPassword
- Specifies the password associated with the /DomainUserName parameter.
- /NoUsersDetection
- Deactivates user importation.
- /NoComputersDetection
- Deactivates computer importation.
- /NoGroupsDetection
- Deactivates group importation.
- /NoPrintersDetection
- Deactivates printer queues detection.
- /Exclude:FileName.txt
- Specifies a file containing a list of OUs to be excluded.
- The file needs to contain each OU to exclude, one per line, using their distinguished name (DN).
- If the OU or CN name contains spaces, there is no need to declare it between quotation marks.
- The content of a specified OU and its child OU will be excluded.
- /ValuesExclusionsFilePath:FileName.txt
- Allows you to specify a file containing a list of records to exclude from the synchronization with criteria based on the variable names of AD.
- It is possible to exclude elements among computers, users, printers or groups.
- Understanding this option is important before using it, see Exclusion of Specific Record From AD section.
- /ActiveUsersOnly
- Add this parameter to restrict import to active users only from Active Directory.
- /DeactivateUsers
- Deactivates Octopus users following Active Directory account status.
- Missing, disabled or deleted account in AD will result in Octopus account deactivation.
- If you use an OU dedicated to unused account, use the /Exclude parameter to automatically deactivate its content.
- /SiteAutoCreation:False
- To disable automatic site creation
- /DepartmentAutoCreation:False
- To disable automatic Department creation
- To disable automatic Department creation
By default, when a user is deactivated, Octopus removes the links between the user and its CIs. It is possible to modify this behavior and ensure that the status of a user does not affect its link to CIs.
If needed, communicate with the Octopus Service Desk, to have this option (User.Deactivation.DeleteCIRelationships.Enabled) modified.
- /ReactivateUsers
- Reactivate Octopus users based on Active Directory status.
- The Active Directory account will be recognized as specifiable in the Import Mechanics section.
- You do not need to use the /DeactivateUsers feature to use this one.
- If you use an excluded OU using the /Exclude switch, accounts contained therein will not be reactivated.
- /IncludeDomainNameInWindowsUserName
- Import users using the domain\username format
- Alternatively, modify the mapping file to use the User Principal Name attribute, with the format username@domain.name.
- /AllowMultipleLogon
- Add this setting when some users have more than one account in the Windows Username field
- If the Windows Username already contains the one from AD, all values in the field will be retained
- If the Windows Username does not contain the one from AD, the value from AD will be the only one kept
- /MatchADKeyOnNullExternalIDOnly
- This option is turned off by default.
- This option changes the way Octopus identifies a user with the ActiveDirectoryKey
- In some rare scenario where a conflict is found with ActiveDirectoryKey a conflict will be found and Octopus will counfound one user for another.
- If the ActiveDirectoryKey corresponds to another ActiveDirectoryKey of an existing user, the Octopus user will be updated.
- With the option set to True if the ActiveDirectoryKey equals to another ActiveDirectoryKey of another user already existing in Octopus, the value of the ExternalID must be empty/null for the user to be updated. In the case where ExternalID is not empty/null, a new user is created.
- /ImportManager
- Add this parameter if you want to import the hierarchical manager.
- The Manager attribute from Active Directory will be imported to the Supervisor field of the user file.
- During the first import, the supervisor field will not be imported since the supervisor first needs to be imported as a user
- /NoStatusUpdate
- Add this parameter is you do not want to change CI status to Retired
- /LogFilePath:FileName.log
- Replaces the location and name of the operation log file.
- By default, the file will be named ADSIReader_YYYYMMDD_HHMMSS.log and will be located in the same directory as the ADSIReader executable program.
- If you relocate the file to a different folder, make sure the folder already exists (Octopus will not create the folder).
- Example: /LogFilePath:C:\LogFiles\ADSIReader.log
- /MappingsFilePath:FileName.xml
- Specify the location of the field mapping file.
- By default, the program will use the ADSIReaderLDAPMappings.xml file contained in the application folder.
If changes are made in the ADSIReaderLDAPMappings.xml file, it is recommended that you move the file to another location to prevent these changes from being overwritten if the application is reinstalled.
Keeping a backup copy of this file is also recommended.
- /NoDBUpdate
- The program will run without updating the Octopus database.
- Extracted information will be stored in the following files: ADSIUsers.xml, ADSIComputers.xml, ADSIGroups.xml and ADSIPrinters.xml.
- You can later import those files using the /NoExtraction parameter
- /NoExtraction
- The program will run without extracting data from the network, but using the XML files.
- Use the /NoUsersDetection, /NoComputersDetection, /NoGroupsDetection and /NoPrintersDetection to control which files are not imported.
- /PurgeLogs
- Can automatically erase old log files
- The parameter is used to determine how many days of log files that you want to keep.
- For more information, see the Octopus Tools | Maintenance of log files.
Automate data import from Active Directory to Octopus
To automate the import from ADSIReader, refer to the Windows Scheduled Tasks article.
Implementation
Automatic attribution of a site to users/computers part of an Organizational Unit (OU)
To automatically attribute a user or computers to the right site based on OU location, refer to the ADSIReader - Automatic site assignation article.
Integration with a single organizational unit (OU)
To import only a specific organizational unit, refer to the ADSIReader - Integration for a single organizational unit (OU) article.
CI and user relation removal option when a user is deactivated
By default, when a user is deactivated, Octopus removes the links between the user and his CIs. In some environments, where a user on leave or long-term illness will be disabled, this can be a problem
It is possible to make a request to modify this behaviour and ensure that the status of a user does not affect his links to his CIs.
If needed, communicate with the Octopus Service Desk, to have this option (User.Deactivation.DeleteCIRelationships.Enabled) modified.
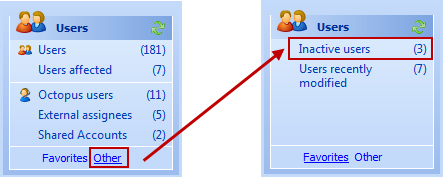
Deactivate generic or system accounts from your users list
The ESI.Octopus.ADSIReaderApp application imports all users defined in AD. To restrain user import to a specific OU, please see this article: How to use Active Directory integration for a single organizational unit (OU)
During the AD import, all users with a first and last name will be imported into Octopus. However, certain among them are not real users (generic account, resources, system account, etc.).
To remove them from the list of active users, they must be disabled using the following method:
- Go into the "Users" module
- Click on the users list
- Select a user to disable or search for the users to be deactivated
- Open the user file
- In the top right corner, uncheck "Active"
- Save the changes
To consult inactive users, select the list "Inactive users" located in in the "Other" section of the lists.
Identifying laptop and server workstations
When computers are imported in Octopus, by default, they all have the CI type "Workstation". You need to make sure that the right CI type is being assigned to the corresponding CI:
- Go into the "Configurations" module
- Click on Workstation
- Select the computers that are in fact servers. It is possible to modify several CI simultaneously (as long as the CI type is the same for all the selected CI).
- Click on Change CI in the list of actions, in the left panel
- Select Server in the Type list
- Click on OK
Repeat the same steps for laptops.
Support for non-IT teams managing CIs
The ADSIReader application is supported in teams other than TI (Team #1).
However, an Octopus administrator mus execute commands to configure the data required for their execution.
To do this, you need to:
- Select menu Tools -> Reference data management... -> General
- Select Team
- Press the Execute button in the CI Types section
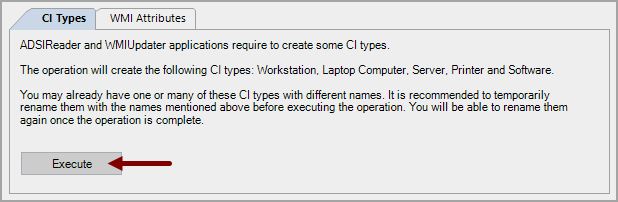
The ADSIReaderApp application already works for all teams without any particular configuration if and only if the following parameters are specified at runtime:
- NoPrintersDetection
- NoComputerDetection
Import specifications
Import mechanics
When Octopus performs importation of users, it will attempt to synchronize AD users relative to the Octopus users the following way:
- External Identifier
- Octopus first tries to match using a unique identifier (ObjectGUID).
- If the external identifier is recognized, the Octopus account will be updated: lastname, firstname, username, email, etc.
- The AD unique identifier is stored in the External Identifier column.
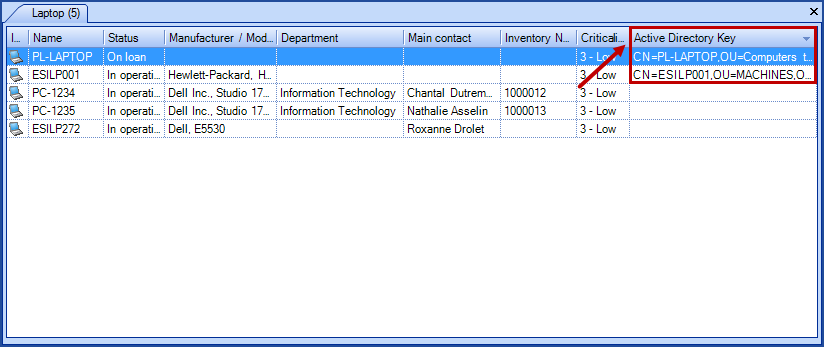
- ActiveDirectoryKey
- If no external identifiers has been found, Octopus will refer to ActiveDirectoryKey (DistinguishedName)
- ActiveDirectoryKey or DistinguishedName is a way to uniquely identify an object in Active Directory. In our case it contains the relative name of different attributes and parent name (relative path) to the user object in Active Directory.
- If the object is matched/found, the Octopus account will be updated.
- ActiveDirectoryKey is normally unique. In the rare case that a conflict is present, this method must be adjusted. This will be accomplished with the option MatchADKeyOnNullExternalIDOnly.
- Username
- Used if the recognition based on External Identifier has not produced a match.
- Attempts to match the account based on the Windows Username for all Octopus account that do not have an External Identifier.
- If a match is made, the External Identifier will be recorded.
- Lastname & Firstname
- Used if both previous methods have not produced a match.
- Attempts to find a match between both lastname and firstname for all Octopus account that do not have an External Identifier.
- If a match is made, the External Identifier will be recorded.
- Recognition is accent sensitive and case insensitive.
- Creation of a new account
- No match could be made.
- Octopus will create a new account.
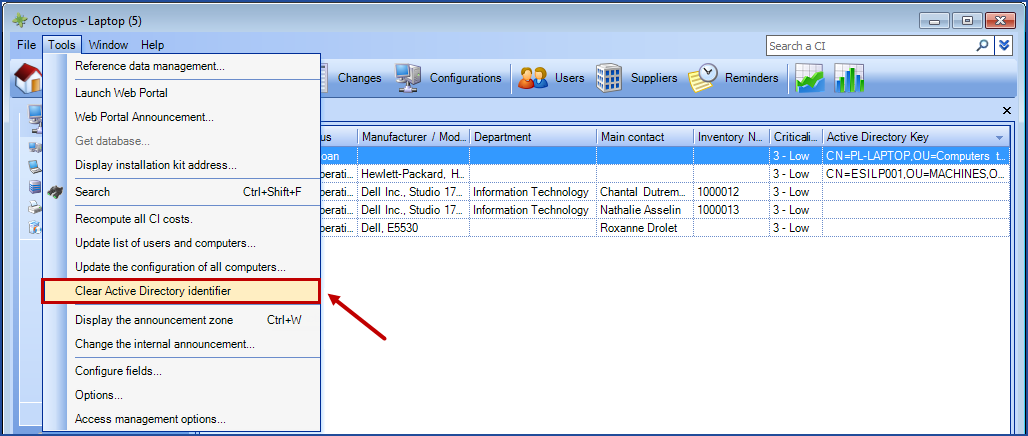
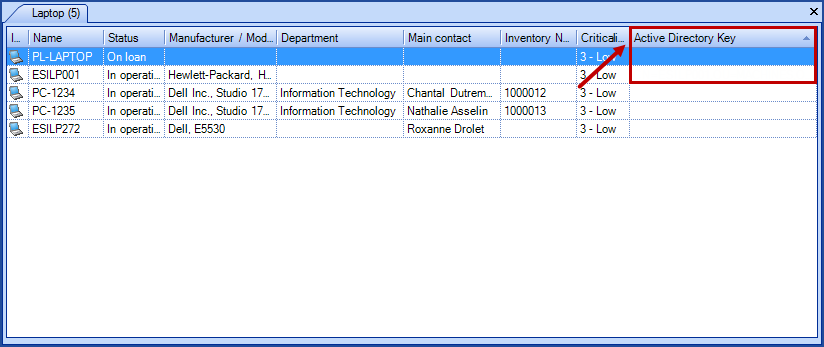
If you want to force synchronization of an object that already has an External Identifier, use the action found in Tools > Clear Active Directory identifier which removes both the Active Directory Key (Distinguished name) and External Identifier (ObjectGUID).
Imported Information
The mapping between AD and Octopus fields is stored in the XML file "ADSIReaderLDAPMappings.xml" located in Octopus client directory.
Here is the content of the default file:
<?xml version="1.0" encoding="utf-8" ?>
<mappings>
  <mapping Name="User">
    <attribute LDAPAttribute="objectGUID" OctopusAttribute="ExternalID"/>
    <attribute LDAPAttribute="sAMAccountName" OctopusAttribute="Name" />
    <attribute LDAPAttribute="GivenName" OctopusAttribute="FirstName"/>
    <attribute LDAPAttribute="sn" OctopusAttribute="LastName"/>
    <attribute LDAPAttribute="Mail" OctopusAttribute="EMailAddress"/>
    <attribute LDAPAttribute="Title" OctopusAttribute="Title" EmptyValueHandling="NoChange"/>
    <attribute LDAPAttribute="TelephoneNumber" OctopusAttribute="TelephoneNumber" Index="0" Separator="x" EmptyValueHandling="NoChange"/>
    <attribute LDAPAttribute="TelephoneNumber" OctopusAttribute="TelephoneNumberExtension" Index="1" Separator="x" EmptyValueHandling="NoChange"/>
    <attribute LDAPAttribute="Mobile" OctopusAttribute="TelephoneMobile" EmptyValueHandling="NoChange"/>
    <attribute LDAPAttribute="homePhone" OctopusAttribute="HomePhone" EmptyValueHandling="NoChange"/>
    <attribute LDAPAttribute="distinguishedName" OctopusAttribute="ActiveDirectoryKey"/>
    <attribute LDAPAttribute="Department" OctopusAttribute="Department" EmptyValueHandling="NoChange"/>
    <attribute LDAPAttribute="EmployeeNumber" OctopusAttribute="EmployeeNumber" EmptyValueHandling="NoChange"/>
    <attribute LDAPAttribute="Pager" OctopusAttribute="Pager" EmptyValueHandling="NoChange"/>
    <attribute LDAPAttribute="physicalDeliveryOfficeName" OctopusAttribute="Local" EmptyValueHandling="NoChange"/>
    <attribute LDAPAttribute="preferredLanguage" OctopusAttribute="Language" />
  </mapping>
  <mapping Name="Computer">
    <attribute LDAPAttribute="objectGUID" OctopusAttribute="ExternalID"/>
    <attribute LDAPAttribute="distinguishedName" OctopusAttribute="ActiveDirectoryKey"/>
    <attribute LDAPAttribute="Name" OctopusAttribute="Name"/>
  </mapping>
  <mapping Name="Printer">
    <attribute LDAPAttribute="objectGUID" OctopusAttribute="ExternalID"/>
    <attribute LDAPAttribute="distinguishedName" OctopusAttribute="ActiveDirectoryKey"/>
    <attribute LDAPAttribute="Name" OctopusAttribute="Name"/>
  </mapping>
  <mapping Name="Group">
    <attribute LDAPAttribute="objectGUID" OctopusAttribute="ExternalID"/>
    <attribute LDAPAttribute="distinguishedName" OctopusAttribute="ActiveDirectoryKey"/>
    <attribute LDAPAttribute="Name" OctopusAttribute="Name"/>
  </mapping>
</mappings>
You are not required to modify this file for the import to work. The default fields to import are already defined.
By default the mapping file contains the EmptyValueHandling parameter with the NoChange choice.
This choice indicates that if the value in AD for the element is deleted, the last value that had been updated in Octopus will remain as it is.
If you prefer to empty the value in Octopus, see the Erase the data in Octopus when a field is emptied in AD section below.
Mapping file modification
- If a field containing data in Active Directory has an equivalent field in Octopus, the AD data will have priority on the one in Octopus. However, if the field is empty in AD but contains data in Octopus, it will not be overwritten.
- If you decide to import sites, departments or sub departments, they will be added in Octopus if they do not already exist.
- The possibilities of Active Directory configurations being infinite (functional level, field usage, fields added to the schema), Octopus cannot provide a list of available fields. However, you can contact an administrator for your domain who will provide you with a list of available LDAP attributes.
Here are some cases where it could be necessary to modify the mapping file:
Azure AD - Synchronization of userPrincipalName (UPN)
Using Azure AD as federated identity manager for applications meant for assignees requires the synchronization of the userPrincipalName (UPN) from Active Directory. It will be added to the existing value of the Windows Username field.
If end users and assignees already authenticate with their UPN in the different Octopus applications, you don't have to make any changes to your configuration.
However, given that it is possible to have a separate authentication mode for the Web Portal and for applications meant for assignees, it is likely that you will need to synchronize the sAMAccountName and the userPrincipalName.
To synchronize the userPrincipalName, add the following line:
<attribute LDAPAttribute="userPrincipalName" OctopusAttribute="UPN"/>
Import the Site field
By default, no Active Directory field are linked to the Site in Octopus. If you have this information in AD, you can add the following line:
<attribute LDAPAttribute="Company" OctopusAttribute="Site"/>
To separate each site, use the pipe character "|" between each level for example: Site | Sub-Site | Sub-Site. It is possible to link the site to an OU in AD. Consult the Automatic attribution of a site to users/computers part of an Organizational Unit (OU) section of the present article.
Some fields in AD contain invalid values
Delete fields that you do not want to import. For example, if you do not wish to import the user title, delete the following line:
<attribute LDAPAttribute="Title" OctopusAttribute="Title"/>
The letter "p" is used to indicate the phone extension
Replace the "x", separator, by a "p" in the following 2 lines:
<attribute LDAPAttribute="TelephoneNumber" OctopusAttribute="TelephoneNumber" Index="0" Separator="x"/>
<attribute LDAPAttribute="TelephoneNumber" OctopusAttribute="TelephoneNumberExtension" Index="1" Separator="x"/>
The phone number only contains the phone extension
Replace the 2 following lines :
<attribute LDAPAttribute="TelephoneNumber" OctopusAttribute="TelephoneNumber" Index="0" Separator="x"/>
<attribute LDAPAttribute="TelephoneNumber" OctopusAttribute="TelephoneNumberExtension" Index="1" Separator="x"/>
with:
<attribute LDAPAttribute="TelephoneNumber" OctopusAttribute="TelephoneNumberExtension"/>
The phone number contains a prefix that needs to be removed
For example, if the "1-" prefix from the phone number 1-514-832-5975 obtained from Active Directory needs to be removed, you must use the "StripLeading" parameter in the ADSIReaderLDAPMappings.xml mapping file:
<attribute LDAPAttribute="TelephoneNumber" OctopusAttribute="TelephoneNumber" Index="0" Separator="x" StripLeading="1-"/>
The phone number contains a portion to be removed
For example, if you want to remove a label that is present in the Telephone number or Extension box as follows +18002341111; ext=3040 and obtain the following result: 18002341111 for the telephone number and 3040 for the extension, use those lines :
<attribute LDAPAttribute="TelephoneNumber" OctopusAttribute="TelephoneNumber" Index="0" Separator=";" EmptyValueHandling="NoChange"/>

<attribute LDAPAttribute="TelephoneNumber" OctopusAttribute="TelephoneNumberExtension" Index="1" Separator="=" EmptyValueHandling="NoChange"/>
Import of department AND sub-department
You can add departments and sub-departments to represent your organizational structure. In the initial file called ADSIReaderLDAPMappings.xml, the correspondence to the department field is already in the list, but not the sub department one. To add a correspondence between Active Directory and Octopus for the sub-department, you must add the following line:
<attribute LDAPAttribute="NameOfFieldAD" OctopusAttribute="SubDepartment"/>
You must replace the expression "NameOfFieldAD" by the field name that you use in AD to determine the sub-department.
If you have entered your department and sub-department in the department field of Active Directory (with the format: Department - Sub-department), you must modify the following 2 lines:
<attribute LDAPAttribute="Department" OctopusAttribute="Department" Index="0" Separator="-"/>
<attribute LDAPAttribute="Department" OctopusAttribute="SubDepartment" Index="1" Separator="-"/>
Import using an Octopus custom field
To import data in an Octopus custom field, you will have to modify your mapping file to specify the target field.
However, the custom field must be codified. To obtain the custom field name, use the following step, using the field Corps de métier ou d'emploi as an example:
- Replace any accented characters by its non accented version.
- Corps de métier ou d'emploi becomes Corps de metier ou d'emploi.
- Switch the first letter of any word to a capital.
- Corps de metier ou d'emploi becomes Corps De Metier Ou D'Emploi.
- Remove any form of punctuation.
- Corps De Metier Ou D'Emploi becomes Corps De Metier Ou DEmploi.
- Remove any space.
- Corps De Metier Ou DEmploi becomes CorpsDeMetierOuDEmploi.
- Add the CustomAttribute.cf string at the beginning.
- CorpsDeMetierOuDEmploi becomes CustomAttribute.cfCorpsDeMetierOuDEmploi.
<attribute LDAPAttribute="ExtensionAttribute4" OctopusAttribute="CustomAttribute.cfCorpsDeMetierOuDEmploi"/>
Importing the Description field of a CI
From the Active Directory Description field, you can import
- A local
- Inventory number
- A CI description field
<attribute LDAPAttribute="description" OctopusAttribute="Local"/>
<attribute LDAPAttribute="description" OctopusAttribute="InventoryNumber"/>
<attribute LDAPAttribute="description" OctopusAttribute="CustomAttribute.DescriptionInAttribute"/>
The Description (or any other aptly named) attribute must have been defined for the imported CI, and you must refer to it by using the CustomAttribute.AttributeName format
Erase the data in Octopus when a field is emptied in AD
By default, the synchronization with Active Directory will allow to add or modify the values in Octopus. Except when a value is emptied in AD. In this case the last value added in Octopus will stay there.
It is possible to change this behaviour for certain fields by modifying the ADSIReaderLDAPMappings.xml file.
Add the option EmptyValueHandling="Clear" at the end of the attribute to erase when it is emptied in AD.
For example :
<attribute LDAPAttribute="EmployeeNumber" OctopusAttribute="EmployeeNumber" EmptyValueHandling="Clear"/>
The following are the fields that can use this option:
For users
- Title
- Office Number
- Ext
- Home Number
- Cell Number
- Pager
- Department
- Sub-department
- Employee ID
- Local
For a CI
- Local
- Inventory Number
- Cost Centre
- Value of a custom attribute
Exclusion of Specific Record From AD
The /ValuesExclusionsFilePath parameter allows to exclude certain records from the AD synchronization.
The types of elements that can be excluded are:
- The users
- The groups
- The computers
- The printers
From a UTF-8 format file, you add the list of records to exclude form the synchronization, using criterion based on the AD variable names.

The rules for using this parameter are:
-
The file must be in UTF-8 format.
- If an OU exclusion is applied in the parameters, then this exclusion takes precedence over the current parameter.
- More than one criteria can be added at a time, using the semicolon to separate them.
- Note that a criterion cannot contain a semicolon because it is used as a separator.
- Criteria containing quotation marks will be ignored.
- Empty values can be handled by adding two semicolons at the end of a list.
- If a criterion is invalid, the entire line will be ignored.
- If several lines of criteria are added, they are processed individually (as soon as one of the lines is true, the record is excluded).
What you need to know:
Before proceeding, we recommend testing with the /NoDbUpdate parameter to validate the results in the log and xml files.
Understanding the use of the semicolon ( ; ) is very important for this parameter:
- It serves as a separator between the criteria, so it cannot be used in the criteria themselves.
- <GivenName>John; Mary; Lucie</GivenName>
- A single or two semicolons at the end of a list means to exclude empty elements.
It is therefore recommended to look carefully at the lists of criteria before proceeding.- <GivenName>John; Mary; Lucie;</GivenName>
- <GivenName>John; Mary; Lucie;;</GivenName>
Here is an example of a file:
<ExcludedLists>
                <Computer>
                               <cn>OCTOAD-DC;OCTOAD-WS1</cn>
                </Computer>
                <User>
                               <GivenName>Mr;Ms</GivenName>
                               <sn>Loranger;Operation</sn>
                               <extensionAttribute1>Étudiant;;</extensionAttribute1>
                </User>
                <Printer>
                               <priority>1</priority>
                </Printer>
                <Group>
                               <sAMAccountName>CTS Web Access Computers</sAMAccountName>
                </Group>
</ExcludedLists>
ADSIReader Troubleshooting
For more information about synchronisation problems, click here
Operation Log Files
The following files are generated when executing ADSIReader:
- ADSIReader_AAAAMMJJ_HHMMSS.log
- This log file is generated automatically each time ADSI is run
- ADSIUsers.xml (version 3.8 or higher) - ADSIEmployees.xml (version 3.7 and lower)
- File containing user information to be imported in Octopus, once completed
- ADSIComputers.xml:
- File containing computer information to be imported in Octopus, once completed
- ADSIPrinters.xml:
- File containing print queue information to be imported in Octopus, once completed
- ADSIGroups.xml:
- File containing user group information to be imported in Octopus, once completed.
These file are created in the directory where the ESI.Octopus.ADSIReaderApp.exe is located. Note that these files could be required to troubleshoot issues with ADSIReader.
Thank you, your message has been sent.