Table of contents
Overview
WMIUpdater (ESI.Octopus.WMIUpdaterApp.exe) allows the update of the configuration in Octopus (hardware and software) of computers in your network. You can synchronize on a particular CI or you can run the update from an automated Windows task.
Prerequisites
- The creation of an Octopus System account to run the task with it. See the Octopus System Account article.
- Allow network connections to machines that need to be inventoried to allow access to the remote RPC server:
- TCP 135,445
- UDP 137
- You also need to import the CIs, either with Active Directory or from another source using DataImporter, before you can run WMIUpdater. However you can import the CI at the same time as you run the synchronization if you do it from a range of IP addresses.
Description of the fonctionnality
When WMIUpdater is executed, it reads all CI types that have been checked with "Is a computer" and that have "Activate configuration detect via WMI" checked in their file.
- Tools > Reference Data Management > CI > Type
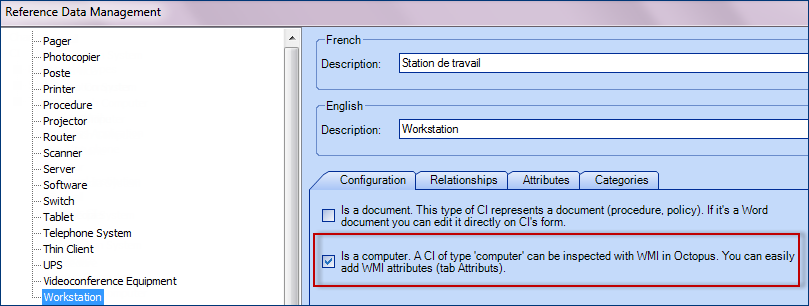
- Configuration Module
- Select a CI
- Configuration Tab

WMIUpdater Steps
- The program is configured to read 16 workstations at a time.
- WMI will never read a workstation that is Retired.
- By default, WMI will only read the workstations that are in service.
- If required, use the /HostsConfigFilePath parameter to read stations that are in a status other than. In service or Retired.
- Attempts to connect to the workstation
- Once connected, it retrieves the workstation configuration (hardware and software)
- Writes the information to a file (WMIComputers.xml)
- Once all the workstations have all been done, the information gets transferred to Octopus by the program. The data transfer to the server is done only once, at the end of the whole process.
If the program cannot retrieve the configuration information of a workstation, the workstation will end up in the WMI error report.
How to use WMIUpdater
WMIUpdater is a "command line" type of program (DOS). It is designed to be easily automated (the section for Updating the WMI configuration from a command line describes how to automate the WMIUpdater execution).
- The complete name of the WMIUpdater program is: ESI.Octopus.WMIUpdaterApp.exe
- It is located in the local Octopus directory of your computer(C:\Program Files\Octopus) or in (\%homepath%\AppData\Local\Octopus)
- Here are some example of where you can find the Octopus folder:
- For Windows 7: C:\Users\slevesque\AppData\Local\Octopus
- For Windows XP: C:\Documents and Settings\Slevesque\Local Settings\Application Data\Octopus
What you need to know:
Each time the program is run a .LOG file is created in this format; ToolName_YYYYMMDD_HHMMSS.log
- For example WMIUpdater_20190618_105242.log.
Use this file to see the results of the command execution and errors if there are any.
Also see the Octopus Tools | Maintenance of log files article about the importance of the log file management.
It is possible to generate an encrypted password and hide the password at runtime, see this article for details.
Parameters
There are 11 available parameters, 3 of which are mandatory to execute WMIUpdater:
Mandatory Parameters
- /Login
- Octopus username
- /Password
- Octopus password
-
/Team
-
The number of the team to be updated. By default, the IT team is 1
-
Optional Parameters
- /NoUsersDetection
- Add if you don't want to link the workstations to the users. Note that all profiles found on a station will be interpreted as users of the workstation and will be added in the list of users for this workstation
- /NoPrintersDetection
- Add this parameters if you don't want to add the local printers
- /Site
- Add this parameter to synchronize only the workstations from a specific site or subsite
- The name of the site/subsite used is unique
- Ex.: /Site:Name of site or Ex.: /Site:Name of subsite
- /LogFilePath
- Enables you to replace the name and location of the log file. By default, the file is called WMIUpdater_AAAAMMJJ_HHMMSS.log and is located in the folder from where you run the WMIUpdater executable. If you move this file in a folder different of Octopus folder, make sure it exists (the system cannot create the folder)
- Ex.:/LogFilePath:C:\LogFiles\WMIFile.log
- /NoDbUpdate
- The program will execute, but will not update the Octopus database. The information gathered will be recorded in the WMIComputers.xml file. You can import this file later by using the "NoExtraction" parameter
- /NoExtraction
- The data will not be updated from the network, but from the .xml file
- Ex.:/NoExtraction:WMIComputers.xml or /NoExtraction:MyFile.xml
- /OutputFileName
- By default, the file for the udpated information (XML file) is called WMIComputers.xml, but it is possible to rename it. Note that the file must be located in the Octopus folder or in a folder under it, but the file must exist
- Ex.: /OutputFileName:MyFile.xml or /OutputFileName:Log\MyFile.xml
- /HostsConfigFilePath
- Add this parameter to identify the path for the hosts.xml configuration file. You must use this file when you synchronize the workstations from an IP range or using CI names.
- See the Update the WMI configuration from an IP range or with CI names section for more details.
- Ex.: /HostsConfigFilePath:c:\program files\octopus\hosts.xml
- /PurgeLogs
- Can automatically erase old log files
- The parameter is used to determine how many days of log files that you want to keep.
- For more information, see the Octopus Tools | Maintenance of log files.
Operation Log Files
Files generated by the execution of the WMIUpdater program:
- WMIUpdater_AAAAMMJJ_HHMMSS.log
- Log file generated automatically each time the program runs
- WMIComputers.xml
- File containing the data that will be imported in Octopus once the task is done
These files will be created in the folder at the executable "ESI.Octopus.WMIUpdaterApp.exe". In addition, these files may be requested for the analysis of issues related to WMI.
Update the WMI configuration of a workstation from Octopus
Updating the WMI configuration from Octopus enables you to quickly update in real time, a specific CI. This option can be handy during the diagnostic of a CI. From the configuration module, select the CI to te updated and then click on the Update the computer's configuration attributes (WMI).

The update will start and you will get the hardware and software configuration of this specific CI.
Update the WMI configuration from a command line
The update from a command line allows you to update the whole of your workstations (or only a part) with the possibility to use different parameters.
To run the WMIUpdater executable, you must open a command prompt (DOS) and position yourself in the Octopus folder you want to update. Then, you need to enter the following command:
ESI.Octopus.WMIUpdaterApp.exe /login:system /password:octo /team:1
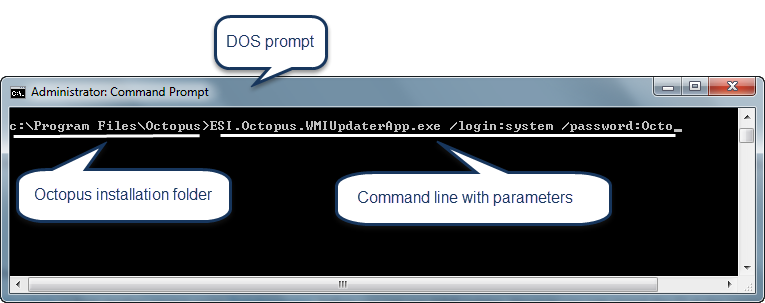
Example of a DOS command line
Before you run the command, you should validate the parameters that you want to use.
Examples
- WMI update without the local printers or the user profiles:
ESI.Octopus.WMIUpdaterApp.exe /login:system /password:octo /team:1 /NoPrintersDetection /NoUsersDetection
- WMI update without updating the server with the data and with the modification of the XML file:
ESI.Octopus.WMIUpdaterApp.exe /login:system /password:octo /team1 /NoDbUpdate /OutputFileName:MyFile.xml
- WMI update from the XML file instead of the network:
ESI.Octopus.WMIUpdaterApp.exe /login:system /password:octo /team:1 /NoExtraction:MonFichier.xml
Create an automated task for the WMI-Octopus synchronization
To automate the import from WMIUpdater, refer to Windows Schedules Tasks article.
Update the WMI configuration from an IP range or with CI names
This is how you run the program:
ESI.Octopus.WMIUpdaterApp.exe /login:system /password:octo /team:1 /HostsConfigFilePath:Hosts.XML
Other parameters like /NoPrintersDetection or /NoUsersDetection can also be used.
Description of the HOSTS.XML File From an IP Range
The configuration file to synchronize the workstations from a range of IP addresses must be defined as follows:
<?xml version="1.0" encoding="utf-8" ?>
   <wmiUpdater>
      <host identificationType="IPAddress">
         <ipAddress start="10.25.125.1" end="10.25.125.255" />
         <ipAddress start="10.100.12.1" end="10.100.12.255" />
      </host>
   </wmiUpdater>
- It can contain several ranges of IP addresses
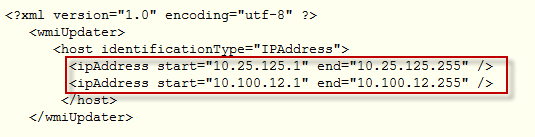
- The file cannot contain an IP address with replacement characters like this:

Description of the HOSTS.XML File From a List of CI Names
The file can also be used to find computer names instead of IP addresses.
- For this, you need to change the identification type of the CI (IdentificationType)
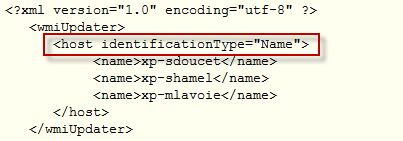
The configuration file to synchronize the stations from their name must be defined as follows:
<?xml version="1.0" encoding="utf-8" ?>
   <wmiUpdater>
      <host identificationType="Name">
         <name>xp-sdoucet</name>
         <name>xp-shamel</name>
         <name>xp-mlavoie</name>
      </host>
   </wmiUpdater>
This type of configuration can be used when you cannot import from Active Directory or from any other external data source.
You can also use this method to synchronize only part of the workstations instead of the ones on the whole network.
Use WMIUpdater in a different domain or at a customer's
If you need to run WMI to update the computer configuration on a different domain and if you do not have a link between the domains, we suggest you to copy the Octopus folder to a USB key and connect to the customer's network to run the program. Of course, you will have to use the /NoDbUpdate parameter and will probably have to use the option of synchronizing from an IP range. Later on, once back on your network, you can run the program again with the /NoExtraction parameter to update the proper database.
Here are the steps:
- Copy the whole Octopus folder to a USB key
- Connect the USB key to a workstation of the domain you want to update (make sure .NET Framework 4 is installed on the computer from where you will run the command)
- Run the following command:
ESI.Octopus.WMIUpdaterApp.exe /login:system /password:octo /team:1 /NoDbUpdate /OutputFileName:MyFile.xml
- Once the update completed, connect the USB key to a workstation in your domain and execute the following command:
ESI.Octopus.WMIUpdaterApp.exe /login:system /password:octo /team:1 /NoExtraction:MyFile.xml
It is possible to use different parameters than the ones mentioned before. Do not forget, always use an administrator account of the domain you want to update.
WMI Error Report
After you have run the WMI synchronization with WMIUpdater, it is important to check the results from the various report available in Octopus. The following lists are available from the Configurations Module, in the Other section:
- Computers never reached by WMI
- Computers with WMI error
- We recommand to add the following columns:
Latest Attempt Date
Latest Successfull Attempt Date

You can use the Computers with WMI error list to diagnose the errors from the last synchronization. For more help with WMI errors, lookup the Troubleshooting WMI errors wiki article.
To diagnose WMI problems, you can use the How to test WMI outside Octopus tool.
A falcultative option is also available WMI.AllNetworkAdapters.Enabled.
Enabling this setting will collect all physical network adapters (which correspond to hardware in the computer) - including wireless ones.
On the other hand, virtual NICs will not be included: VPN adapters, virtual NICs for internal routing, bridge to IPv6.
To request the addition of this option,, the authorized Octopus administrator must send a request to our ServiceDesk using the query Configuration / Data Modification.
Thank you, your message has been sent.