Table of contents
Introduction
Octopus can connect to a federated identity manager to ease access to the application in a hosted environment.
Single sign-on can be used independently for the following components, depending on what your federation provider supports:
- Web Portals for end users.
- Applications meant for assignees (Windows client (WinUI), WebTech).
Prior to considering this solution, make sure you have available resources and expertise to implement and support identity federation.
The required technical knowledge lies outside of our field of expertise.
Prerequisites
To enable integrated logon, you need to provide a federation infrastructure compliant with the following requirements:
- Use an Identity provider supported by Octopus.
- Active Directory Federation Services 3.0/4.0 (AD FS)
- All Octopus applications are supported by this federation infrastructure
- End users Application
- Web Portal
- Assignee applications
- WinUI
- WebTech
- End users Application
- All Octopus applications are supported by this federation infrastructure
- Identity Federation - Microsoft Entra ID
- All Octopus applications are supported by this federation infrastructure
- End users Application
- Web Portal
- Assignee applications
- WinUI
-
WebTech
-
Octopus 5
- End users Application
- All Octopus applications are supported by this federation infrastructure
- Active Directory Federation Services 3.0/4.0 (AD FS)
- Enable the appropriate technical configurations.
- Make your identity federation provider available on the Web.
- Activate required endpoints for all required applications.
- Configure your identity federation provider to trust the required relying parties.
- Use a SSL certificate recognized by a public certification authority.
- This step is mandatory to enable the Octopus client to connect to your environment without a Virtual Private Network (VPN) connection.
- Adjust your business processes to support your use of federated identities.
- Make sure there is a match between Octopus and federated identities.
- Configure desktops to support single sign-on.
Identity federation configuration possibilities being endless, Octopus cannot offer technical support on setting up these requirements; you must make sure that you have an internal resource with the appropriate knowledge.
How Identity Federation works
When you are using integrated authentication, Octopus is no longer responsible for authenticating users.
When a user attempts to connect, Octopus will forward the authentication request to your identity federation manager, and wait until it provides a session token.
The user's system will then automatically use the session token to authenticate in Octopus. If the user is recognized by your identity federation manager but doesn't exists in Octopus, it will automatically be created and assigned to the default group End User (Web Portal) and will have access to your Web Portal.
Each application uses different authentication endpoints that must be supported:
- General configuration
- Federation Metadata [/FederationMetadata/2007-06/FederationMetadata.xml].
- WinUI
- WS-Trust 1.3 - Kerberos [/adfs/service/trust/13/kerberosmixed].
- WS-Trust 1.3 - Password [/adfs/services/trust/13/usernamemixed].
- Web Portal
- SAML2.0/WS-Federation [/adfs/ls or /wsfed].
- Octopus Web (Octopus 5)
- OAuth2 [/adfs/oauth2/authorize].
- OAuth2 [/adfs/oauth2/token].
- OauthClient needs to be both enabled and configured.
The session token submitted to Octopus by your identity federation manager must contain the following claims:
- name
- Corresponds to the Windows Username field in Octopus.
- Corresponds normally to the sAMAccountName attribute in Active Directory.
- This field is used to establish the link between the identity provided by the manager and Octopus. In the context of Azure AD, consider the uniquePrincipalName of your Active Directory.
- This claim is mandatory.
- givenname
- Corresponds to the First Name field in Octopus.
- Corresponds normally to the givenName attribute in Active Directory.
- This claim is mandatory but is not used for any validation.
- surname
- Corresponds to the Last Name field in Octopus.
- Corresponds normally to the sn attribute in Active Directory.
- This claim is mandatory but is not used for any validation.
- emailaddress
- Corresponds to the Professional Email field in Octopus.
- Corresponds normally to the mail attribute in Active Directory.
- This claim is optional and not used for any validation.
Octopus Configuration
Once your federation manager is in place, you need to follow this procedure to finish setting up Octopus.
Activating integrated authentication is available only once your identity federation server has been tested.
Only an Octopus administrator with the following permissions is able to modify the Identity Federation parameters:
- General - Administer Octopus.
- General - Modify common team data.
- Applications - Access the Web Portal.
- Applications - Access to Octopus.
- Applications - Access Web Tech.
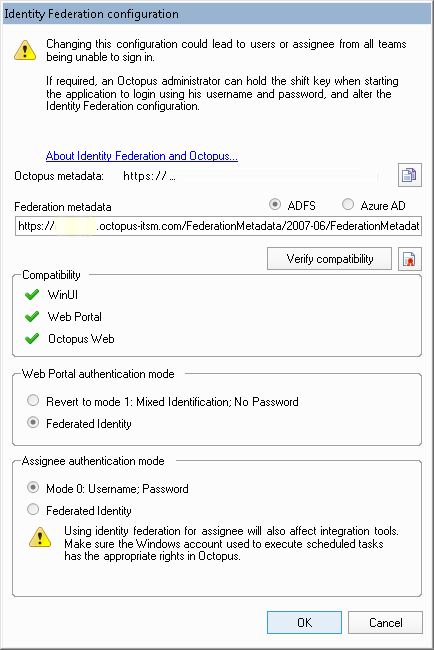
To access the configuration, use the Tools > Identity Federation Configuration menu.
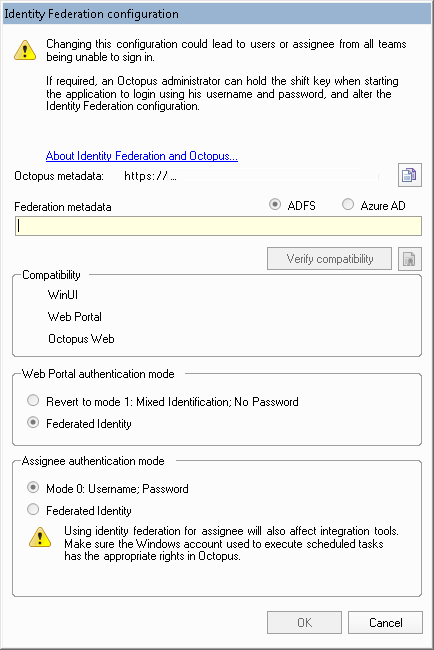
In the Identity Federation configuration window, you will find the link providing the Octopus Metadata to help you configure your Relying Party in ADFS. It is normal that this URL cannot be accessed directly.
You will be able to enter the address of your Federation Metadata file to verify its compatibility. The compatibility check will establish a connection to the Metadata service to determine what compatible endpoints are available before testing each one.
Once verification is complete, you will be able to activate federated identity independently for the users (Web Portal) or for assignee applications (WinUI, WebTech and Octopus 5).
Configuring ADFS 3.0/4.0 Relying Party
Generally, ADFS Relying Parties must be configured as such:
- Have a relying party for each environment you are using (production, test).
- https://clientname.octopus-itsm.com.
- https://clientname-test.octopus-itsm.com.
- Manually create a relying party for each legacy URL that you are using. If you do not use any legacy URL, you do not have to create those.
- https://app.octopus-itsm.com.
- https://app1.octopus-itsm.com.
- https://app3.octopus-itsm.com.
- https://app4.octopus-itsm.com.
- Each relying party must refer to a single URL endpoint.
-
Each relying party must use the WS-Federation Passive protocol.
- No relying party must encrypt it's token.
- Octopus offers a Metadata service that allows you to easily configure a relying party.
Relying Party Configuration
The use of multiple authentication factors, authorization restrictions, changes to claims rules, and aggregation of multiple identity sources is beyond the scope of this procedure. Refer to your identity federation specialist for more information.
To configure a Relying Party using the least amount of feature, use the following procedure:
- Obtain the metadata URL for the appropriate environment by going to Tools > Identity Federation Configuration and clicking on the copy button at the end of the Octopus Metadata line. The URL will look like https://client_name.octopus-itsm.com/API. Although that URL cannot be accessed directly, your ADFS server will know how to access the relevant information.
- In your ADFS server, add a new relaying party trust.
- In the Select Data Source step, copy the metadata URL in the prompt for Federation Metadata Address, then click Next.
- In the Specify Display Name step, use a name descriptive enough (for example, https://client_name.octopus-itsm.com), then click Next.
- In the Configure Multi-factor Authentication step, choose to skip multi-factor authentication, then click Next.
- In the Issuance Authorization Rules step, choose to permit all users access to this relying party, then click Next.
- In the revision step, make sure only one identifier is used, that encryption is not configured, that claims are present in the list (Name, Given name, Surname, E-mail address), and that the unique endpoint uses WS-Federation passive, then complete the assistant.
- From the contextual menu for the relying party configured, edit the claim rules to add a rule.
- Choose to send claims using a custom rule and specify the following rule :
c:[
  Type == "http://schemas.microsoft.com/ws/2008/06/identity/claims/windowsaccountname",
  Issuer == "AD AUTHORITY"
  ]
=> issue(
  store = "Active Directory",
  types = (
    "http://schemas.xmlsoap.org/ws/2005/05/identity/claims/name",
    "http://schemas.xmlsoap.org/ws/2005/05/identity/claims/emailaddress",
    "http://schemas.xmlsoap.org/ws/2005/05/identity/claims/givenname",
    "http://schemas.xmlsoap.org/ws/2005/05/identity/claims/surname"
    ),
  query = ";sAMAccountName,mail,givenName,sn;{0}",
  param = c.Value
);
Configuring Microsoft Entra ID
Refer to the following article for integration with Microsoft Entra ID : Identity Federation - Microsoft Entra ID
Verifying compatibility
Before verifying compatibility, make sure all instances of your default browser are closed.
Once the verification is started, Octopus will attempt to validate compatibility with your authentication server. The verification will have the following behaviour:
- WinUI: no apparent behaviour, as this attempt is made in the background. You could have to manually login in the context of Azure AD.
- Web Portal: the Web Portal and Web Tech will be launched in a new browser window. You could have to manually login. A message will confirm if it's working.
- Octopus Web: the Octopus 5 application will be launched in a new browser window. You could have to manually login. A message will confirm if it's working.
Activating Identity Federation for End Users (Web Portal)
When you are ready to switch over to centralized authentication for users, select Federated Identity in the appropriate box and click on OK. This change will have the following impact:
- Your application will restart.
- Authentication mode changes will apply to all teams. Make sure you have performed all relevant tests to prevent users from being unable to access.
- As this operation will expire all current authentication tokens, users actually connected to the Web Portal will have to sign-in again.
- At any time, come back to this option dialog to go back to the previous authentication mode, for which all parameters have been saved.
Activating Identity Federation for Assignees (WinUI, WebTech, Octopus 5)
When you are ready to switch over to centralized authentication for assignees, select Federated Identity from the appropriate box and click OK. This change will have the following impact:
- Your application will restart.
- Authentication mode changes will apply to all teams. Make sure you have performed all relevant tests to prevent assignees from being unable to access.
- As this operation will expire all current authentication tokens, assignees could have to restart their application.
- At any time, come back to this option dialog box to go back to the native authentication mode.
Scheduled tasks and integration tools
Special considerations must be given to the accounts used to run integration tasks:
- Integration tools (MailIntegration, ADSIReader, etc.) will present to the identity provider the same identity that has been configured to run the scheduled task. You must make sure that the account used are recognized by ADFS / Azure AD.
WARNING:
Make sure you don't enable the use of multifactor authentication (MFA) for accounts executing administration tools when these are used as part of a scheduled task in Windows.
- The identity provider will then present to Octopus the same identity. It must at a minimum be associated with an Octopus user account bearing the same Windows login name, having at least a Batch license and an associated role.
- When enabling identity provider on your environment, the /Login and /Password switches will become superfluous. However, the /Team switch must remain.
- Keep the superfluous switches: you will receive a warning, which you can safely ignore. In case of rolling back authentication mode, the jobs will continue working.
- Remove the superfluous switches: you will no longer receive a warning. In case of rolling back authentication mode, the jobs will stop working, and you will need to add them back.
WARNING:
In the context of Azure AD, it is recommended to specify the /Login switch. Windows caches the various Azure accounts with which users have authenticated to the workstation. To avoid conflicts, the presence of the /Login switch will ensure that the appropriate user account is used.
FAQ Related to Setting Up Identity Federation
If my Federated Identity service is unavailable, how can I connect to Octopus?
In case of an Identity Federation manager outage, see troubleshotting guide.
- No user will be able to access any application while the manager is unavailable.
- Only assignees able to modify Identity Federation parameters will be able to login. To access the application, they will have to hold the shift key to be prompted for the old authentication using username and password. They will then be able to revert to the previous authentication mode.
If needed, the Octopus Service Desk can help you reset an administrator's password to access back the application in case it was forgotten.
How can I activate OAuthClient on my ADFS server?
From a PowerShell command prompt, enter the following command and replace "mysite" with all the site names that could be invoked in your environment:
Add-AdfsClient -Name "octopus-itsm.com" -ClientId "octopus-itsm.com" -RedirectUri @("https://mysite.octopus-itsm.com/", "https://mysite.octopus-itsm.com/octopus/", "https://app.octopus-itsm.com/mysite/", "https://app.octopus-itsm.com/mysite/octopus/", "https://app1.octopus-itsm.com/mysite/", "https://app1.octopus-itsm.com/mysite/octopus/", "https://app2.octopus-itsm.com/mysite/", "https://app2.octopus-itsm.com/mysite/octopus/", "https://app3.octopus-itsm.com/mysite/", "https://app3.octopus-itsm.com/mysite/octopus/"  )

Enable-AdfsEndpoint -TargetAddress "/adfs/oauth2/"
- Make sure your site name is all lowercase.
- Make sure you include the trailing slash in each Redirect URI.
Some ADFS server versions might require permission to be granted using the following command, replacing your relying party URL:
Can Octopus work with other identity providers supporting the WS-Federation Standard?
While theoretically, other providers compliant to the standard could work, none of them have been tested. Actually, the combination of functioning and tested product is to make Octopus work with ADFS 3.0/4.0 behind an ADFS 3.0/4.0 Proxy or an Azure Active Directory.
If you have another conform system which is not yet supported, you can still try and use the verify function to see if Octopus is able to use the system to authenticate.
How to allow auto-logging for Chrome and Firefox?
By default, ADFS 3.0/4.0 does not allow Kerberos/NTLM auto-logging for all browsers. Therefore even if the user is inside the corporate network he is redirected to a login page instead of benefiting from true auto-logging.
Here are useful links to help you understand and resolve this issue:
- Allow Chrome to automatically sign-in internally
- Configuring intranet forms-based authentication for devices that do not support WIA
Which icon can I use to publish Octopus on the Office 365 Portal ?
Use the following image to publish Octopus on your Office 365 Portal
How can I troubleshoot the unique authentication when it does not work ?
The same way that you would troubleshoot most of the other secured services that you offer on the Internet:
- From a global point of view, make sure that the DNS correctly resolves your proxy server.
- That your firewall authorizes secured communications to your proxy server.
- That your proxy server receives connection attempts from your customers/users.
- That the ADFS service works properly on your proxy server.
Our team does not have the expertise to deploy a federation service. Can you supply a provider name that could help us in reaching our goal ?
Unfortunately, Octopus cannot recommend any provider at the moment.
Thank you, your message has been sent.