
Welcome to the 3.8.130 release notes of Octopus!
Winter is already at our doors. It is with great pleasure that we present you the 3.8.130 version that contains additional features that you will appreciate. Since this is a minor version, we take this opportunity to make a summary of the changes made in recent months.
As always, we highly recommend that you read these notes so you can make the most out of our current and soon to come Octopus features.
Happy Holidays!
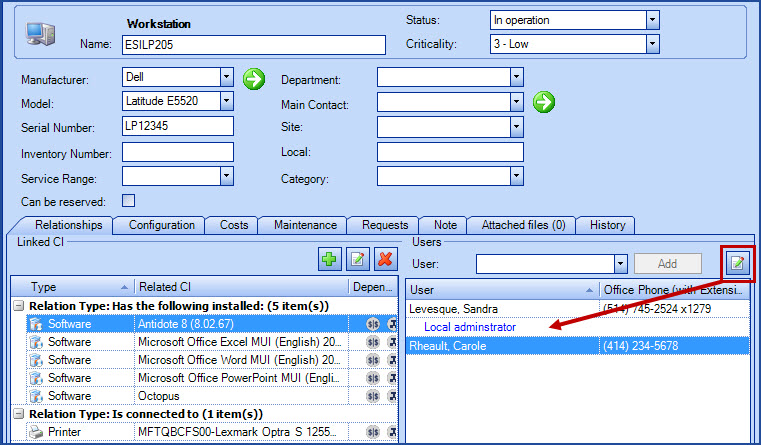
relationship between a user and a CI
Edit the relationship between a user and a CI
It is now possible to add a comment to the relationship between a user and a CI.
To do this, you must click on the edit the relationship button,enter the comment and click on OK.
The comment will appear in blue underneath the user's name.
Web portal
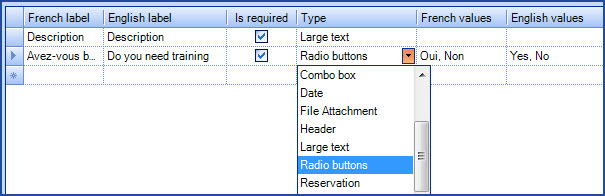
Radio Buttons available for the Web forms
Radio buttons are now available for the Web forms. To use them, simply select Radio buttons in the Web Portal field type and enter the various choices in the French values and English values fields. The radio buttons are configured like the Dropdown list field.
To modify Web forms :
- Tools > Reference Data Management... > Service Request > Types > select the SR type to modify and go to the Web Portal tab
OR
- Tools > Reference Data Management... > Incident > Templates > select the incident template to modify and go to the Web Portal tab
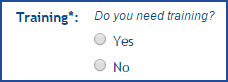
You will get the following result in the Web Portal
To modify Web forms, you must have the permission to administer Octopus.
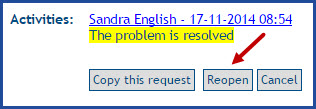
Allowing the reopening of a request from the Web Portal
A new option is now available from the Web Portal to reopen a resolved request. To use this option, you must view the request and click on the Reopen button located at the bottom of the request.
This option cannot be configured directly in Octopus, to activate/deactivate the option, please communicate with our Service Desk.
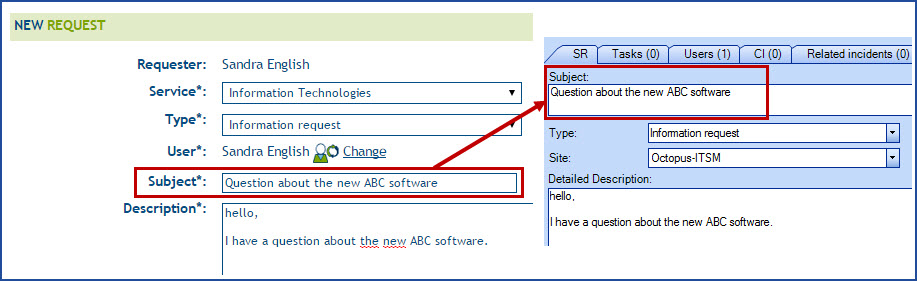
Custom Web Field linked to the request subject
It is now possible to link the subject field of a request with a subject field from a Web form. When a text field is named Subject (or Sujet), the field value will be transferred into the subject field of the incident or the SR and will not be written into the Description field, like the other custom Web fields. In addition, when the field is present in a Web form, it is always required.If various fields labeled Subject (or Sujet) are present in the same form, the first one will become the subject of the request and the others will be considered as standard Web fields, and will be transferred into the request Description. Only the Text fields with the right label (Subject or Sujet) will be taken into account.

Possibility for a manager to see the requests from all his departments
The option His department for requests visible on the Web Portal (Octopus tab of a user file) has by modified to His departments. When the option is selected, all requests of a manager's departments are now visible on the Web. Once on the Web Portal, when the user unchecks the option See my requests only, he will gain access to the requests of the department in his file and also to the departments for which he is the manager.
To modify or view the manager of a department: Tools > Reference Data Management... > General > Department, select a department and the information is displayed in the Manager field.
To modify or view departments, you must have the permission to Administer Octopus.
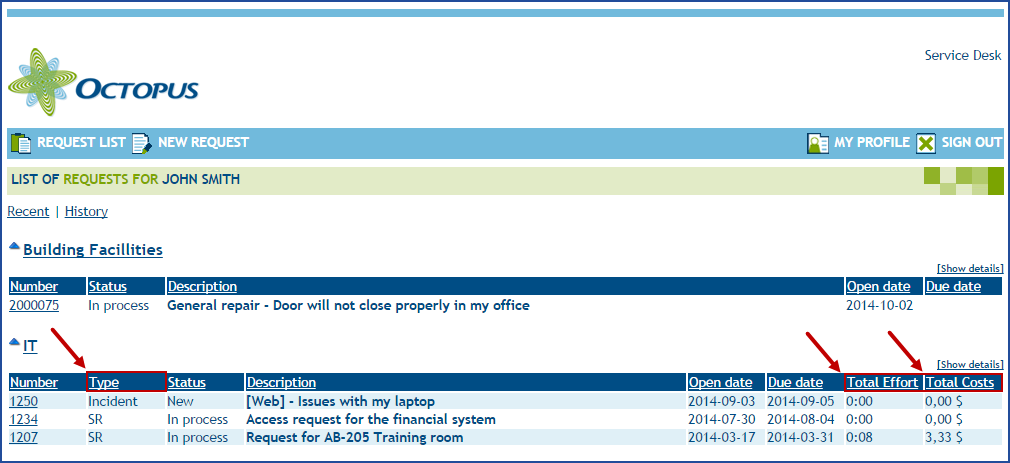
New columns available on the Web Portal
In some companies, services provided can be charged back to departments. To allow users to know which types of requests can be billable, the required time to process them and their costs, it is now possible to add 3 new columns that will be visible to users on the Web Portal. These columns are configurable by team, if needed.
- Type
- indicates if the request is an incident or a service request
- Total effort
- indicates the effort put into activities for a request
- Total cost
- indicates the total cost of the request. Includes activitiy efforts and additional costs of external labor or parts used to resolved the request
If you would like these columns, please contact us to make a request via our Web Portal. Two choices are available: the "Type" and/or "Total effort and cost".
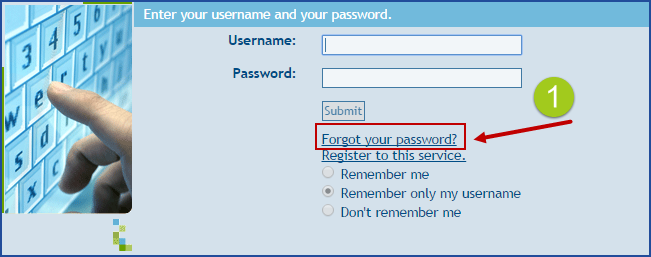
Change to the Web Portal password reset
The password reset procedure has been improved, notification of the reset request received by the user will now contain a link to a Web page to confirm the password reset. The password will not be sent automatically anymore. This link is valid for a 4 hour period. After the delay, a new password reset request must be made.To request a password reset, you must:
- Click on the "Forgot your password" link on the Web Portal
- Enter your email adress
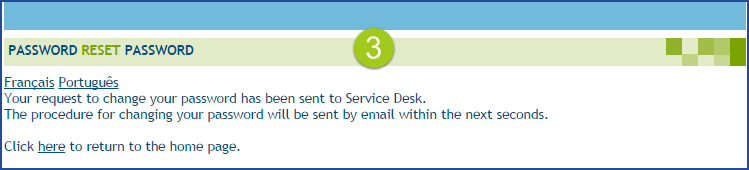
- A confirmation message will appear on the screen, mentioning that your request will be delivered to the service center and that the password request procedure will be sent to you by email
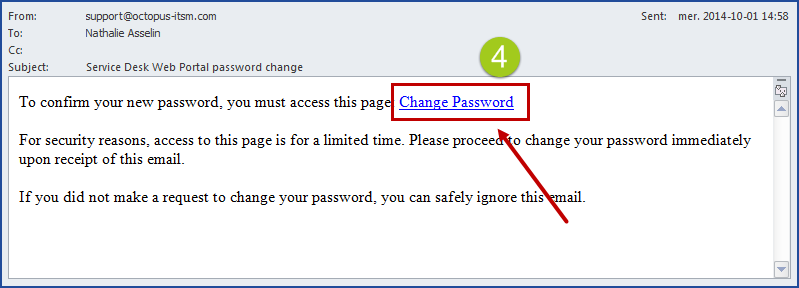
- An email will be sent to the provided address. Click on the "Password reset" link from the message
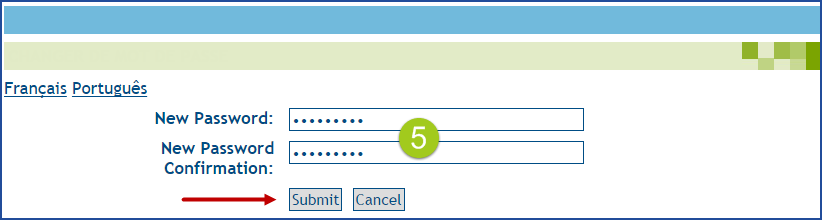
- The password reset page will open. Enter a new password, submit it, then the Web Portal will open
The reset link inside the email is valid for 4 hours only.
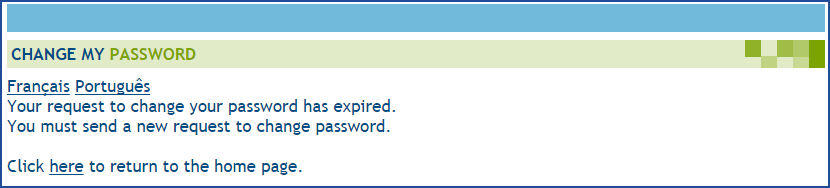
If you take more than 4 hours to click on it, the system will provide the following message "Your request to change your password has expired. You must send a new request to change password" and you will have to restart the process. This delay can be changed if required by our Octopus Service Desk.
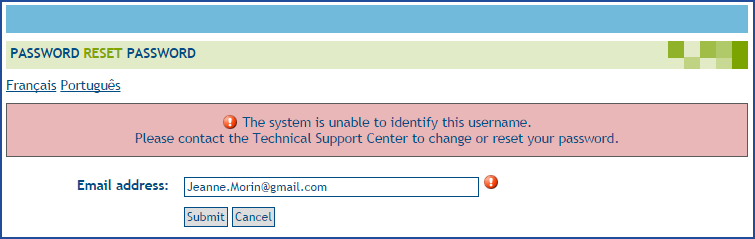
IMPORTANT: You must use your Octopus account email address . If you try to do a password reset with another email account, you will get the following error message "Unknown email address".
If you use another email address that is not related to your account, you will get the following message
If you wait more than 4 hours before using the provided link, you will receive the following message
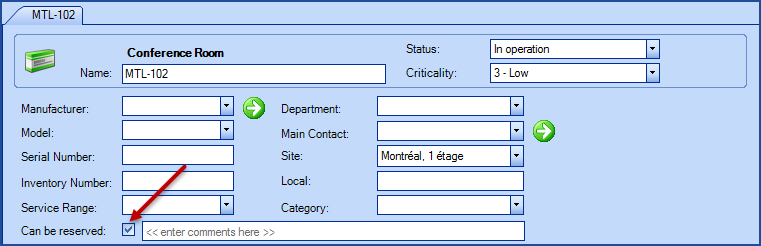
New reservation management option
In order to allow users to make room or equipment reservations from the Web Portal, we have created a new type of field to be used in Web forms and we have added the Can be reserved field in the CI file.The Reservation field links the reservation request to the CI representing the item being reserved. This new type of field can be used by itself or combined to other questions in the Web form, to add a task to prepare the room for example.
To manage this type of request you need to have the Octopus administrator permission and proper knowledge of how to configure Web forms.
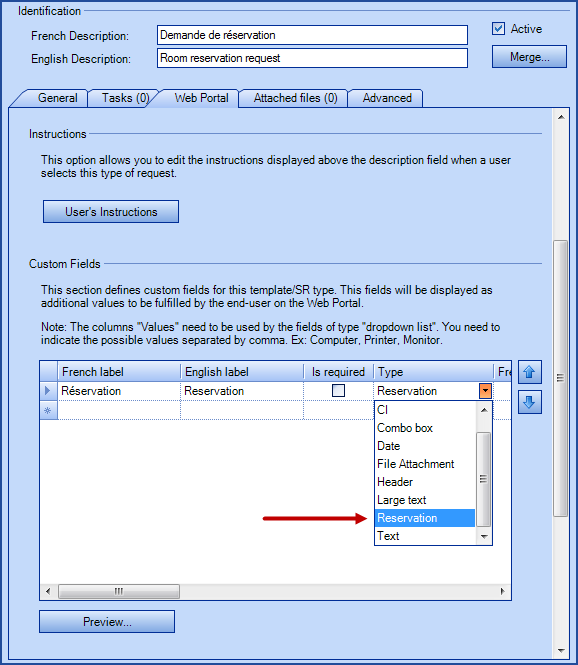
Follow the link to see a document detailing the use of Reservation Management.
ADSIReader
ADSI Reader - Added parameters to detect from another domain
Two new parameters were added to allow detection from a domain different from the one which the current machine is connected:- /DomainUserName
- /DomainPassword
For more information see the ADSIReader -Integration to Active Directory page.
ADSIReader - exploring active directory sub groups
The ADSIReader tool can now explore the Active Directory groups embeded to the groups specified in the reference data management.
For example: if the AD group named "Parent" is associated to an Octopus user group that contains the group "Child" that also contains users; the Octopus group will be updated with members from both "Parent" and "Child" groups.
Embeded groups must be part of the same domain to be correctly explored.
Octopus user groups can now refer to multiple Active Directory groups
The configuration of an Octopus user group can now refer to multiple Active Directory groups.
Each Active Directory group must be specified by its distinguished name, one per line.
You can also use the button to explore and select the desired group from the visible groups list of your domain.
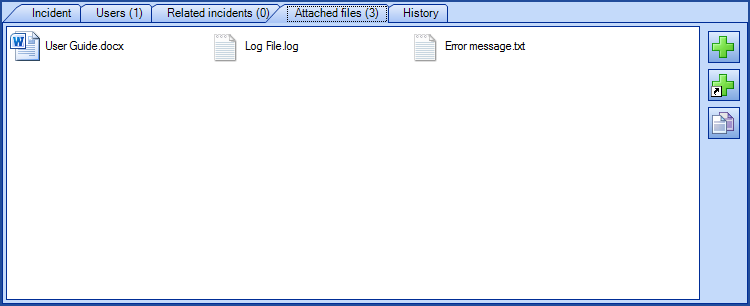
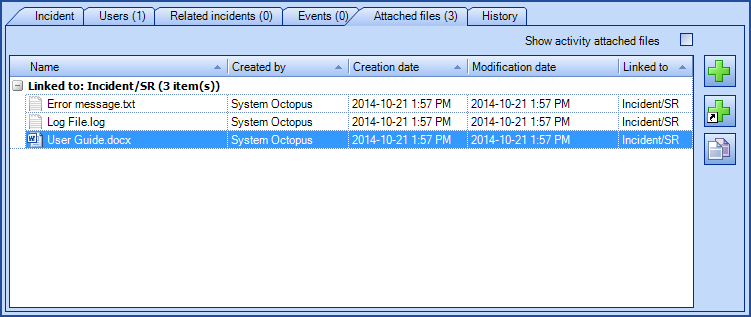
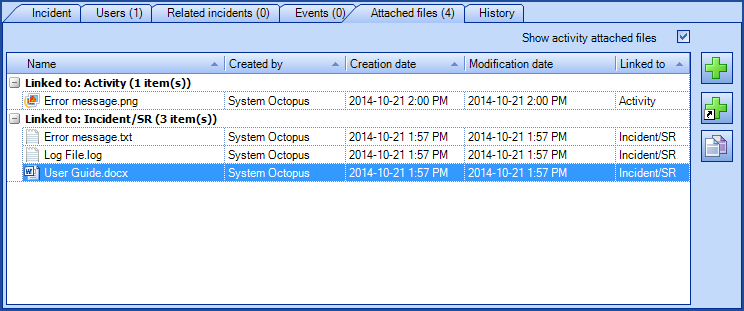
Changes to the display of attachments
- Name
- Created by
- Creation date
- Modification date
- Linked to
Before version 3.8.100
From version 3.8.100 on
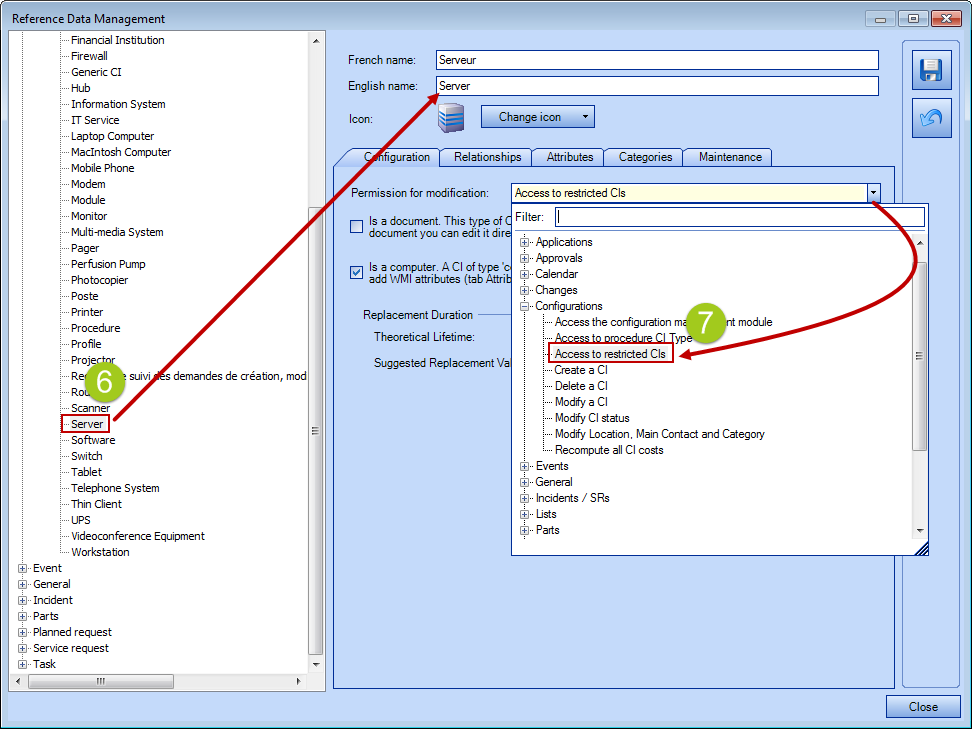
Possibility to restrain the modification of ci Types
This is done through custom permissions in relations to restricted CI types.
Here are the steps to render a CI type in Read only mode:
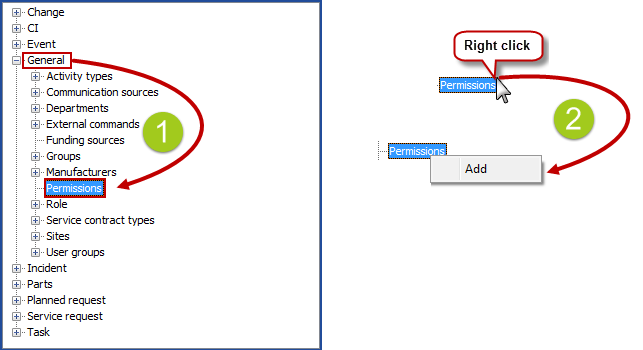
Creation of custom permissions
- From Reference data management, go to "General", then "Permissions"
- To create a new permission, right click on "Permissions" and then click on "Add"
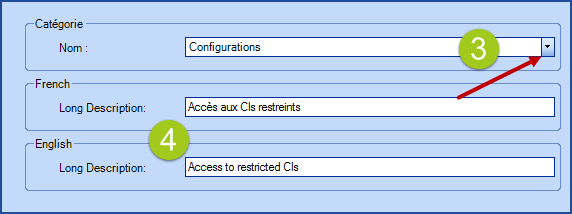
- Since this permission will be part of the whole list of Octopus' permissions, you must select under which category it will appear
- Give it a French and English name under Long Description
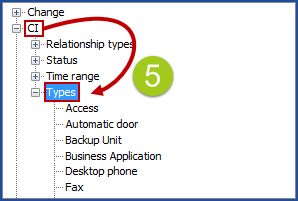
CI Type restriction
- From reference data management, go to the "CI" node, then "Types"
- Choose the CI type to be restricted
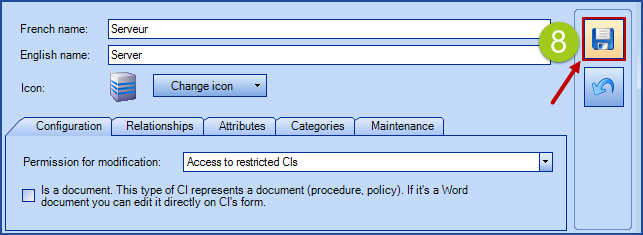
- In the field called "Permission for modification", select the custom permission previously created
- Save the changes. If more than one CI type must be restricted, repeat the same steps
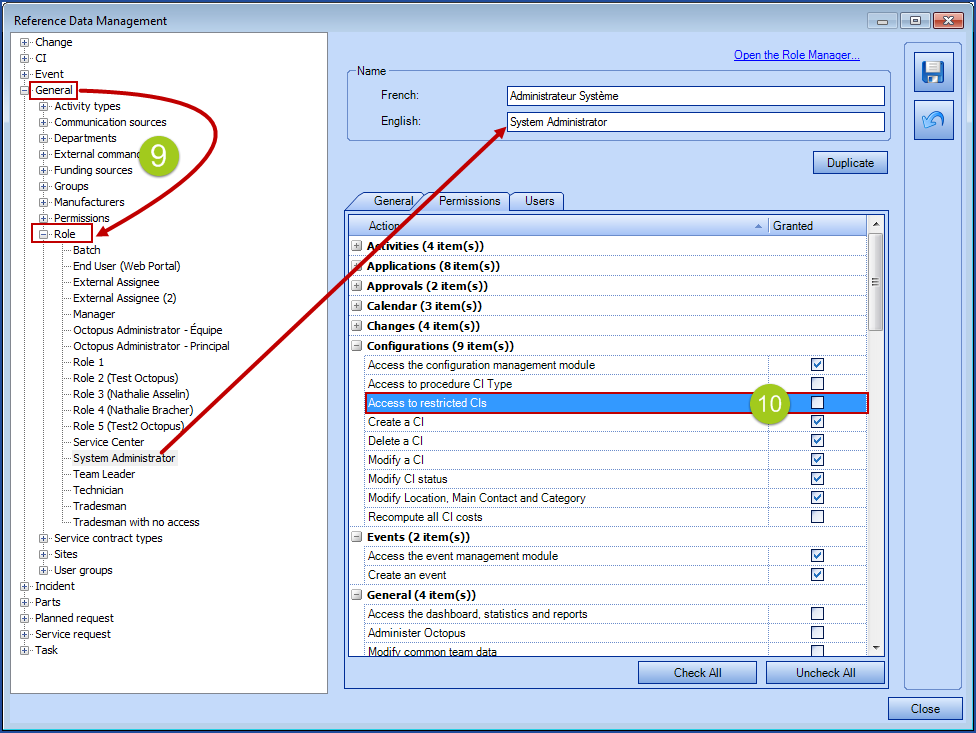
Manage the new permission in the roles
- From reference data management, go to the "General", then "Roles"
- Add the custom permission previously created to one or more roles given to Octopus users
To learn how to provide roles to Octopus users, please see wiki on Role Management.
You must have the permission to administer Octopus to make the required modifications in the reference data management.
GROUPs and User GROUPS - Improved Member Search
In the Groups form (or User groups), the left list containing members and managers has been replaced by a list field allowing a user search like the one used in requests.
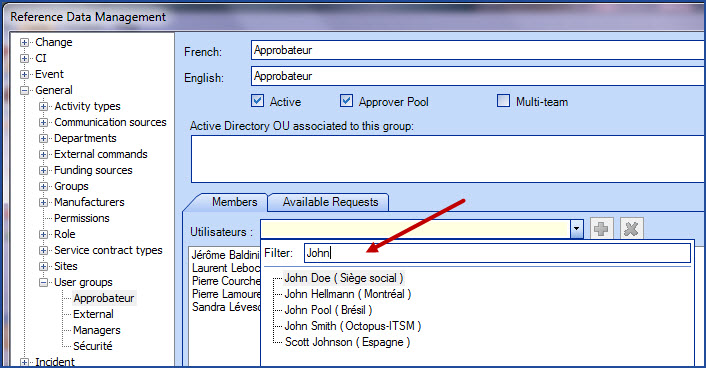
To modify groups, you must have the permission to administer Octopus.
To access it, go to Tools > Reference Data Management... > General > Groups (or User Groups)
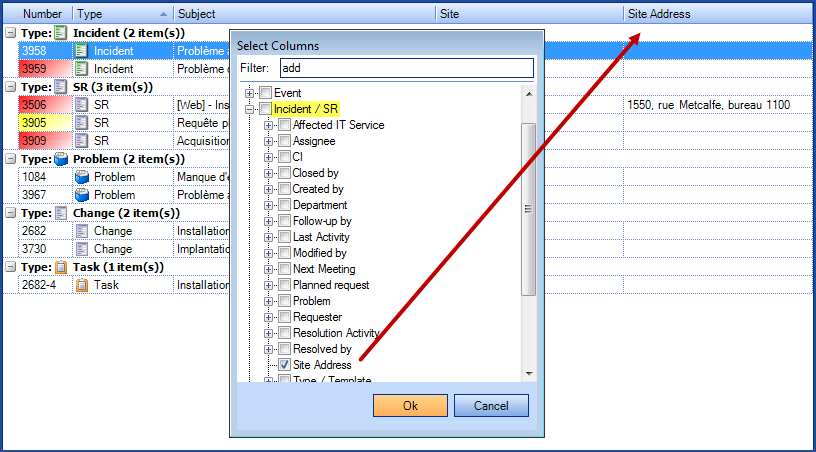
New Site address column
The information in the Address field of your sites can now be displayed as a column and can also be searched. You can find this column the Incident / SR lists.
- Sites can be configures from the Tools > Reference Data Management > General > Sites menu.
Copying the current tab title
You can rapidly copy the request number or any other information related to the current tab
To do this, you must:
- Right click on the current tab
- Select "Copy the tab title"
- Paste the copied information where you want
The pasted information will be different based on the copied data. For example, you will get the following results when you will copy:
- a request number : SR #3909, Incident #3955, Problem #1084 or Change #2682
- a task number : Task #3909-1
- a list : My assignments (12)
- a CI : PC-1234567
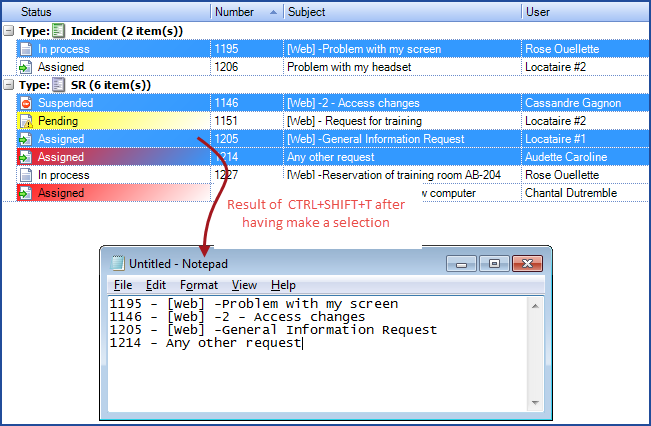
Copying a selection in a list
Furthermore, it is possible to rapidly copy the request number and subject from a multiple selection.
Use the following steps:
- Open the desired list or do a search
- Select the desired items
- Press the CTRL+SHIFT+T keys
-
Paste the copied information where you want to
IMPROVEMENTS TO PLANNED REQUESTS
Thank you, your message has been sent.