Table of contents
Introduction
This article explains how to proceed to import planned requests.
See the DataImporter - Import CI Linked to Planned Requests article to find out how to import the specific CIs related to the planned requests.
References
 The reference template files (.xlsx et .xml) to prepare imports are included in the PlannedRequests.zip file.
Required Fields
- Type - Text (100)
- Determines if it is a Change or a Service request (SR).
- Accepted values are: Change or Service Request (SR).
- ScheduleMode - Text
- Represents the request creation frequency.
- Accepted values are: One time, Daily, Weekly, Monthly or Variable Interval.
- AssignmentMode - Text
- Represents how the request will be assigned at its creation.
- Accepted values are: As defined in the CI (or CI Type), As defined in the type / template or Custom.
- If the As defined in the type / template is used you need to specify the Template.
- CISelectionMode - Text
- Represents how the CI will be associated to the planned request.
- If no CI are associated, select: No CI.
- Accepted values are: No CI, CI type, CI Model, or Custom CI.
Optional Fields
Several fields offer the possibility of putting more than one value separated by a comma. However, there must be no space between the items and the comma.
- Number - Numeric
- Represents the number of the planned requests.
- This field must be used only for updates. When adding a new planned request, it must be empty, because the system will assign a number.
- Category - Text (100)
- Planned requests can be categorized to improve management or organization of planned requests.
- If the category does not exist, it will automatically be added.
- EstimatedEffort - Text
- Represents the estimated effort of the planned request.
- Format HH:MM:SS (in Excel the column must be in text format).
- The effort must be between 00:01 and 99:59
- For example, for one and a half hour, write 01:30 in the column.
- A day value is converted into hours. For example, 1 = 24 hours, so 24:00.
- When the minutes exceed 59, they are converted into hours. For example, 0:75 = 1:15.
- If there are seconds added, they are ignored. For example, 1:10:25 = 1:10.
- Note - Text
- This field can be used to enter an additional description to the planned request. The column can then be added to different lists in the Planned request module.
- This field is replaced by imported data upon each import. The program does not add information, but replaces it.
- IsActive - Boolean
- Determines if the request will be active immediately. If it is not, it will need to be manually activated directly in Octopus OR use the AutomaticActivationDate below.
- Accepted values are: 1 or 0, True or False, Yes or No.
- LastRequestCompletionDate - Date
- This field allows to add the last completion date.
- Valid only if the IndividualRequestPerCI field is False.
- NextRequestPlannedDate - Date
- This field allows to add the next planned date.
- Valid only if the IndividualRequestPerCI field is False.
- Invalid if a request is presently active, that the schedule mode (ScheduleMode) is at variable interval and is after Completion.
- AutomaticActivationDate - Date
- Date when the task will automatically be activated.
- If empty, the task will not be activated automatically.
- The date must be in the future.
- AutomaticActivationDate - Date
- Date when the task will automatically be deactivated.
- The date must be in the future.
- OnceExactDate - Date
- NOTE, this field is mandatory if the schedule mode is One time.
- Example: 2013-07-15.
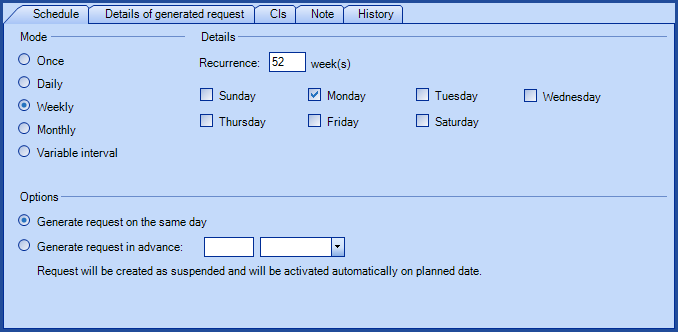
- Recurrence - Numeric
- NOTE, this field is mandatory if the schedule mode is Daily or Weekly.
- For an annual occurrence, use Weekly with 52 as the recurrence.
- Example: 1
- WeeklyMode - Text
-
NOTE, this field is mandatory if the schedule mode is Weekly.
-
Accepted values are: Recurrent, Select weeks.
-
Exemple : Selected weeks.
-
-
WeeklyWeeks - Text
-
NOTE, this field is mandatory if the schedule mode is Weekly.
-
To indicate multiple selections, separate them by comas.
-
Accepted values are: 1,2,3,4,5,6,7,8,9,10,11,12.... up to 53.
-
Example: 2,26,40.
-
- WeeklyDays - Text
- NOTE, this field is mandatory if the schedule mode is Weekly.
- To indicate multiple selections, separate them by comas.
- Accepted values are: 1,2,3,4,5,6,7.
- Example: 2,4,6.
- MonthlyMonths - Text
- NOTE, this field is mandatory if the schedule mode is Weekly.
- To indicate multiple selections, separate them by comas.
- Accepted values are: 1,2,3,4,5,6,7,8,9,10,11,12.
- Example: 2,6,10.
- MonthlyDays - Text
- NOTE, this field is mandatory if the schedule mode is Monthly.
- Non compatible with the MonthlyPeriods and MonthlyPeriodDays.
- To indicate multiple selections, separate them by comas.
- Accepted values are: 1, 2, 3, 4, 5, 6, 7, 8, 9, 10, 11, 12, 13, 14, 15, 16, 17, 18, 19, 20, 21, 22, 23, 24, 25, 26, 27, 28, 29, 30, 31 or Last.
- Example: 15,Last.
- MonthlyPeriods - Text
- NOTE, this field is mandatory if the schedule mode is Monthly.
- Non compatible with MonthlyDays.
- To indicate multiple selections, separate them by comas.
- Accepted values are: 1, 2, 3, 4 or Last.
- Example: 2,Last.
- MonthlyPeriodDays - Text
- NOTE, this field is mandatory if the schedule mode is Monthly.
- Non compatible with MonthlyDays.
- To indicate multiple selections, separate them by comas.
- Accepted values are: 1, 2, 3, 4, 5, 6 or 7.
- Example: 2,4,6.
- VariableIntervalNumber - Numeric
- NOTE, this field is mandatory if the schedule mode is Variable Interval.
- Example: 1.
- VariableIntervalUnit - Text
- NOTE, this field is mandatory if the schedule mode is Variable Interval.
- Accepted values are: day, week, month or year.
- Example: Month.
- VariableIntervalAfter - Text
- NOTE, this field is mandatory if the schedule mode is Variable Interval.
- Accepted values are: Creation or Completion.
- Example: Completion.
- CreateRequestAheadNumber - Numeric
- Represents the number of days, weeks or months the request will be created in advance.
- Example: 5.
- CreateRequestAheadUnit - Text
- Indicates if the request will be created in advance in days, weeks or months.
- Accepted values are: day, week or month.
- NOTE, this field is mandatory if the CreateRequestAheadNumber is specified.
- Example: day.
- Template - Text
- Must be the name of an existing SR type if the Type field is Service Request (SR) or the name of a change template if the Type is Change.
- Example: 'Update Holiday Calendar.
- Subject - Text (500)
- Use this field to give a specific name to the request instead of the name constructed from the template, the CI name and the date.
- Group - Text
- This field must be used only if the Type is Service Request (SR).
- NOTE, this field is mandatory if the Assignment mode is Specific.
- Example: Service Desk.
- Assignee - Text
- This field must be used only if the Assignment mode is Specific.
- The user must be a member of the group specified in the Group field.
- Must be an Octopus user.
- Example: Alice Tremblay.
- User - Text
- This field can be used to specify the user of the generated planned request.
- If this value is not specified, the request will automatically be generated with the default user.
- Example: Bob Sinclair.
- Site - Text
- Represents the specific site that will be associated to the planned request.
- If this value is not specified, the request will automatically be generated with the default site.
- Example: Quebec.
- Procedure - Text (65000)
- Represents the procedure that will be added in the Description field of the request.
- CIType - Text
- Required if CISelectionMode is CI Type or CI Model.
- Example: Printer.
- CISiteSelectionType - Boolean
- By default, this value is at All Sites, so all the CIs from all sites are included.Even the ones with no sites.
- Accepted values are: All Sites, Specific Sites.
- Specific Sites - Text
- NOTE, this field is mandatory if the CISiteSelectionType is Specific Sites.
- By default the child sites are included.
- Use a collum (;) between each specific site or sub-site.
- To specify sub-sites, use the vertical bar (|) or the comma (,) to separate the sub-sites in the hierarchy.
- Specify the separator used in the XML file with the SiteSplitStrategy tag.
- Example : Site 1; Site 2|Sub-site A; Site 2|Sub-site E.
- CIManufacturer - Text
- Required if CISelectionMode is CI Model.
- Example: Hewlett-Packard.
- CIModel - Text
- Required if CISelectionMode is CI Model.
- Example: Laserjet 6000.
- IndividualRequestPerCI - Boolean
- By default, this value is set to yes, so one request per CI will be created.
- Accepted values are: 1 or 0, True or False, Yes or No.
Configuration File (XML)
The declaration of the source is done by indicating the PlannedRequest value in the <Content> tag.
<?xml version="1.0" encoding="utf-8" ?>
<Sources>
    <Source Name="ImportPR">

<ConnectionString>Provider=Microsoft.ACE.OLEDB.12.0;Data Source=c:\Import\PlannedRequests.xlsx;Extended Properties="Excel 12.0 Xml;HDR=YES";</ConnectionString>
<ViewName>[Import PR$]</ViewName>
<Content>PlannedRequest</Content>


<!-- Additional tags -->
<UserIdentificationMethod>UserByWindowsUsername</UserIdentificationMethod>
<SiteSplitStrategy>ByPipe</SiteSplitStrategy>
<EmptyValueHandling>NoChange</EmptyValueHandling>
    </Source>
</Sources>
See the XML Configuration File article that explains how to program your tags.
Information on Additional Tags
To import planned requests, the XML file can contain additional tags. These tags are not mandatory and if they are not specified, the default values will be used.
The additional tags are case sensitive.
If the value is not written exactly the way it is documented, Octopus will ignore the tag and use to the default value.
Assignee Identification Method
In the XML file to import planned requests it is possible to specify how the assignee will be found. If this tag is not specified the default value will be the Windows Username.
Permitted values for the AssigneeIdentificationMethod tag:
- UserByID: Assignee employee number
- UserByName: First and last name of assignee (in the following format John Smith)
- UserByWindowsUsername (Default value): Windows username of the assignee. In the data source, the format with more than one username is not accepted, like "sile01;esil18". Only one username must be used.
To use this tag, add the following line to the XML file:
<AssigneeIdentificationMethod>VALUE</AssigneeIdentificationMethod>
Data Separator Management
When importing choices for categories, a separator must indicate the delimitation of the data.
The two choices are:
- The pipe ( | )
- The comma ( , )
To specify which separator to use in the file, the SiteSplitStrategy tag must be added to the XML file
Values allowed for the SiteSplitStrategy tag:
- ByPipe (default value)
- ByComma
To use this tag, add the following line in the XML file.
<SiteSplitStrategy>VALUE</SiteSplitStrategy>
If the tag is not specified in the XML file, the default value is applied.
Management of Empty Fields
DataImporter can help clean the data contained in Octopus when empty fields are encountered. If this tag is not present, the NoChange default value will be used.
If you want to use this tag as part of an import, it is important that your data source only contain columns to act on. DataImporter will systematically try to clean all these columns. You can clean all fields except:
- Required fields
- Fields that have been configured as mandatory in the Octopus database
- Fields that accept only specific values, for example boolean type fields (yes/no)
Permitted values for the EmptyValueHandling: tag
- Clear: The existing value in Octopus will be cleared and the field will be empty.
- NoChange (Default Value): Fields that are empty in the data source being imported will be ignored and the existing value in Octopus will be kept
To use this tag, add the following line to the XML file :
<EmptyValueHandling>VALUE</EmptyValueHandling>
Thank you, your message has been sent.