Table of contents
Creation from Octopus
All service requests can be created in Octopus by an assignee; those designated as visible on the Web portal can also be submitted directly by the user.
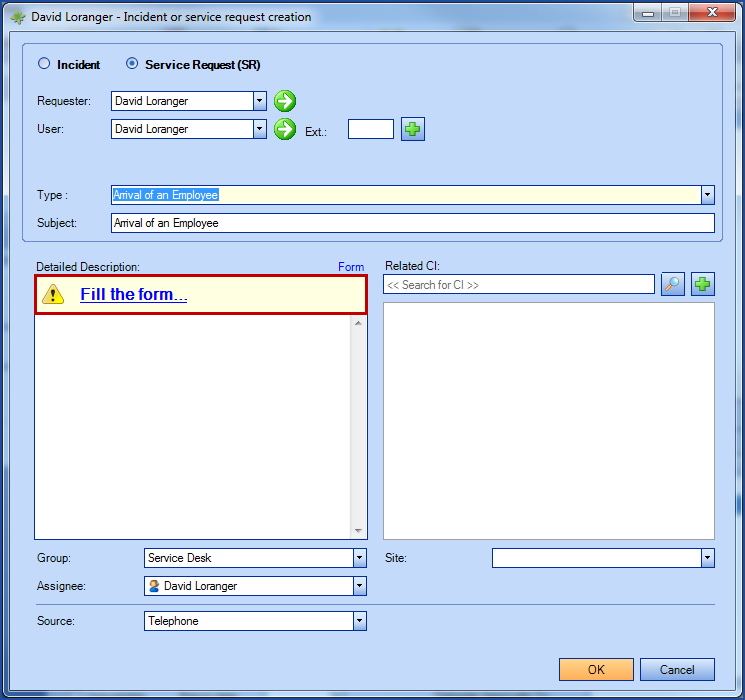
- From the Incident or service request creation window, select the Service Request (SR) button
/Creation_SR_EN.png)
- Enter information about the service request (SR):
- Select a service request type
- This selection is mandatory, so the list should reflect the services offered (see Basic configuration - Service Requests article for more details about the creation of a service request type)
- Enter a detailed description
- Add one or more related CIs, if any
- Assign a group and/or an assignee
- Select a service request type
- Click OK (before, the creator can select the Open the form checkbox if he wants to add information to the service request once it is created)
- If you go into the request you wlll be able to see the information captured, including the opening date and the due date
- or add the name of a second contact that can help with this request
/SRcreated_EN.png)
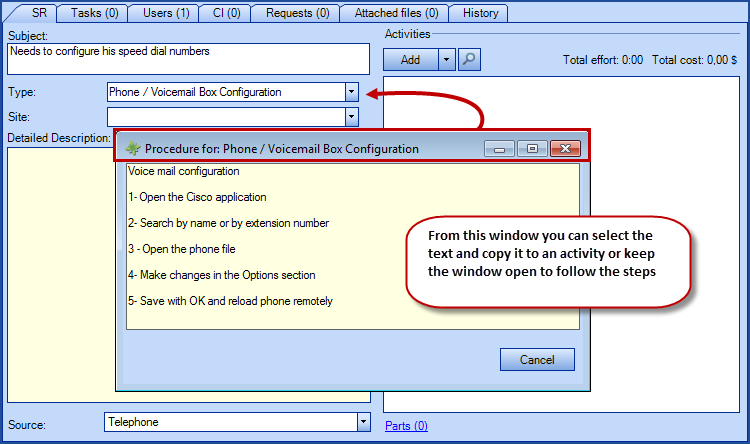
SR type with procedure or form
When creating a service request from within Octopus, if a Web form or a procedure exists for the selected type, a link called Form or Procedure will appear above the Detailed Description window.
/UtiliserType_EN.png)
Use the Form and Procedure links when they are available to help you with the data entry and the process to follow. If the form is mandatory, a yellow bar will prompt the technician to Fill the form.
/UtiliserFormulaireDeSR_EN.png)
/UtiliserFormulaireResultatsSR_EN.png)
/UtiliserProcedureSR_EN.png)
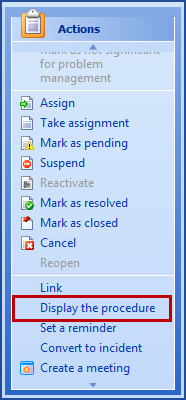
Action Display the procedure
The Display the procedure action is always visible; it will be grayed out if there is no procedure is there to consult and available if there is one. This information is configured from the Data reference management, see the How to add an internal procedure section of the Basic Configuration - Service Requests wiki for more information.
- When selecting a service request, the name is automatically copied in the Subject field, but it can be modified to one that is more precise.
- The Priority field is not applied in the same way for incidents and service requests (see Priority Definition and Basic Service Levels article. The execution of a service request is not based on evaluation of its priority level (as it is the case for incidents).
- The Source field indicates the incident's origin. By default, the source will be Telephone, but if the incident has been created from the Web Portal or by email, the field will automatically be modified accordingly to Web Portal or Email.
- If required, the default source can be modified by the Octopus Service Desk.
- The agreed service level targets for service requests are base on their delivery time, the the IT delivery performance will be based on those targets. Any request required more quickly than expected is considered an "accommodation" to the user. Even if the IT organization cannot execute the request according to this arrangement, it will not be penalized as long as the request execution is done within the initial agreement.
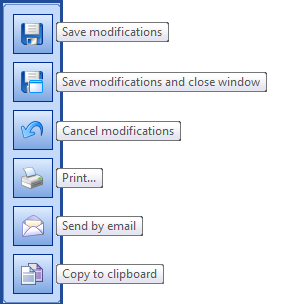
Useful buttons
To the right of an incident record, there is a list of buttons that allow us to quickly do very useful actions:
- Save modifications: Saves the modified items and stays in the incident window.
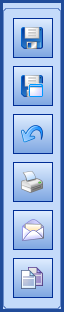
- Save modifications and close window: Saves the modified items and closes the incident window.
- Cancel modifications: Cancels the modification done since the incident was last saved and stays in the incident window.
- Print: Opens the Print window.
- Send by email: Allows sending the request by email outside of Octopus, by opening the email account and software (Microsoft Outlook, Lotus Notes, etc.) configured on the workstation.
When you click the button from within the incident:
- Octopus will offer to send the email to the following people, on the condition that they have an email address in their file: the requester, the user, the Octopus user, Other, All.
- Than, Octopus will open the workstation email software and copy the following items:
- In the email subject
- [Communication] Incident number, Subject
- In the email body
- Incident number, Subject
- Requester's name
- User's name
- Detailed description
- Activity log
- Copy to clipboard: Copies the following items to the clipboard so they can be pasted elsewhere:
-
Incident number, Subject
-
Requester's name
-
User's name
-
Detailed description
-
Activity log
-
Example of what is sent by email
/EnvoiParCourrielSR_1_EN.png)
/EnvoiParCourrielSR_2_EN.png)
Example of what is sent to the clipboard
/EnvoiAuPressePapiersSR_EN.png)
Creation from the Web Portal
Users can submit their own requests for those designated as visible on the Web Portal.
In addition to this accessibility on the Web, forms specific to the service request could be developed, in order to standardize and supervise the Service Fulfillment.
You can consult the following articles for more information about the Web Portal configuration :
- Identify Incident templates and SR types as visible on Web Portal
- Web Form Customization
- Web Portal Authentication Modes
- How to configure a user
How Service Requests link to other modules
Creation of a new request
There may be reasons to want to create other request types from an SR, for this we have two parts:
- The action to create from a Service Request (SR)
- The relationship types
From a Service Request the actions available are located at the bottom left you can:
- Create an incident or SR from ....
- Create a change
/SROtherModulesActions_EN.png)
The actions described above are available with the Octopus version 4 and on, via extension plug-ins that can be requested to our Service Desk.
The relationships that will link the Service Request to the other request will be dictated by the kind of request and the situation. The relations you can see are:
- Is related to
- Has been used to create
- etc
/SRRelatedOtherModules_EN.png)
Thank you, your message has been sent.