Table of contents
However, when the plugin for renaming sections is installed, the display order of sections in a Change is different from the default behavior.
Sections with content are displayed first. This behavior is due to the way the plugin was developed and cannot be changed.Related Articles
- Change Management - ITIL Process
- DataImporter - Import Change Status Transitions
- Project Management in Octopus
- Deployment Calendar
- Task Management
Introduction
This article describes the configuration and functional use of the module; you will also find elements explaining the link between the functionality and the best practices.
For starters, the Changes module allows you to capture and follow your changes in a centralized way, which is the first key factor in the improvement of change management. According to ITIL (refer to the Change Management - ITIL Process article for more information), all changes without exception should be recorded, validated, authorized, prioritized, planned, tested, implemented, documented and reviewed in a controlled manner. Indeed, any change performed outside of this context puts the stability and reliability of the infrastructure at risk, and consequently, the availability of related IT services. Depending on the organizational context, the scope of Change Management could vary, but some activities should not be neglected.
The Changes module gives you a structure that allows you to document, build, approve, test and follow all your changes. You should define in advance how you want to manage your changes and use the tool accordingly.
In establishing the bases for the process and the configuration of the tool, there is no need to aim for perfection. As surprising as it might sound, it is not unusual to see change "management" in an Excel spreadsheet - not to mentioned those who get implemented at any time of the day, without authorization, impact analysis, rollback plan or documentation. For many organizations, recording all changes in a change management tool will represent a major transition.
Creating a Change
Changes are created from the Changes module by clicking Create a change. This action opens the New change window.
A unique request number will be allocated once the change is created. Note that there are three mandatory fields to enter:
- Category
- Submitted by
- Subject
The following sections explain the content of the creation form.
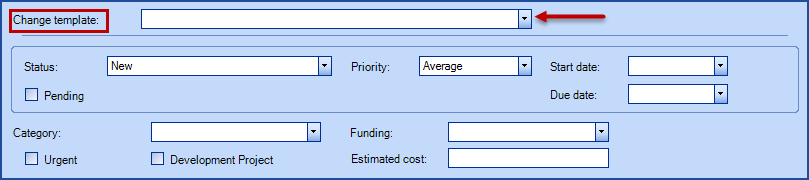
Top part of the Form
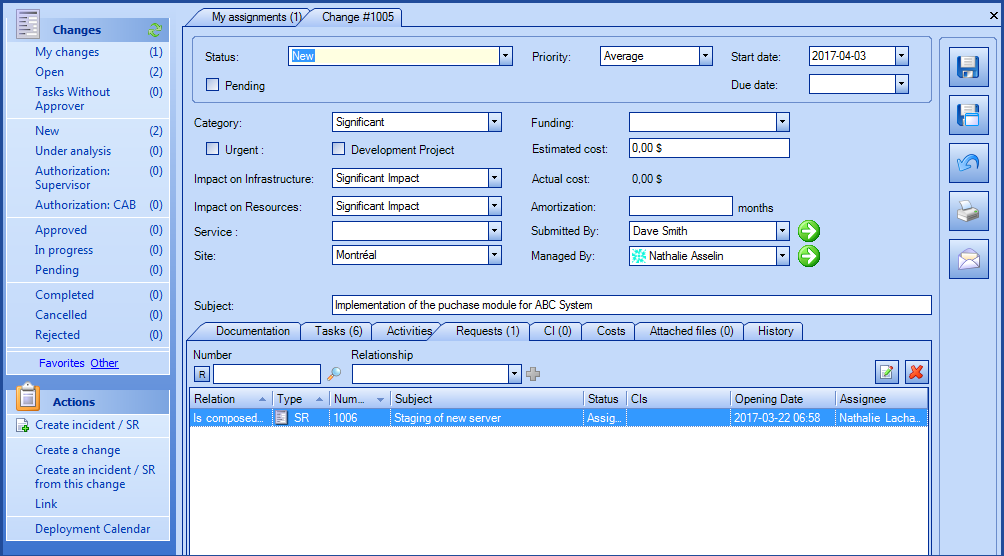
The New change form is split in two parts. Here is an image and a complete description of the fields.
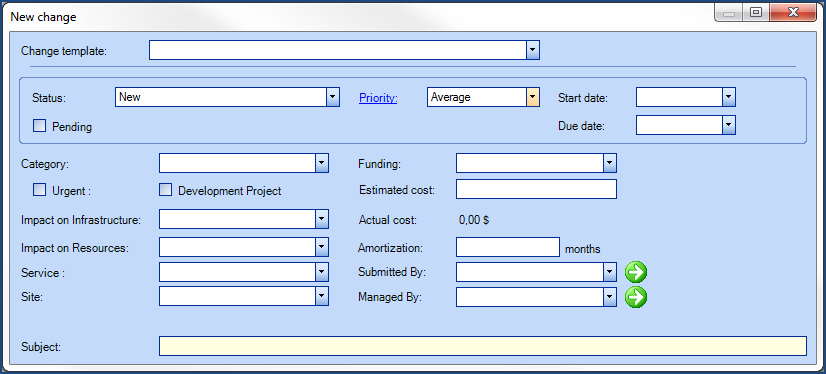
Description of Fields
- Change template: allows the selection of a template from the ones configured in Tools > Reference data management > Change > Templates. For more information, consult the Change Templates section
- Status: shows where the change is at within its life cycle. By default, the status is at New. The items from the Status list can be configured in Tools > Reference data management > Change > Status. For more information, consult the Status Management section.
To modify a status, click the down arrow on the right of the field. The status needs to be manually updated during the transition lifecycle until the change is at the Closed status. - Priority: the change priority is derived from the impact and urgency.To access these fields, click on the Priority link of the form..
- A priority is suggested at the beginning by the change initiator, but could be modified during the evaluation and approval processes of the change. The risk assessment is an additional factor to consider. The approval party will need information on the change in order to properly assess the implementation risks. The criteria used to prioritize a change are different from the ones applied to incidents. The impact is based on the benefit of the business once the change is implemented, the reduction of negative impacts or the cost when a change corrects an error. The urgency, is based on the timeline that we can afford to wait until implementation. Whatever they are, the documentation of the criteria - number of users affected, criticality of an application on the business, the extent of damages if the change goes wrong (risks), etc. contribute to an accurate evaluation of the change and increases its success.
- Priority values:
- High: the change severely affects key users, a large number of users or the business
- Average: no severe impact, but the change cannot be deferred until the next deployment - it must be planned in a relatively short time
- Low: the change is necessary and justified, but we can wait for an opportunity to arise (for example, a service interruption for another planned change)
- Priority values:
- A priority is suggested at the beginning by the change initiator, but could be modified during the evaluation and approval processes of the change. The risk assessment is an additional factor to consider. The approval party will need information on the change in order to properly assess the implementation risks. The criteria used to prioritize a change are different from the ones applied to incidents. The impact is based on the benefit of the business once the change is implemented, the reduction of negative impacts or the cost when a change corrects an error. The urgency, is based on the timeline that we can afford to wait until implementation. Whatever they are, the documentation of the criteria - number of users affected, criticality of an application on the business, the extent of damages if the change goes wrong (risks), etc. contribute to an accurate evaluation of the change and increases its success.
- Start date: the change can be recorded ahead of time, within a project, for example; perhaps we will want to indicate the beginning of the change. But it can be used other ways, for example the date when the change was assigned to a resource
- Due date: this field can be used to write the implementation date requested by the change initiator
- Pending: when the change needs to be put on hold to an unknown date, or for any other reason - when the box is checked, a justification is required
- Category: indicates the change category. This field determines the lifecycle that will be applied. The category can be configured in Tools > Reference data management > Change > Categories. For more information, consult the Categories Management section
- Funding: designates the funding source for the change, for example IT service, Client, or any other source. Items from this list are configured in Tools > Reference data management > General > Funding sources
- Urgent : indicates a normal change that needs to be implemented as soon as possible
- Development Project: this field is temporary and will eventually be removed from the form. It can be configured as a Project category in the Reference data management
- Estimated cost: currency type field to indicate the estimated cost of the change
- Impact on Infrastructure : indicates the extent of the risk on the infrastructure, whether if the CI related to the added or modified CI can also be affected by the change. For example, a change to a router can affect multiple sites who depend on this router. The possible values are:
- Major Impact
- Significant Impact
- Minor Impact
- Actual cost: total cost accumulation from the Cost tab as well as the total cost related to the efforts in the change activities. The estimated cost VS the actual cost allows to follow the financial aspect of the change
- Impact on Resources : indicates what the change requires in terms of the implication of resources for the change. The possible values are:
- Major Impact
- Significant Impact
- Minor Impact
- Amortization (month) : allows to record the amortization of the change, for example, a new application that would have a book value that needs to be amortized in a period of "x" months
- Service : allows to select a service impacted by the change, the items come from the Service type CIs of the Configurations module
- Submitted By: identifies the user who created the change, who can also be a technician. This field is mandatory to create a change
- Site : indicates the site affected by the change (restricted to one site)
- Managed By: identifies the technician managing the change - does not represent the change manager in the ITIL sense of the term
- Subject : text type field mandatory at the creation of a change
- Additional field: It is also possible for an administrator to add fields from the field configuration, Change section. After adding, the field is visible in a new tab: Additional Information.
- There is also an optional setting that we can modify to display these fields in the top section. Contact our ServiceDesk to modify the setting: RFC.AdditionalInformation.SupportsGridEdition.Enabled to False. This setting can be configured by team. Please specify the team name and number.
Lower Part of the Form | Tabs
The lower part of the New change form contains several tabs detailed bellow.

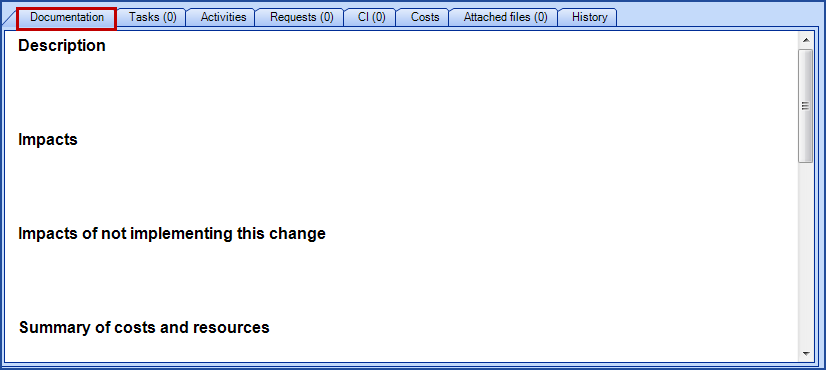
Documentation Tab
The Documentation tab allows to document the change and provide the Change manager the details required for the acceptance, the analysis and approval. Here are the sections:
- Description
- Impacts
- Impacts of not implementing this change
- Summary of costs and resources
- Risk assessment
- Contingency plan
- Planned downtime
- Communication plan
- Authorizations
As you document them, the fields will position themselves automatically to the list mentioned above.
Other types of changes (significant or major) could be managed in separate documents more formal. They can be joined as attachments to the change request.
NOTE: It is possible to modify the name of the fields or remove one or more default fields from the Documentation tab in the Changes Module.
A plugin is available to customize these sections. Note that an update to your database will be necessary.
Default fields:
|
|
However, when the plugin for renaming sections is installed, the display order of sections in a Change is different from the default behavior.
Sections with content are displayed first. This behavior is due to the way the plugin was developed and cannot be changed.
For more information or to modify these sections in your environment, download and fill in the Excel file and forward your Configuration/Data Change request to our Service Desk.
Tasks Tab
The Tasks tab can include approval, standard and notifications tasks related to the execution of the change (workflow). These tasks can be assigned to a group / assignee for execution. An assignee can document his actions by adding activities to the task without necessarily being assigned to it.
Note that the post implementation review, considered as as a best practice in change management, can be represented in a task to be executed before the closure of the change.
Tasks can be viewed in the list or graphic mode. See the Tasks Management article for more information on how to exploit tasks in Octopus.
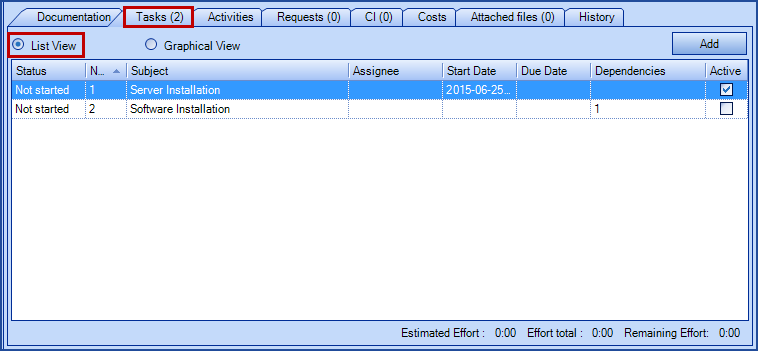
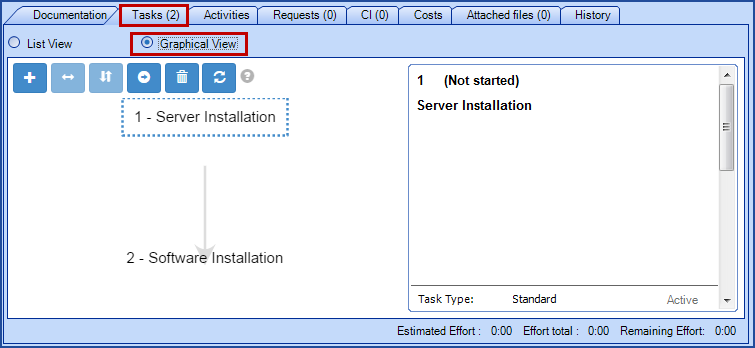
Deployment Task
A deployment task is a standard task that is intended for the deployment of a change. All deployment tasks will be considered in the Deployment calendar, which turns out to be a useful planning and communications tool. We consult it to plan changes that will not conflict with other or that can be deployed together, to identify the ones that require an interruption of service, the ones that provoke a degradation of service or that have no impact. The Deployment calendar can be consulted by the Octopus users.
Deploying multiple changes helps minimize the service interruptions. A best practice is to define a service range known to users where deployments will be executed to minimize impact on the business. It is important to consider the nature and the criticality of the services that will be interrupted or degraded as well as the frequency of the deployments.
Consult the Deployment Calendar wiki for more details.
Activities Tab
The Activities tab contains the log of all activities of a change. All the activities, weather added from a task or from the request will be consolidated in this tab.

Requests Tab
The Request tab allows to relate changes to other types of requests (incident, SR, event, problem, change).
For more information, consult the Request Relationships wiki.

CI Tab
The CI tab contains the CIs that are part of the change.

Cost Tab
The Cost tab contains the cost other than the ones included in the change or task activities (effort). Costs entered in this tab are directly computed in the Actual cost field.

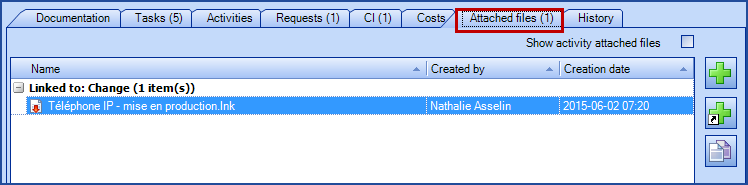
Attached Files Tab
From the Attached files tab, it is possible to add files to the change request; a form, an email authorization, the results of tests, a contingency procedure, meeting notes, post implantation review, in short, all documentation mandatory or not that is relevant to the change, that will make it easier to consult before, during or after the implementation.
History tab
The History tab keeps a list of changes made to the request done to the change. You can see the Initial Value, New Value, the date and time of the change and the Octopus user responsible.

Changes Module Configuration
Items of changes Categories, Status and Templates can be configured in Tools > Reference data management > Change.
Category Management
Add a category
- Go to Tools > Reference data management > Change > Categories
- Right click and select Add
- Enter the name of the category in French
- Enter the name of the category in English
- Enter its position in the list of categories
- Save

Deleting a Category
Right click on the category and select Delete.
It is not possible to delete a category that has already been used in a change. A possible choice then would be to Merge with another category.
To Find Out More On Categories
The change categorization allows to classify changes in order to apply the appropriate level of management based on the extent of change. We used the ITIL framework to identify the different categories of change. To understand this categorization structure, here's an illustration:
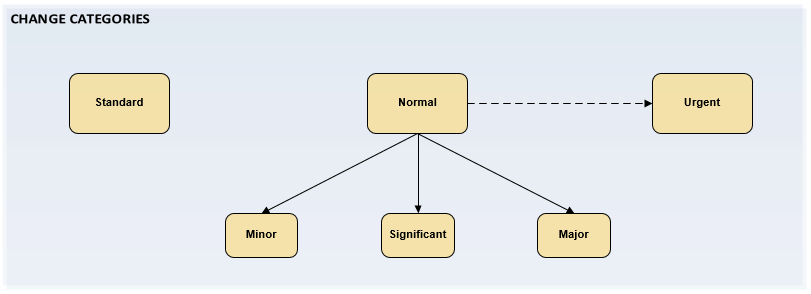
- Standard: a standard change is a pre-authorized, relatively common change, executed according to a pre-established procedure ("workflow") with controlled risk. We will take care of creating predefined Standard templates in advance and all other change that are not part of it will be considered as minor changes
- Minor: a minor change is a normal change with low impact and risk. It will be approved locally (by the change manager, for example) and does not have any pre-established procedure. These are "small" procedures that will not go through the CAB
- Significant / Major: a significant or major change is a larger normal change that needs more attention. We consider its cost to be more important, as well as the impact and risk, a formal approval of one or more stakeholders, according to the case (CAB, executives) will be required. We should have a contingency plan, in case of issues, as well as tests, etc.
- Proposal: A proposal is often associated with a major change. Used in at a very high level, its purpose is to present a future change, it includes a business analysis document, that evaluated the risks, the problems and alternatives, the budget and financial evaluation, as well as the construction and implementation of the change. Once approved by the change management, we modify the category of the request, and the real lifecycle of the change starts
- Project: the project category has been added to distinguish between the changes and the projects
You would check the Urgent box of a normal (minor, significant or major category) change if it needs to be implemented quickly (to resolve an urgent incident for example).
Status Management
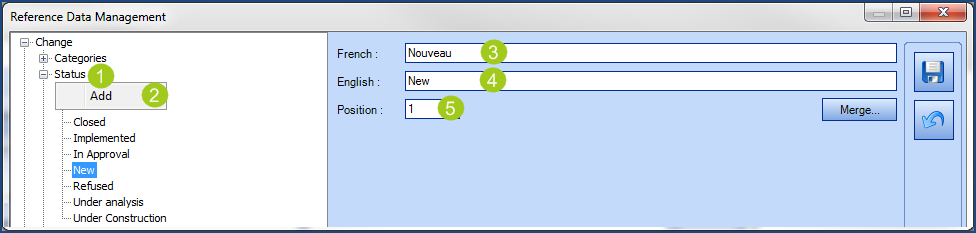
Add a Status
- Go to Tools > Reference data management > Change > Status
- Right click and select Add
- Enter the name of the status in French
- Enter the name of the status in English
- Enter its position in the list of status
- Save

Deleting a Status
Right click on the status and select Delete.
- It is not possible to delete a status that has already been used in a change. A possible choice then would be to Merge it with another status.
- Limit the number of statuses to a minimum, only have enough to manage the different change cycles. For example, instead of adding a Change review status, exploit the tasks to do a post implementation review. This will facilitate the comprehension and the application of the status by the Octopus users.
- If you change the category of an existing change, the status will be reset to New.
Status Description
Most of these status come from the ITIL literature and the descriptions are for reference purposes only and do not represent the reality of all IT organizations.
- New: status of a change at creation
- Under analysis: according to the information provided for the change, the risk, benefit for the business, costs, impacts are acknowledged and the following points are validated; is the change in the right category, with the right approval level, does it need to go to the CAB, are all the required tasks there, etc. If some information or documents are missing, the change is returned to the initiator
- Under Construction: once the change has been validated, the person responsible for the change can start the work required to get to the deployment of the change. Depending on the scale, he will have a contingency plan and document tests to help the CAB evaluate if the change can go into production
- In Approval: status of a change that is waiting on the CAB approval. If refused the change can be resubmitted to the CAB at a later date
- Being Deployed: deployment of the change in production. It can be done in multiple phases; the deployment tasks control this aspect
- Implemented: the change has been implemented in production. For a while it is watched to make sure the change is not the cause of new incidents, if it's the case you will need to decide if a new change is required
- Closed: the change has been implemented with success. You can use an activity type to specify the results of the change: success, partial success, rollback applied or other. This contributed to identifying the change management elements to improve l to increase the success rate
- Refused: status of a change that was refused
- Canceled: status of a change that was opened by mistake
Status Transition
The status transition is a mechanism that we have built to control the cycle of a change, from its creation until its closure. In Octopus, the transition is based on the category of the change. For example, a standard change is by definition a pre-authorized change with pre-defined steps, it will not need to go through the In Approval or Under analysis to be executed. However, a major change has an implementation cycle that is more complex; because it represents increased risk and impacts, it must go through a more controlled cycle.
![]()
![]()
In order to apply a controlled status transition in Octopus, you can import the possible transitions with DataImporter for each change category. You decide what transitions are allowed or not, depending on the level of control that you want to impose in the change lifecycle. For example, below you can see a representation of the transitions for standard and significant changes, we have allowed the assignee to go back to the previous status for more flexibility.
![]()
![]()
- Statuses that are missing from Octopus will be automatically added during the import
- You must make sure to add permission to the roles for their proper application
- The system will only consider the statuses/transitions/permissions of the last import
- Test the transitions for each category
We propose a default transition model for the standard, minor, significant and major categories, from which you can work. You can find this model in the DataImporter - Import Change Status Transitions article.
Template Management
Change templates allow to create reusable models for certain change categories. They are widely used to define standard changes. They help define some default fields as well as a basic workflow that can be adjusted according the needs of the change. It also makes the creation of a change easier and more consistent for Octopus users.
Change templates defined in the reference data management are accessible from the change creation window:

How to Create a Change Template
You can create a change template or category (folder). The category allows to create a logical structure for the change templates, which renders the selection of the correct template more intuitive when creating a change.
- Access the change templates via Tools > Reference data management > Change > Templates
- Right click and select Add. The system will ask if you want a template or a category (folder)

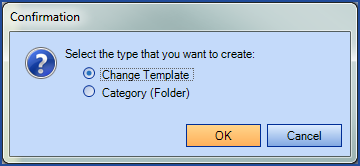
- Category or template
Create a category
- Enter a French and English description and save
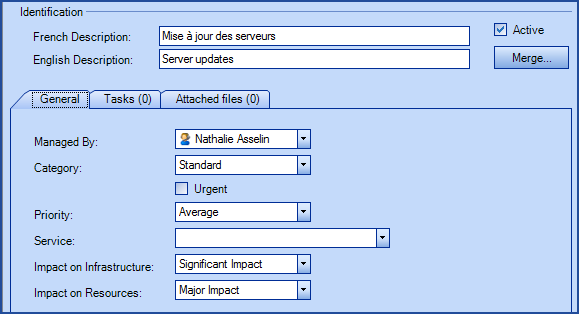
Create a template
- Identification section:
- Write the subject (French/English)
- General tab :
- Select who manages the change
- Identify the Category of the change
- Indicate if this template will be used for Urgent changes
- Select the Priority, the Service, the Impact on the infrastructure and Impact on the resources
* Le Category field is mandatory.
- Tasks tab:
- We can determine the change workflow by configuring one or more tasks. They can be executed sequentially or in parallel, depending on the workflow of the template. You can configure tasks of the following types; Standard, Approval or Notification.
For more information on the task configuration, see the Tasks Management wiki article.
- We can determine the change workflow by configuring one or more tasks. They can be executed sequentially or in parallel, depending on the workflow of the template. You can configure tasks of the following types; Standard, Approval or Notification.
-
Attaches files tab:
-
Add files if required
-

Deleting a Change Template
Right click the template and select Delete.
- Is is not allowed to delete a template that has already been used to create a change. You will have two choices: uncheck the Active box to deactivate the template, or Merge the template to another.
- Merging will remove the link from the changes and the source type and create a new link with the destination link. The original source link will then be deleted.
- You must move or delete the change templates under a category before it can be deleted.
Tasks in Change Templates
Just as with the SR types, you can add tasks to change templates. Even deployment tasks.
To find out more, see the Deployment Calendar article.
Proposed Models for Change Management
The following are the proposed models for Change management in Octopus.
There are 3 types of change - Standard, Normal, that would include minor, significant and major changes, and Urgent. Each type would contain models designed to handle the process flow. A more complete workflow could be created for changes that have more impacts or risks.
- Standard changes: As they are pre-approved, no approval task is required.
- Normal changes: Depending on if they are minor, significant or major, one or more approvals may be required.
- Emergency changes: The ECAB is involved, and the workflow may be different in order to consider the urgent situation.
Permissions
By default, there are four permissions associated to the Changes module:
- Access the change management module
- Create a change
- Delete a change task
- Modify a change
Other permissions can be added and applied to the roles. For more information on this subject, see the Role Management wiki article.
Metrics
Changes Per Month
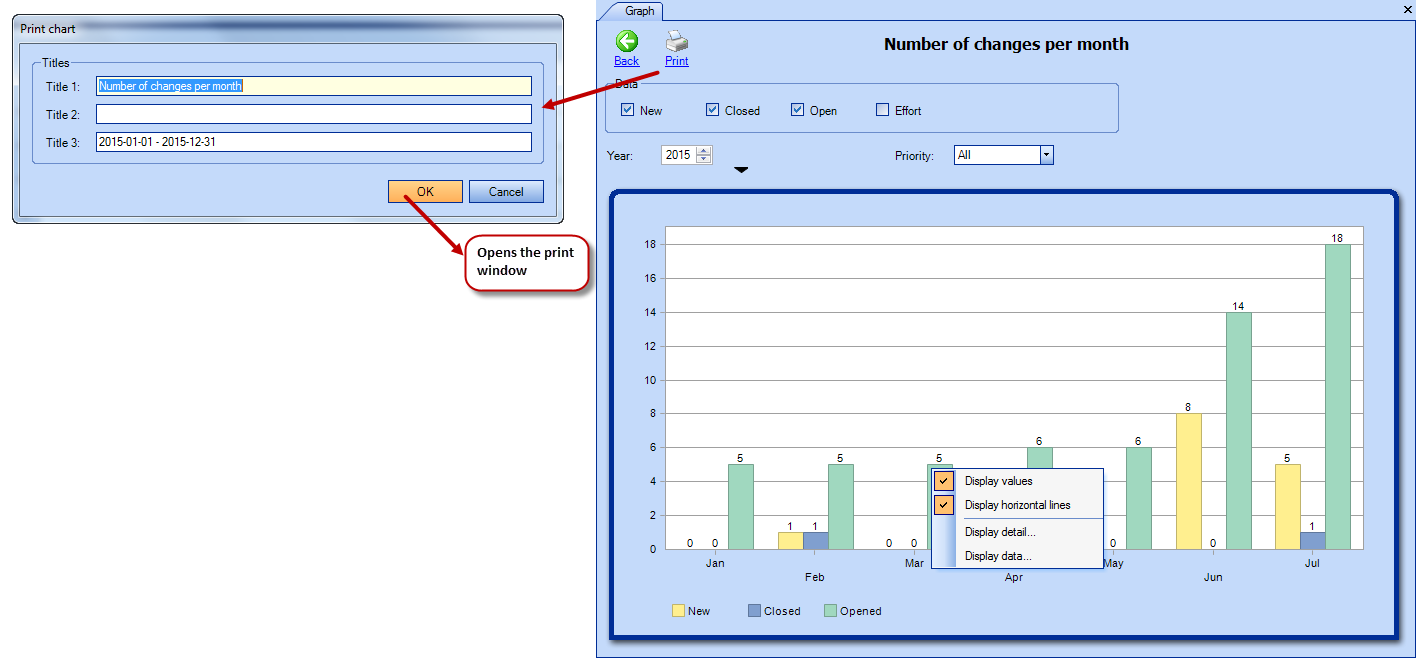
In the Statistics module, there is a report named Changes per month; you get different results according to the following parameters and/or filters:
- Changes per month: New and/or Closed and/or Open
- Effort per month
- You can select a range of dates
- You can designate a priority
- Right click on the graph to display values and/or horizontal lines
- Right click on a bar to display
- the details of this bar in another graph or
- to display the data in a list format
- The report can be printed or saved in PDF format
Follow Up Lists
Lists are a good tool to gather other metrics that are very useful to follow changes. Lists like:
- Change by status
- Closed changes
- Change by category
- Changes by impacted CI
- Approved changes
- Implemented changes (for an x period)
- Change tasks by groups
- Closed changes with a post-implementation review
- Proposition change
- Projected Service Outages
- Other
Actions Menu
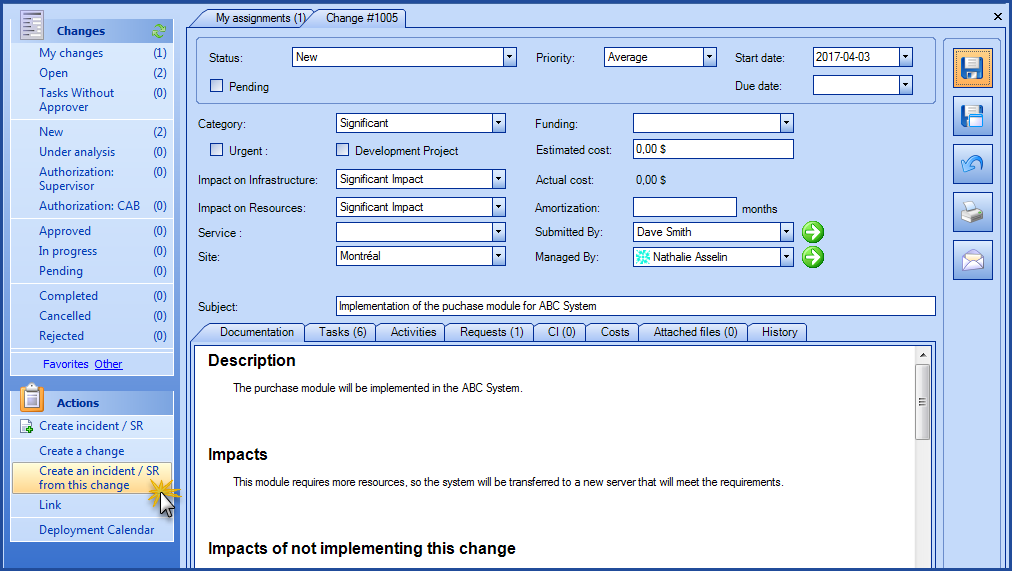
Create an Incident / SR From This Change
In the context of a change or a project, it often happens that we have internal requests to create. To facilitate the creation of such requests, use the Create Incident / SR from this change action. At the request creation, the name of the person managing the change will be used as the Requester and User of the request and a link will be made between the change and the new request.
Deployment Calendar
A deployment calendar opens when you select the Deployment calendar action, it displays the deployment tasks that were configured in the changes. See the Deployment calendar article for more information.
Thank you, your message has been sent.