Table of contents
Introduction
Effort management allows calculating time spent on each request and activity. It can be used either in a manual or automated fashion, and is available in all types of requests (incidents, SR, problems, changes, tasks and events).
Prerequisites
By default, effort management is enable but not set to start automatically. To automate its use, you must enable some options from your user profile ( File > Modify my profile > Effort tab). By not enabling automation, you will have to manually start and stop the timer.
Efforts tab
- Activate effort management : Allows to enable or disable effort management. If it is disabled, the start/stop button and the timer will not be visible in the application.
- Start the timer for the following actions : Allows starting the timer automatically when the user performs the following actions :
- Creation of an incident / SR.
- Creation of an activity.
- Taking assignment of a request (incident / SR, task).
- Stop the timer for the following actions : Allows stopping the timer automatically when the user performs the following actions :
- Mark on hold/ suspend request (incident / SR, change, task).

Usage
When using effort management, a Start / Stop is available in the top right corner of the incident/SR creation form, and to the right of the Add an activity when the request is open (or selected and having the edition zone showing). A pull-down on the right of the button gives many options for tallying your efforts.
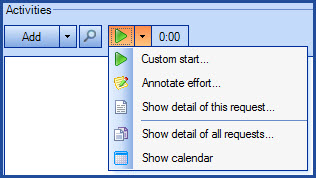
Custom start
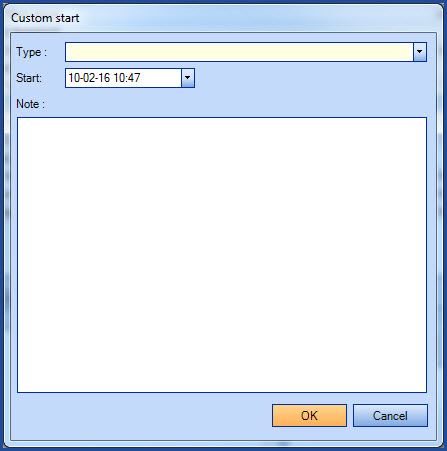
The Custom start allows starting a timer by supplying some details like a note or the start time to use. The action is only available when the timer is not started. Alternatively, you can press the Ctrl key while clicking on the start button.
Annotate effort
Once the timer is started, the Custom start action is not available; you can however use the Annotate effort action to add or modify the effort information. This action requires at least one effort entry not converted yet converted into an activity.
Information available in the Custom Start and Annotate Effort windows
- Type : Pull-down box containing the list of all activity types enabled through the options.
- Start : Indicates the timestamp when the effort was started, and can be modified if need be.
- End : Only available through the Annotate Effort windows. This will show the timestamp when an active timer was stopped, either through the stop button or by starting another effort timer elsewhere.
- Note : Allows adding information on what was accomplished during the activity. The content of all notes will be aggregated and copied into the .
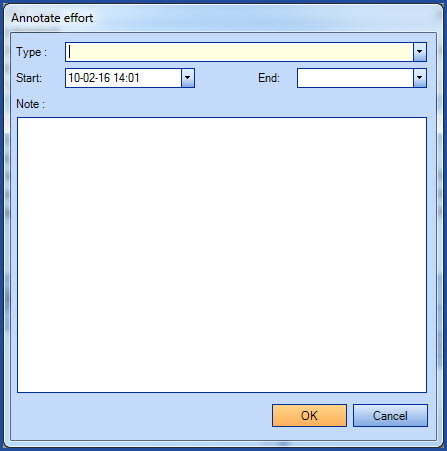
The system will detect if the end time is set before the start time. However, it is allowed to set an end date in the future.
For example : If you have a meeting that you will leave at 5h00 pm, you could start the timer when entering, and already set the end time.
Unused Effort Details
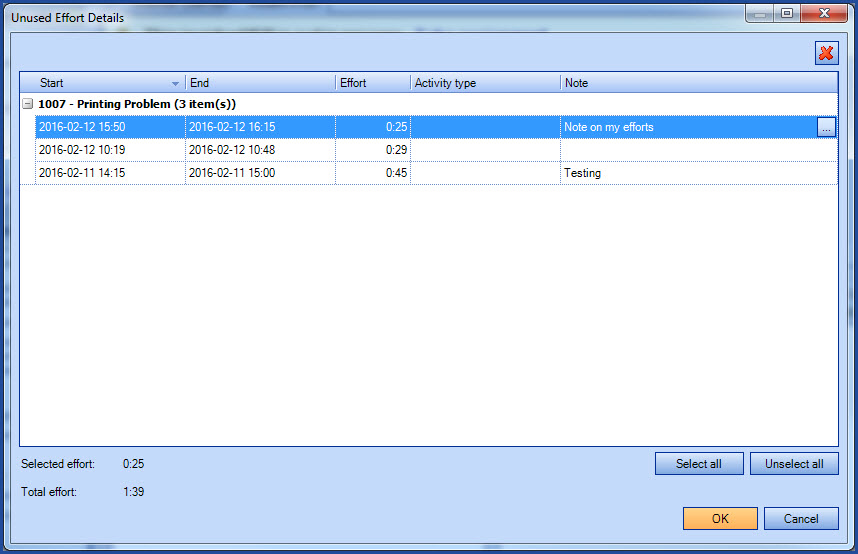
Unused Effort Details is composed of records showing all efforts that were accumulated (start/end) which could be used to create activities.
Two options are made available: details for the current request or details for all requests.
- Show details for this request...
- Total for unused efforts in the current request. The value is automatically refreshed by the system if a timer is active.
- Show details for all requests...
-
Total for unused efforts in the current request. The value is automatically refreshed by the system if a timer is active.
-
In both cases, the Unused Effort Details dialog will contain the following information:
- Start : Shows the start time for that effort. It can be modified if need be.
- Fin : Shows the end time for the timer, when it is stopped. If not, the field will be blank. This date can be modified. If you enter an end time on an active timer, it will automatically be stopped at the indicated time.
- Effort : Total effort (start / end) for each entry, also showing the current sum for the active timer.
- Activity type : Pull-down box for selecting an activity type, if enabled through the options.
- Note : Allows adding a not relating to the record. The content of the note will be copied to a newly created activity. If more than one effort record have notes, all the notes will be added to the activity.
Additional information :
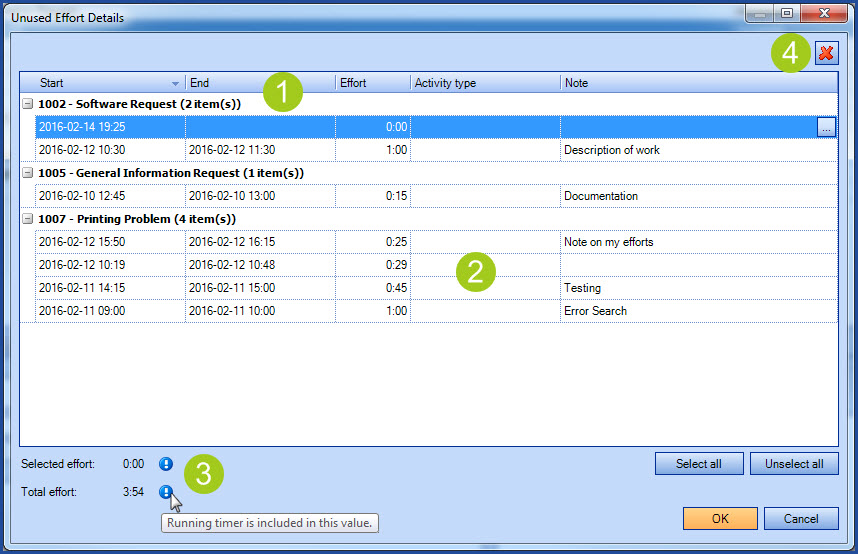
- Information is grouped by requests, shown in bold.
- Unused efforts are presented with the most recent one on top, down to the earliest one.
- Selected effort at the bottom of the screen will update as you select different efforts. If a timer is currently active, its time is considered in the selected effort.
- The red X button allows removing one or more records. It is only made available once a record is selected.
- When you open using the Show details for all requests action, you can open a request by selecting its name and selecting the open action from the contextual menu.
Visual explanation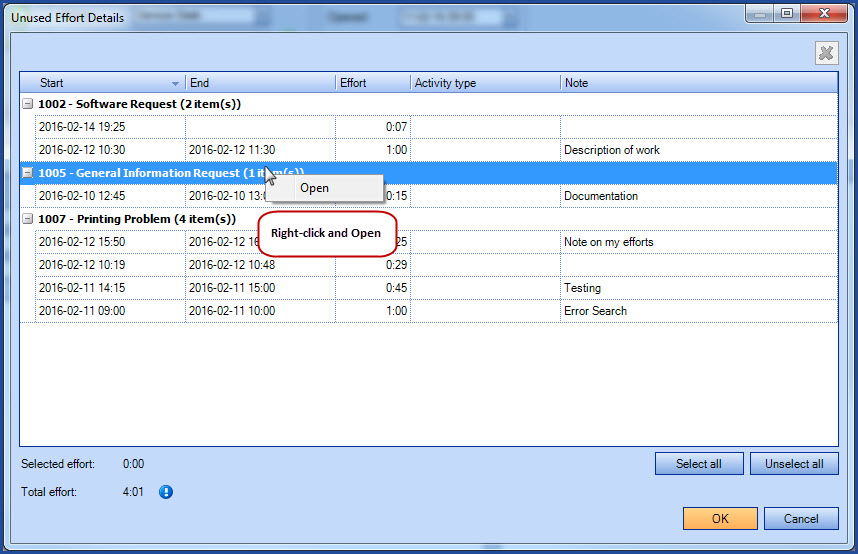
- To select multiple lines, use the Shift or Ctrl key depending if you want clustered rows or not.
- Unused efforts not added to an activity will be kept for a period of 30 days. Over that time, they will be automatically deleted.
- The system supports only one active timer at a time.
Show calendar
The Timesheet in calendar view allows the technicians to consult how efforts are spread between existing activities and unused efforts. The presentation allows finding empty periods during the week where efforts are missing. The information comes from all the requests where efforts were recorded. Also, it displays the total for the current week and days in the week, and also eases taking corrective measures, if necessary.
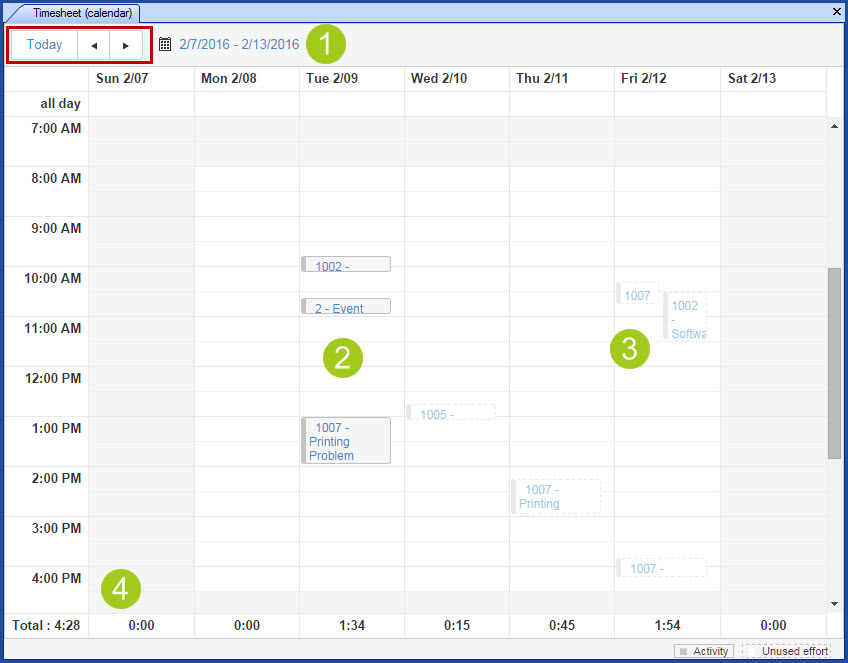
- Period representing the current week. Select a precise date by using the calendar button. The Today button will bring you back to the current period.
- Efforts part of activities are shown with a dark color and outline.
- Unused efforts are shown with a light color and dotted outline.
- Each total per day is displayed at the bottom of the day and a running total for the week is also displayed.
See the calendar of another assignee
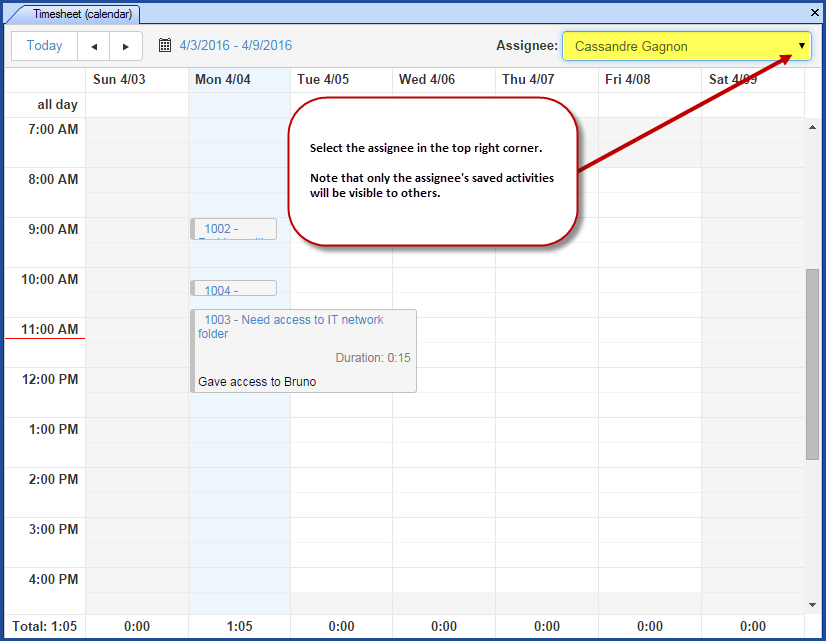
For Octopus users with the permission Access the dashboard, statistics and reports, the calendar view of the timesheet allows to consult the efforts recorded in the activities of other assignees. The information comes from all the requests where efforts were recorded. Also, it displays the total for the current week and days in the week.
To see another assignee's timesheet in calendar view:
- Go to File > Timesheet (calendar).
- Choose the name of the Assignee on the top right.
- By default, the one selected will be the current user.
Only recorded activities are visible in the calendar of another assignee, the unused efforts are not.
Creating activities
By default, all effort records in a request will be used when creating an activity. However, a technician can still select which record to acumulate into the created activity.
In the following example, only the selected record will be used. Selection of efforts must be made using the Effort detail windows from within the activity creation dialog.
Creating activity containing unused effort example
When creating an activity containing unused efforts, the system will automatically display the total effort and the timer will start by itself (if the option Start timer when creating an activity is set). Moreover, notes will be concatenated in the activity description.
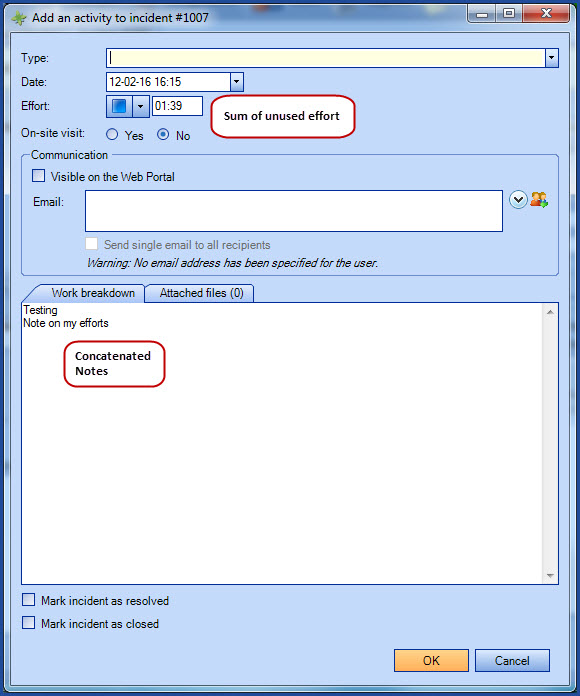
To select, validate or modify records, click on the arrow next to the Start/Stop timer button and select the Show detail of this request action from the pull-down.

From the Unused Effort Details, select the target records to be included. You can select more than one by using the Ctrl or Shift keys.
After clicking the OK button, only the total of the selected effort will be considered.
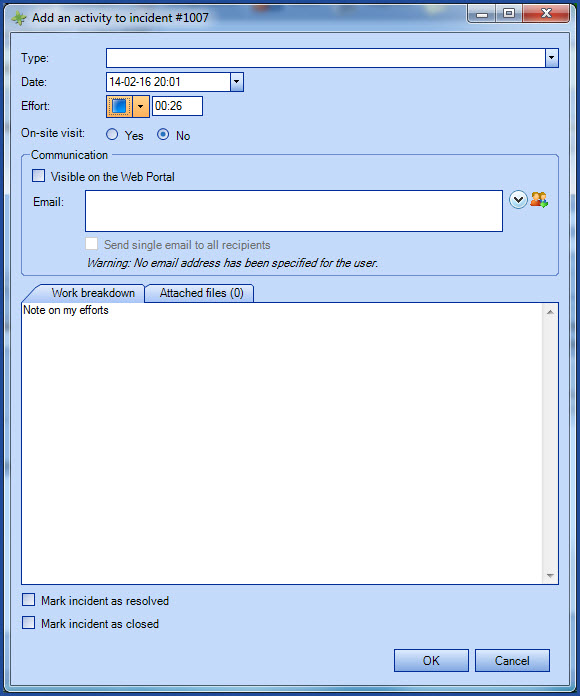
Once an activity has been saved, selected effort records are automatically deleted. If adding the activity is canceled, unused effort will be left untouched, and the timer will be left in the same state as it was.
Maximum effort
The application will alert the user when the sum of the efforts exceeds 99h59, this way he can take action to prevent the loss of efforts:
- If this is for different unrecorded efforts, you can make a selection of multiple efforts that will total an amount below the maximum allowed.
- If this is for only one unrecorded effort for more than 99h59, the Octopus user will need to create as many effort recordings to distribute the amount of time that overflows.

Effort of an activity of less than one minute rounded to 00:01
When the timer is set to the automatic mode, the effort of an activity that takes less than one minute will be rounded to 00:01.
Création d'un incident / SR
Lorsque l'option de démarrer le chronomètre automatiquement à la création d'un incident ou d'une demande de service est activée, dès l'ouverture du formulaire, le chronomètre se mettra en marche pour ainsi comptabiliser le travail d'entrée de données. Par la suite, pour utiliser ce temps, vous devrez entrer une activité et y inscrire le travail effectué. Encore une fois, si l'option de démarrer le chronomètre automatiquement à la création d'une activité est activée, le temps va continuer à se comptabiliser pour vous donner l'effort total à la sauvegarde de votre activité.
Incident/SR creation
If your effort options are set to start the timer upon creation of an incident/SR, the timer will start as soon as you open the dialog box to make sure to track the whole creation process. To use the effort recorded so far, simply add an activity which will consume it normally. If you also have the option set to start the timer upon creation of an activity, the timer will simply go on, allowing you to record the effort without interruption.
Quick call creation
If the timer is started automatically upon incident creation and you are selecting a quick call type, the effort recorded as part of the automated closure will be the real time spent instead of the average effort configured in the reference data management for that quick call.
Thank you, your message has been sent.
