Table of contents
Related articles
Introduction
The activity types are used to standardize the information entered into Octopus by the Octopus users.
They are used to create message templates that can be sent to users or internal activities to help with data entry in Octopus or on the mobile.
Activity Type Visibility
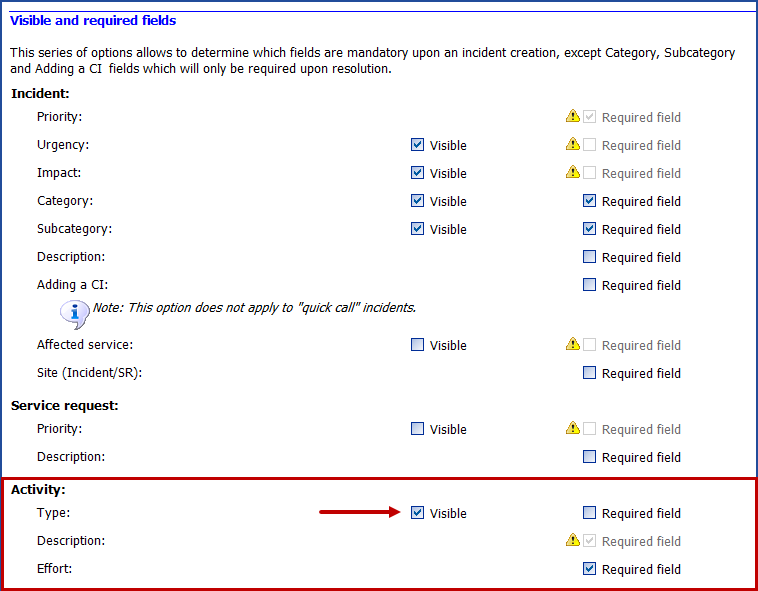
To allow the Octopus users to use the activity types, the field must first be activated in the options. You need permission to Administer Octopus to access this menu.
From the Tools > Options > Important general options > Visible and required fields menu, you can activate or deactivate the visibility of the field and choose to make it mandatory.
Note that if the field is mandatory, each activity entered by the Octopus users must use a type, it is recommended to make the field visible without making it mandatory.
How to Access the Activity Type Configuration
An Octopus user needs the Administer activity types permission to access the configuration of the activity types.
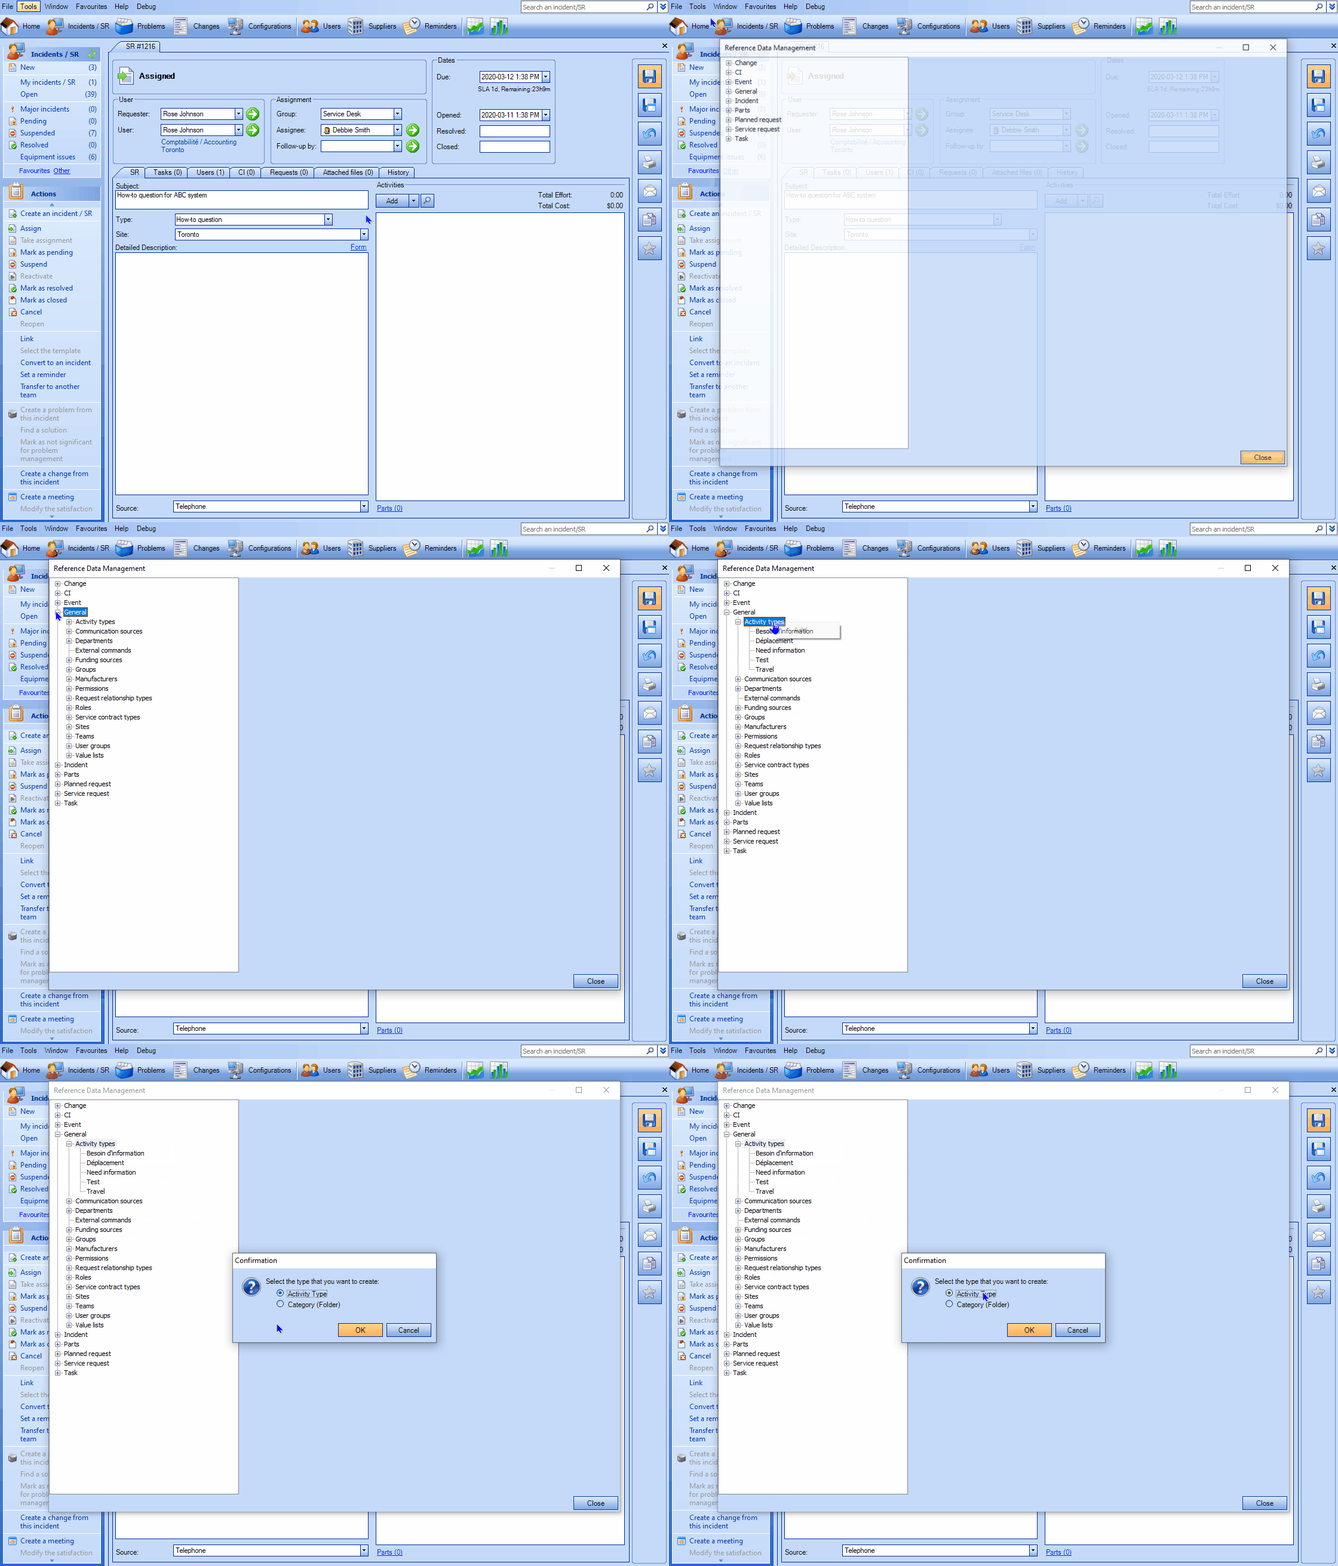
- Go to Tools > Reference data management > General > Activity types.
- As for using the reference data, the actions are available with a right click.
Configuration of Activity Types
New Type
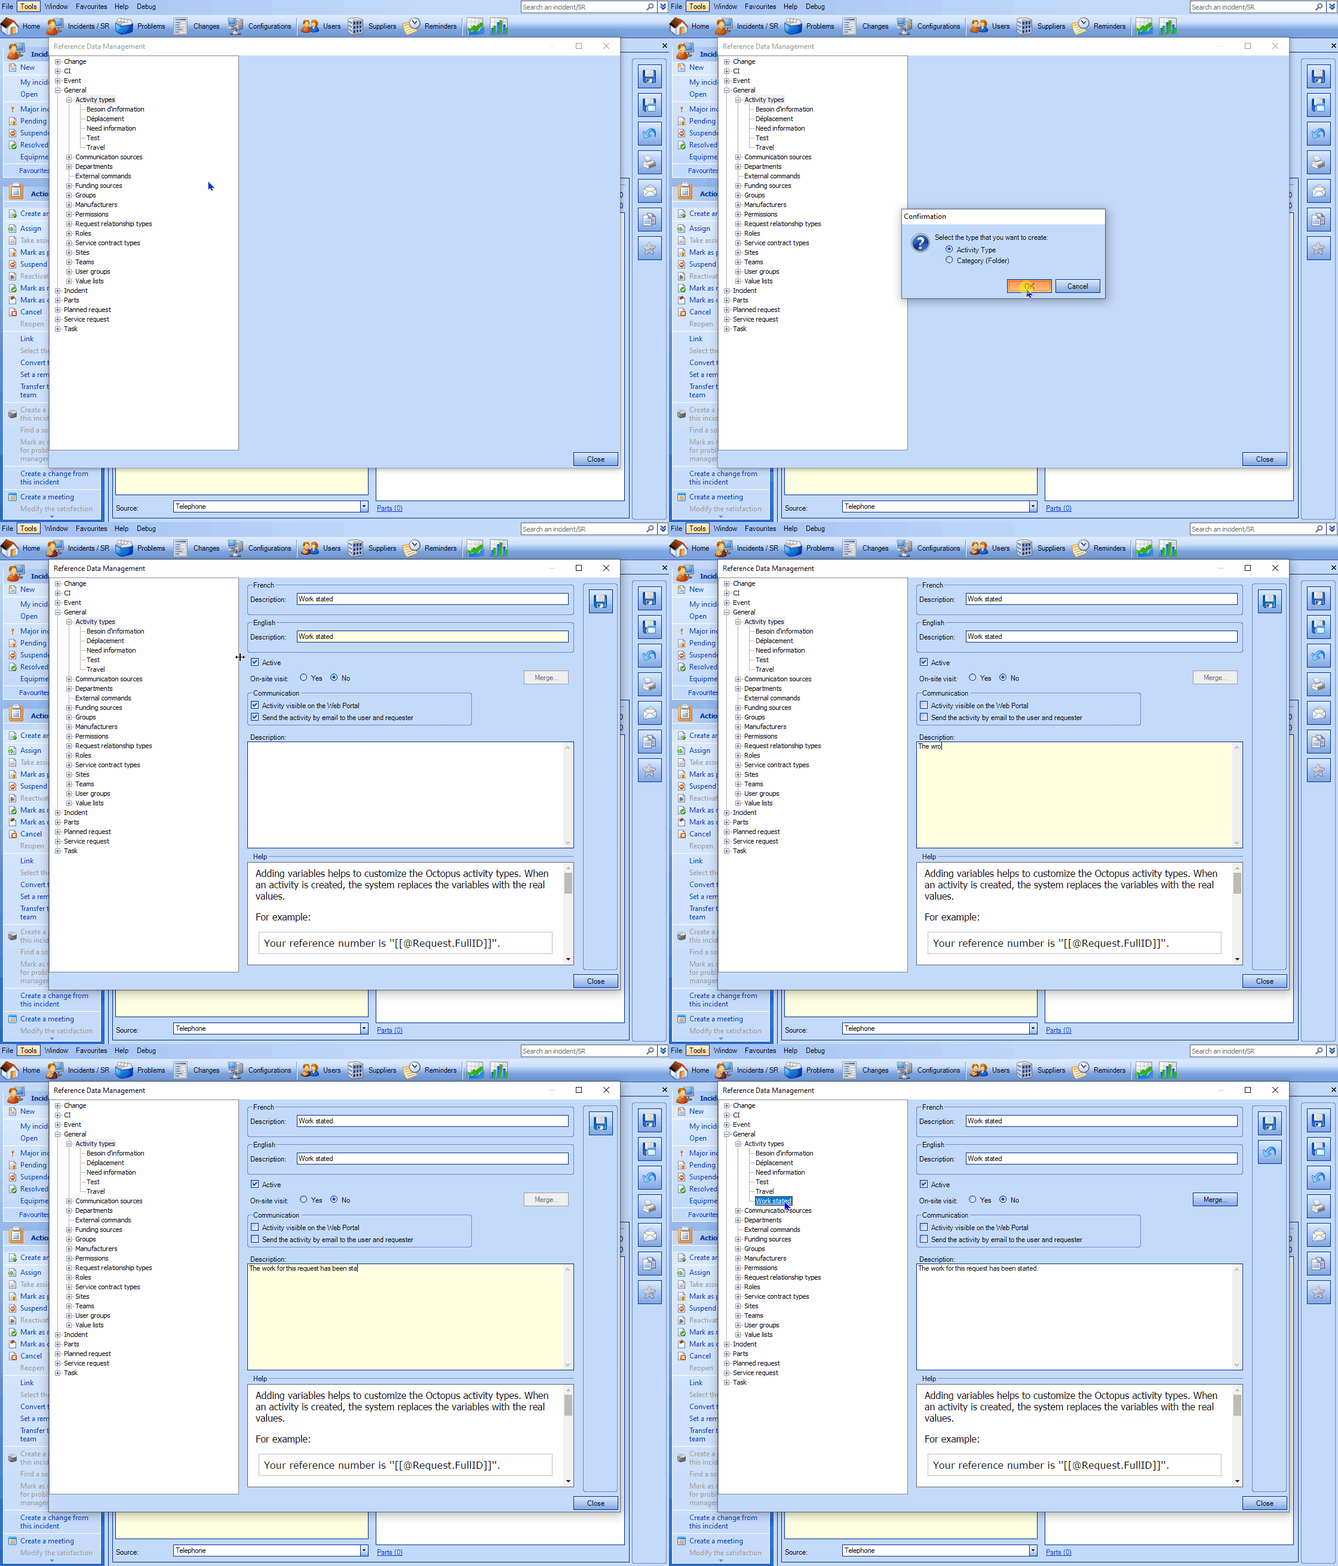
- From the reference data, we can create a new type with a right-click on Activity types > Add.
- Or if there are already categories, right-click on the category where you want to add the type.
- Select Activity Type.
- And OK, the configuration window will open.
- Enter the name of the type.
- In a unilingual context, copy and paste the English name into the French one.
- By default the type will be Active.
- Modify the choice if required.
- If the type is not active, it will not be available from the activities.
- Confirm the on-site visit option.
- Choose the communication options.
- Add the text
- And save.
Modifying an Activity Type
You can modify an activity type from the reference data.
- Activating or deactivating will make the type available or remove it for the next activities.
- Changing the name or merging one type into another will change the name of the data already entered in Octopus.
- The modification of the on-site visit, the communication options or the text will be taken into account for the next activities, but will not affect the data already entered in Octopus.
- Octopus users must restart Octopus to get the changes.
Merging an Activity Type
If there are duplicates among the activity types, they can be merged into one type.
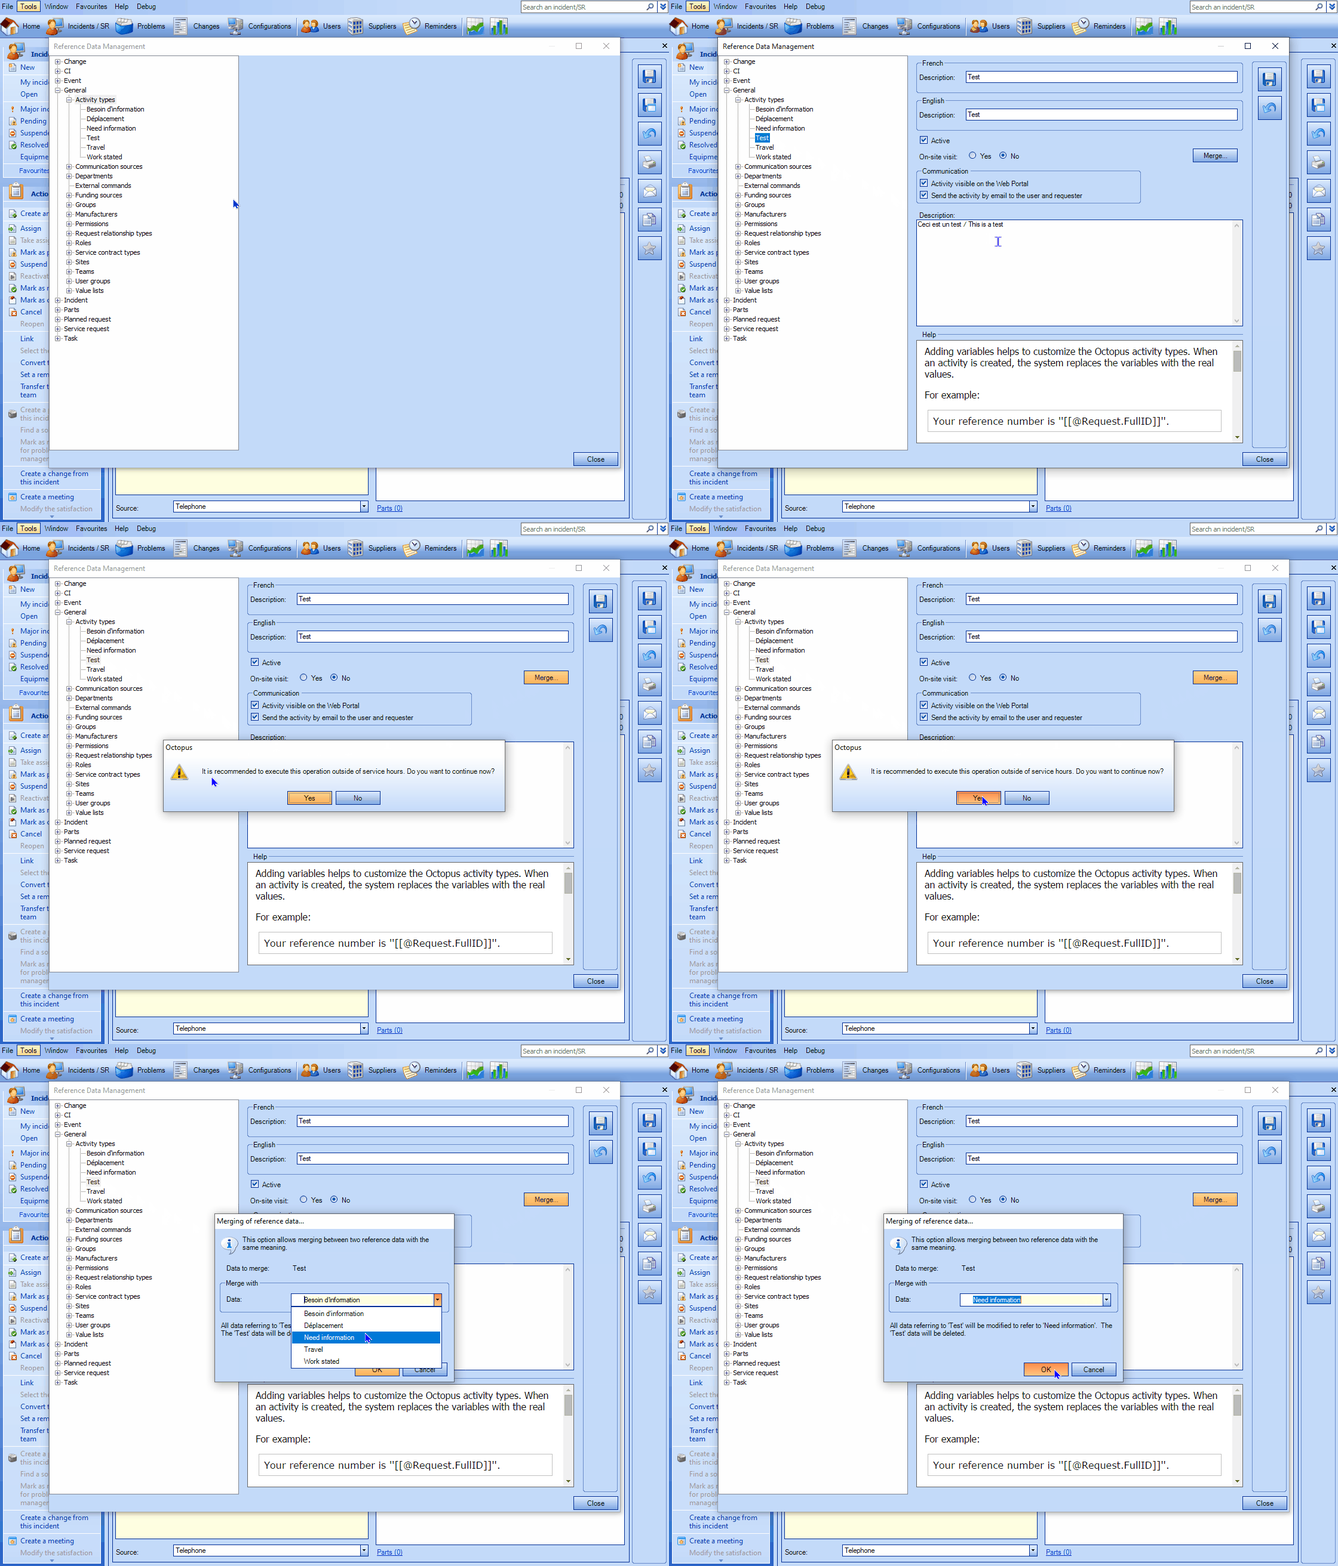
- Always start the merge with the type you want to get rid of.
- Select Merge.
- A message recommending that this type of manipulation be done out outside working hours appears.
- Answer yes if it is the appropriate time and continue.
- Answer no if it is during working hours and resume later.
- Select the type with which to merge
- Octopus indicates that all the data referring to the first type will now be found under the second type and that the old type will be deleted.
- Finish with OK.
- Octopus users must restart Octopus to get the changes.
Deleting an Activity Type
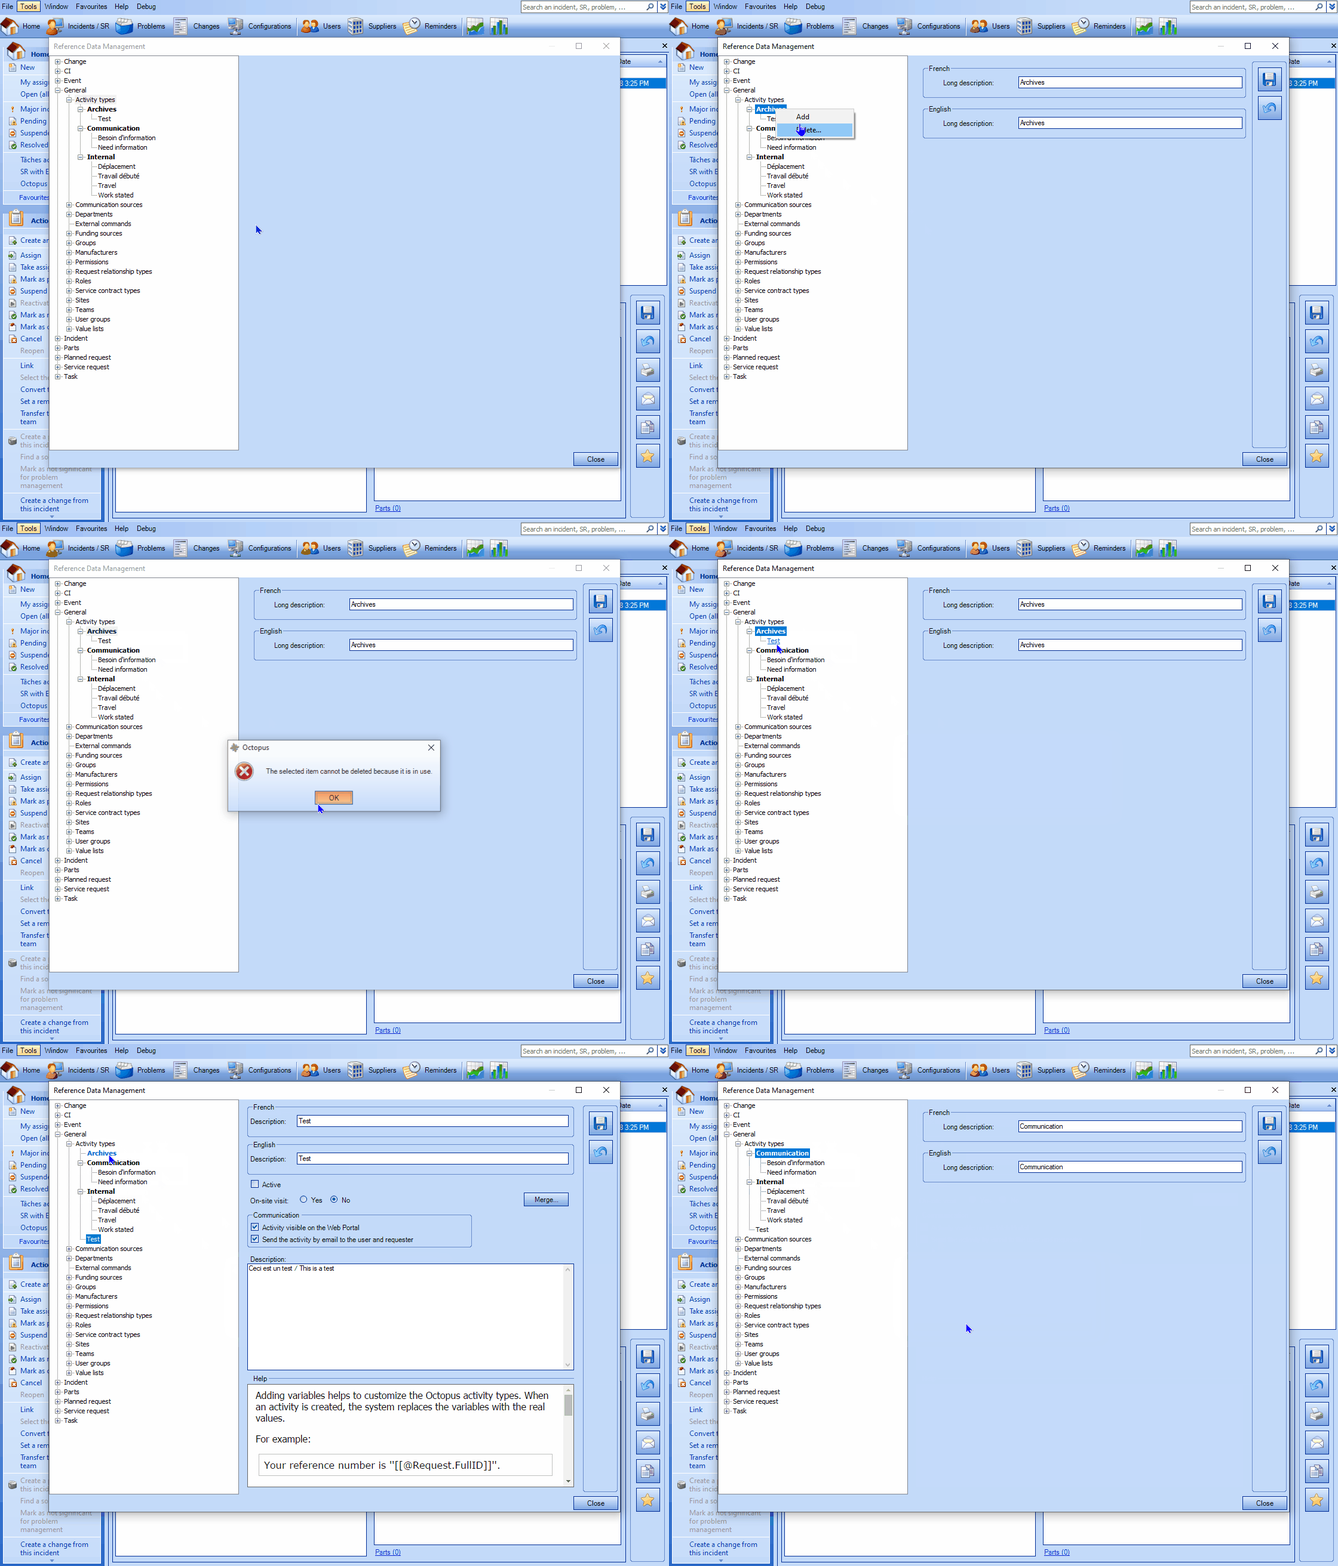
An activity type can be deleted from the reference data provided that it has not already been used to enter an activity.
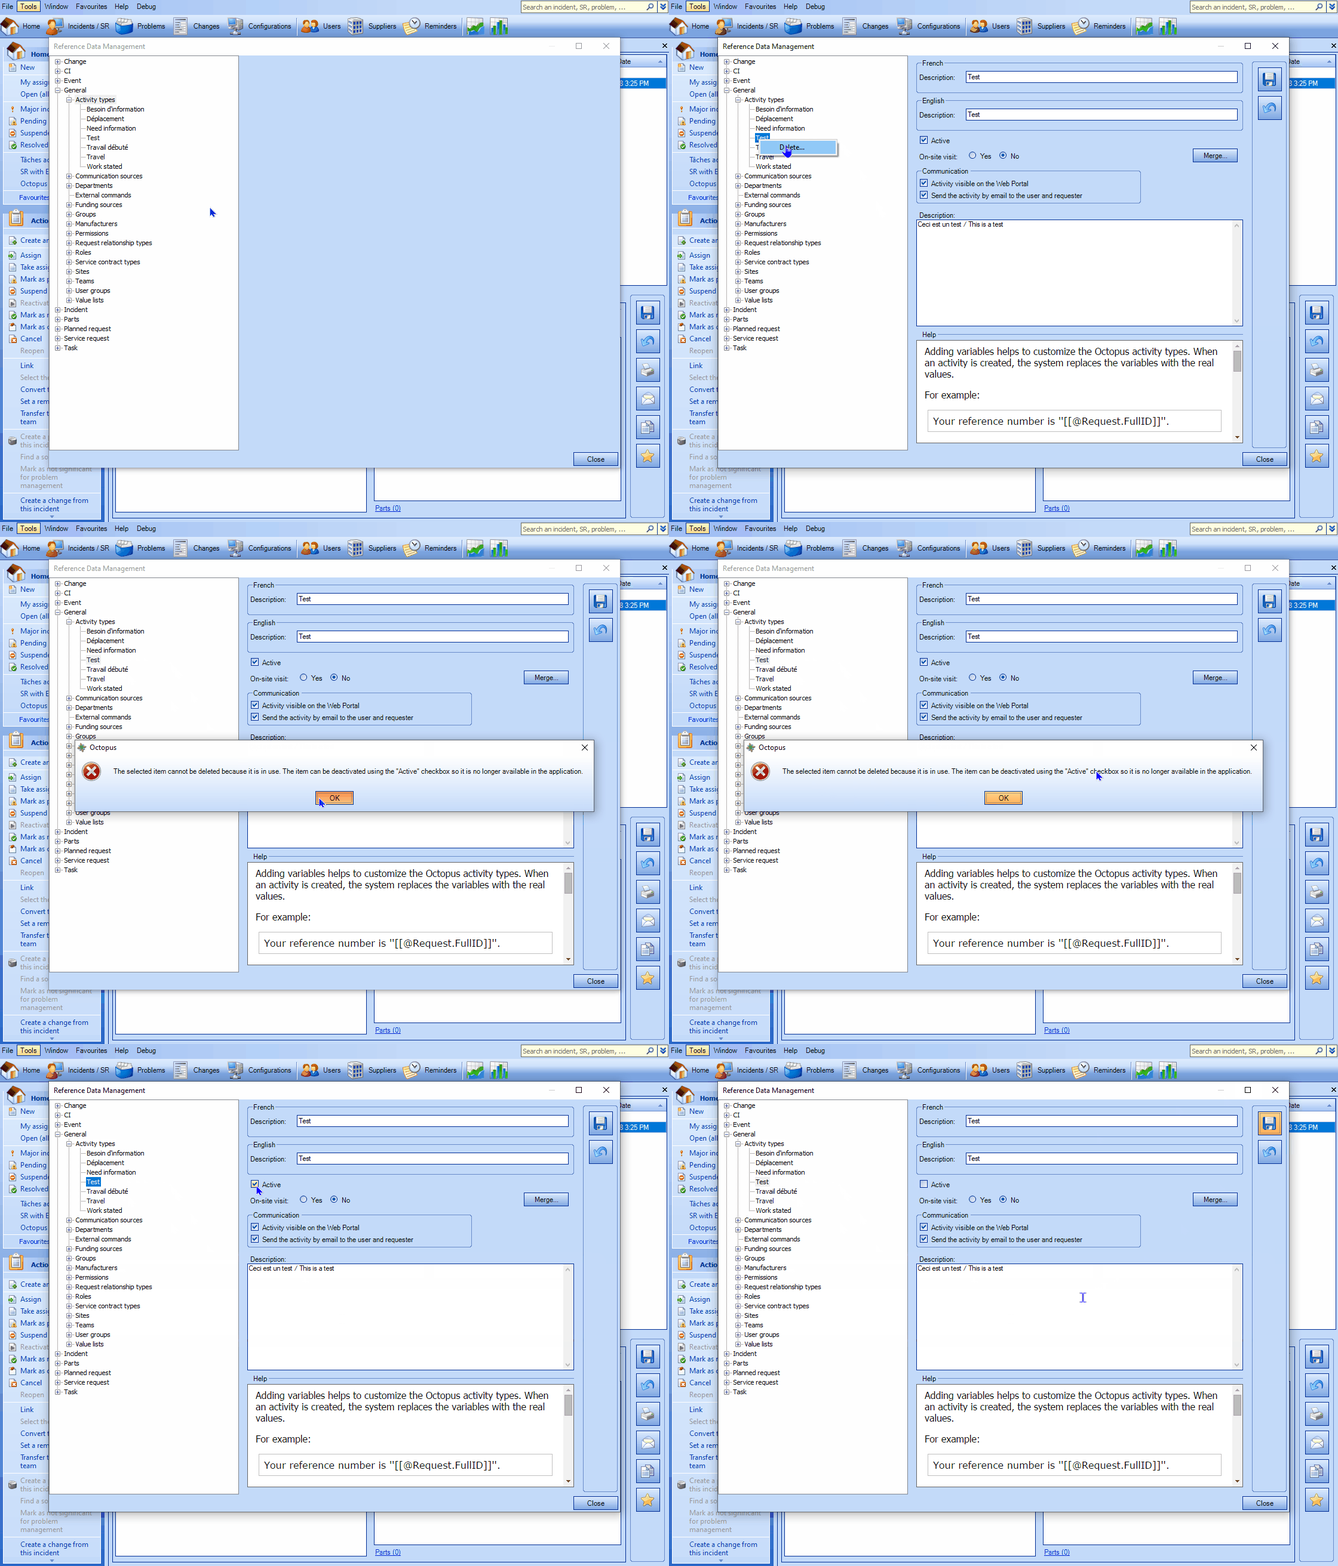
- Select the type you want to get rid of.
- Right-click and choose Delete.
- If the type has not been used in the past, it will disappear.
- If the type was used to enter one or more activities, a message will appear to confirm the type has been used and suggest deactivating the type.
- If you cannot delete the type, you will have two choices.
- Disabled the type, it will no longer be visible from the activities, but will keep its history.
- Merge the type to another, the existing data will be placed under the name of the type you keep.
 Trick!
Create a category called Archives to keep the activity types that are no longer used. This way you keep the history and the activity types remain organized.
Note that a type that is not Active will not be visible from the activities, but can be used in searches and lists.
Using Activity Categories
Because the list of activity types can quickly get long, the categories are very useful for organizing everything.
An activity type category represents a container in which you can add new types or drag existing ones.
Although the manipulation of activity categories is very simple, it is recommended to always make this kind of modification outside of working hours.
Octopus users must restart Octopus to get the changes.
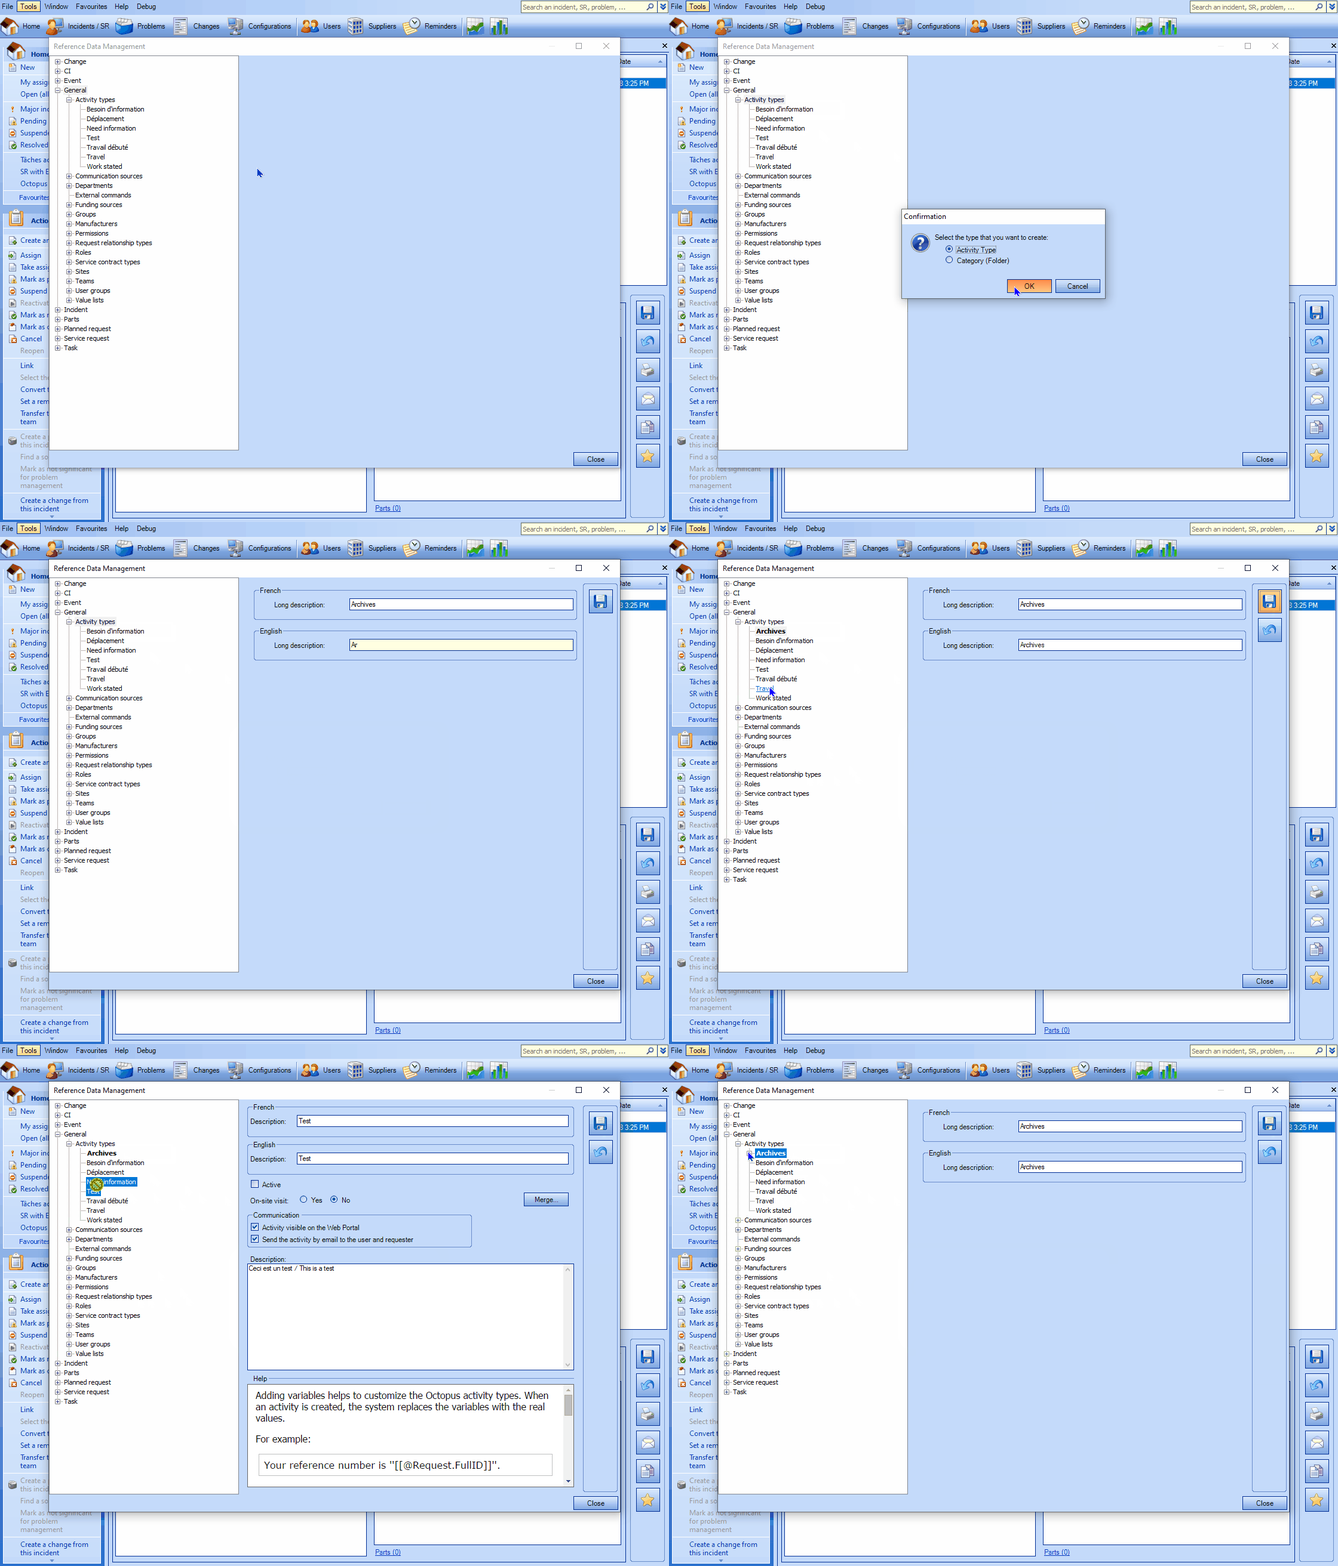
Creating an Activity Category
- From the reference data, we can create a new type with a right-click on Activity types > Add.
- Or if you want to add a subcategory to a category that's already there, right click on the category where you want to add it.
- Select Category (Folder).
-
And OK, the configuration window will open.
- Enter the name of the category.
- In a unilingual context, copy and paste the English name into the French one.
- Save the new category
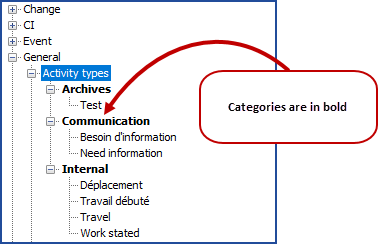
Note that the name of the category will be in bold in the list, this is to easily indicate that it is a category.
Organizing with Activity Categories
- It's easy to organize activity types using categories.
- Just add the required categories and drag the desired types to them.
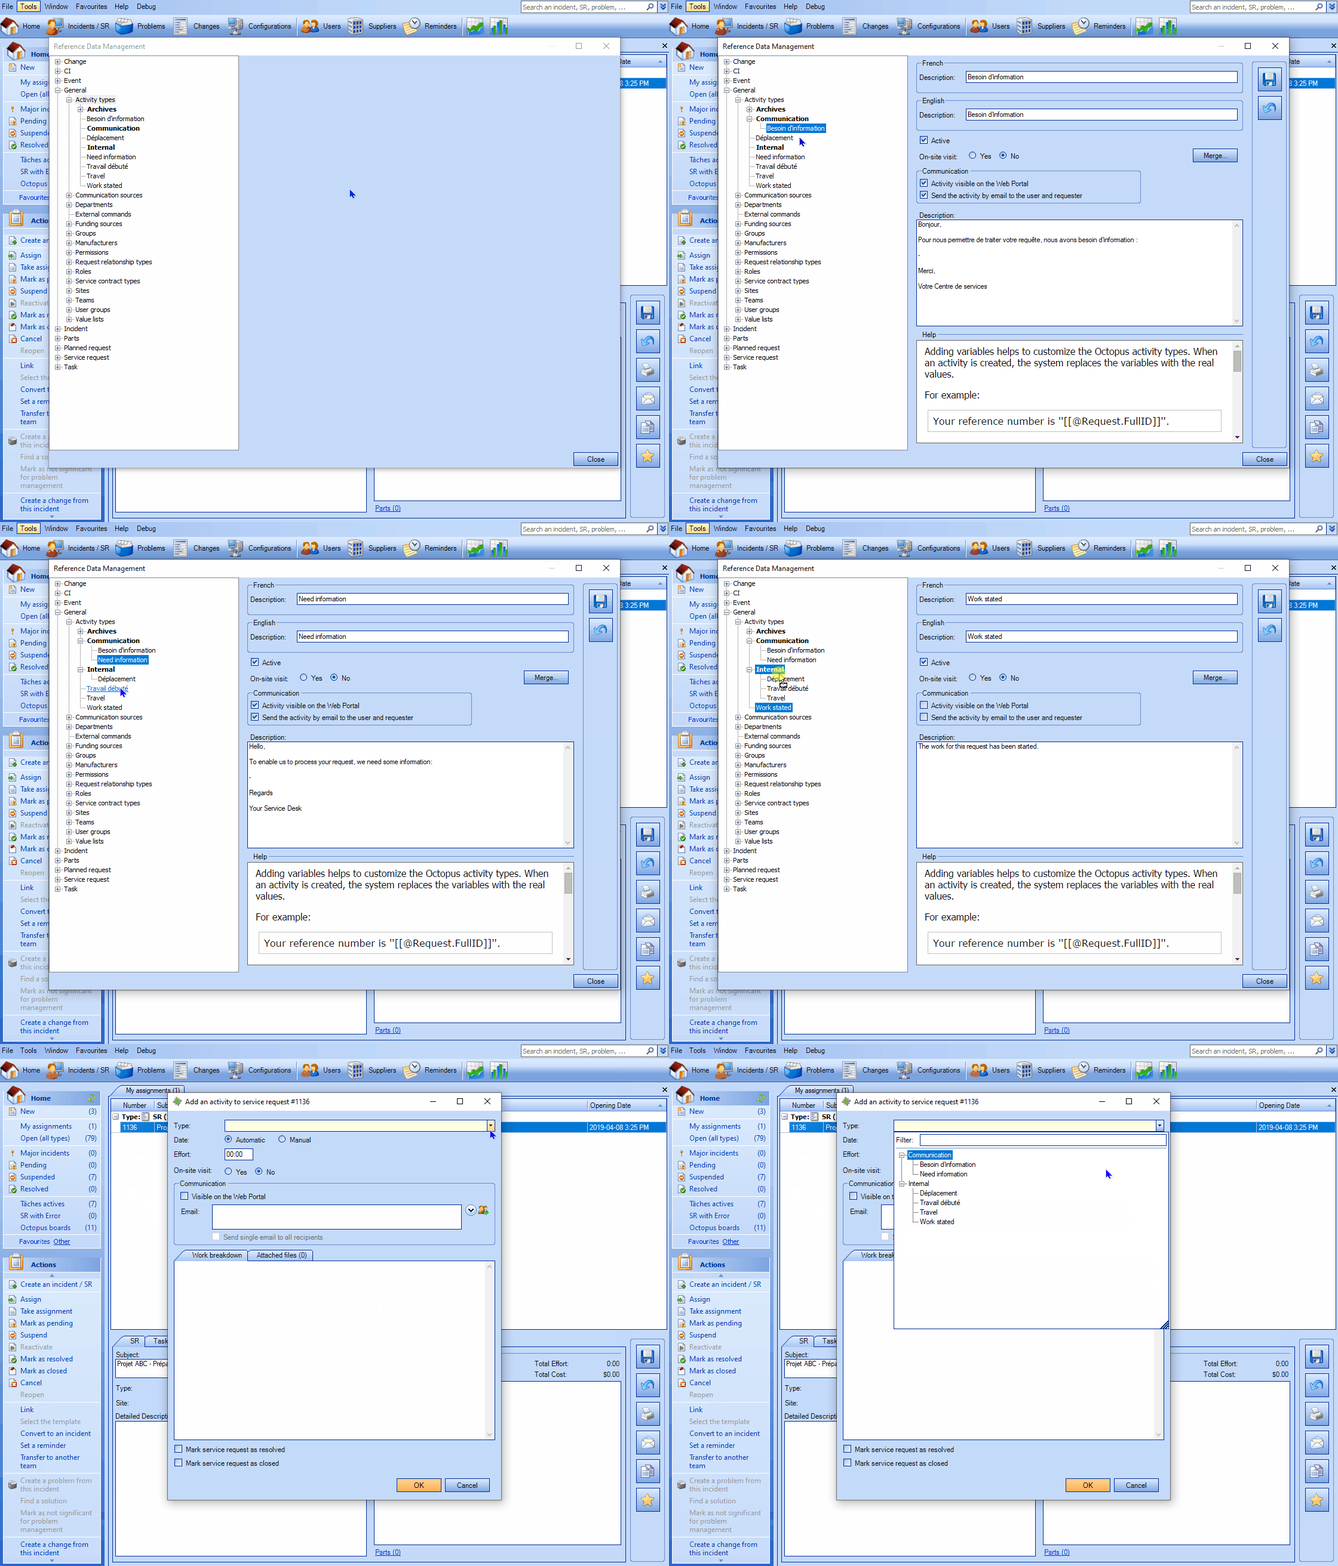
Modify or Delete a Category
- Categories can easily be changed, since they only contain a name.
- They can also be deleted, provided that they do not contain any activity type.
- If necessary, drag the activity types elsewhere to remove them from a category, then it can be deleted.
Enrich the Activity Types With Variables
As we saw above, using an activity type allows you to add information to an activity without having to make the same data entry every time. But you can also add variables to customize the Octopus activity types.
When creating an activity, the system replaces the variables with the actual values.
For example
- Your reference number is @Request.FullID.
Becomes:
- Your reference number is 1005.
Add a Variable
To add a variable in an activity type, position the cursor where you want the variable in the text and press F3 and select the field to include in your template.
It is important to take into account the context in which you want to use a variable that you add to a type, for example make sure not to add variables that apply to the Changes module in a type that will be used in Incidents/SRs. Because in this case, the system will return empty values.
It is also recommended to carry out several tests with the variables in the activities to ensure that the correct ones have been used.
The available variables are grouped in the Activity and Request nodes.
Note that in general the variables added from the Request node will be replaced immediately upon selection of the activity type, because the system already knows the value. While those of the Activity node will be replaced when saving the activity.

Syntax Error
If you manually edit a variable and make a mistake in the syntax, the system will not give you an error message.
Not having found a corresponding value, the system will replace the variable with an empty space
Additional Variables
There is a special variable available that you cannot get with F3, because it does not correspond to the name of a field.
- #Activity.OtherRecipients.
- Name of other recipients.
Example of Variable Usage
- Add the name of the CI(s) of the request.
- Works with the CI in cause of the incident or the CIs of an SR.

- Create a signature for the current Octopus user.
- This generic signature will return the information of the Octopus user using it.
- If the context of the DB presents the last name before the first name Smith, Dave, then instead of using the Full name variable, we suggest using separate First name and Last name variables of the Octopus user.

The name of the activity type for email communications will be visible only to Internal Assignee (standard license).
and not visible to an end user (license type: End user - web portal)
Thank you, your message has been sent.
