Table of contents
Introduction
Here are four (4) ways to create a Frequently Asked Questions page to answer users' most frequently asked questions.
1st method
In this method, you'll only use the Comment field, so it won't be possible for the customer to submit a query.
This form is therefore completely informative.
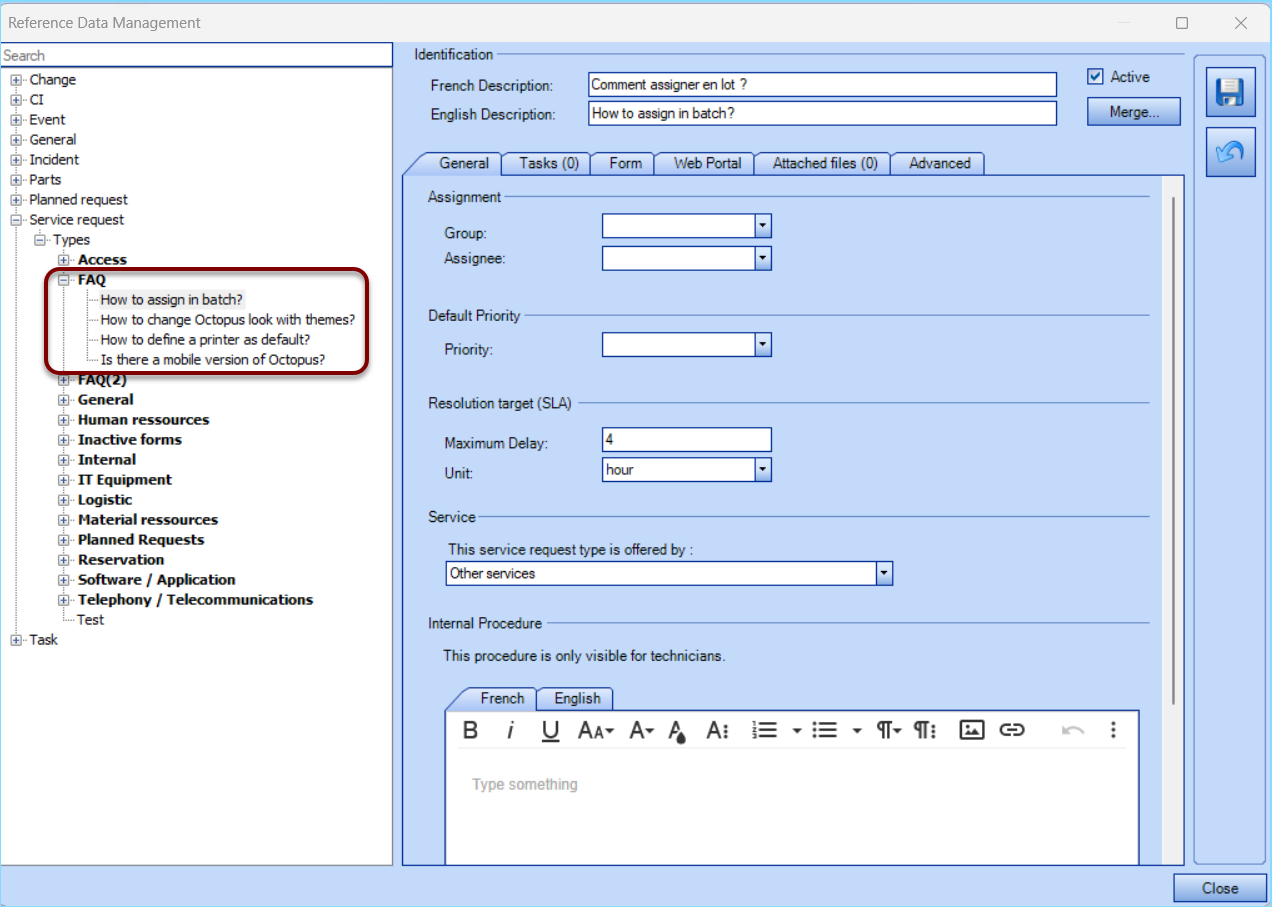
Configuration
- Tools menu > Reference data management
- Create a new category in Service Request
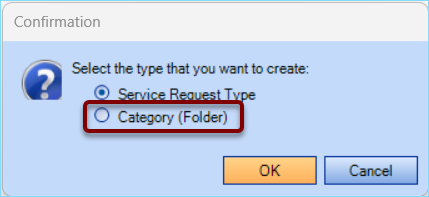
- Position your cursor on Type, right-click, then Add
- Select Category (Folder)
- Create a Frequently Asked Questions (FAQ) category to publish an independent tile on the Web portal
- In this category, add a Service Request Type named Frequently Asked Questions (FAQ)
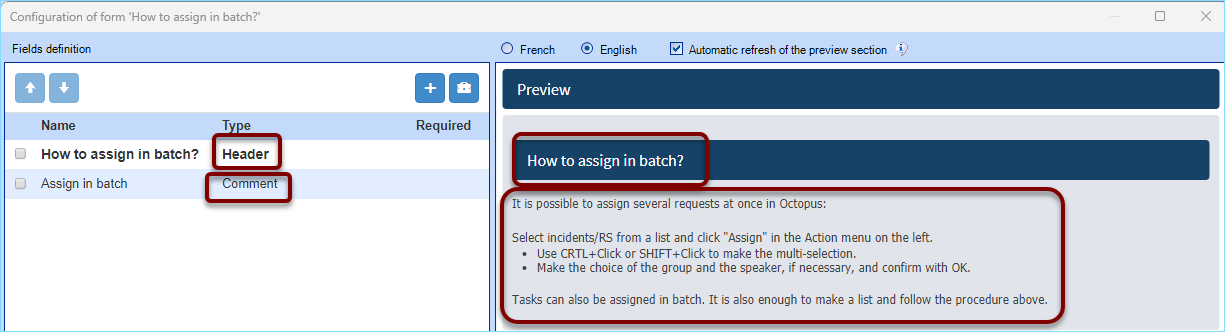
Creating the form
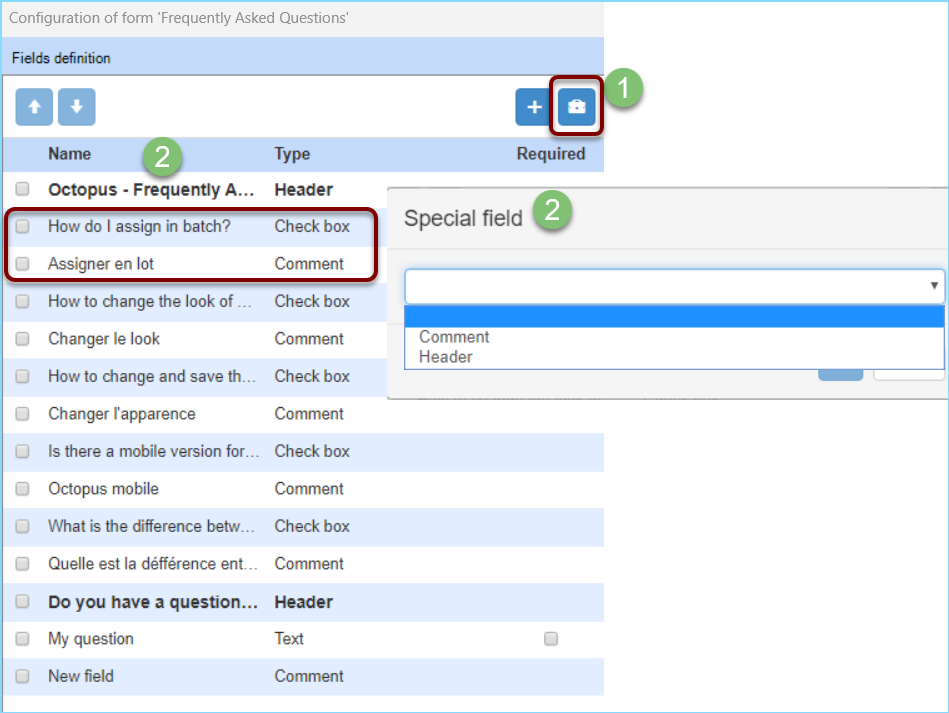
- Select the Form tab
- In this window, click on Configure form
- Alternate the creation of a Header field containing the title of the question, then a Comment field containing the content of the answer.
In the end, you'll have created a form that's completely informative, so you can quickly answer frequently asked questions.
This type of form doesn't allow you to submit, because if you use only the Header and Comment fields, the Submit button won't appear.
2nd method
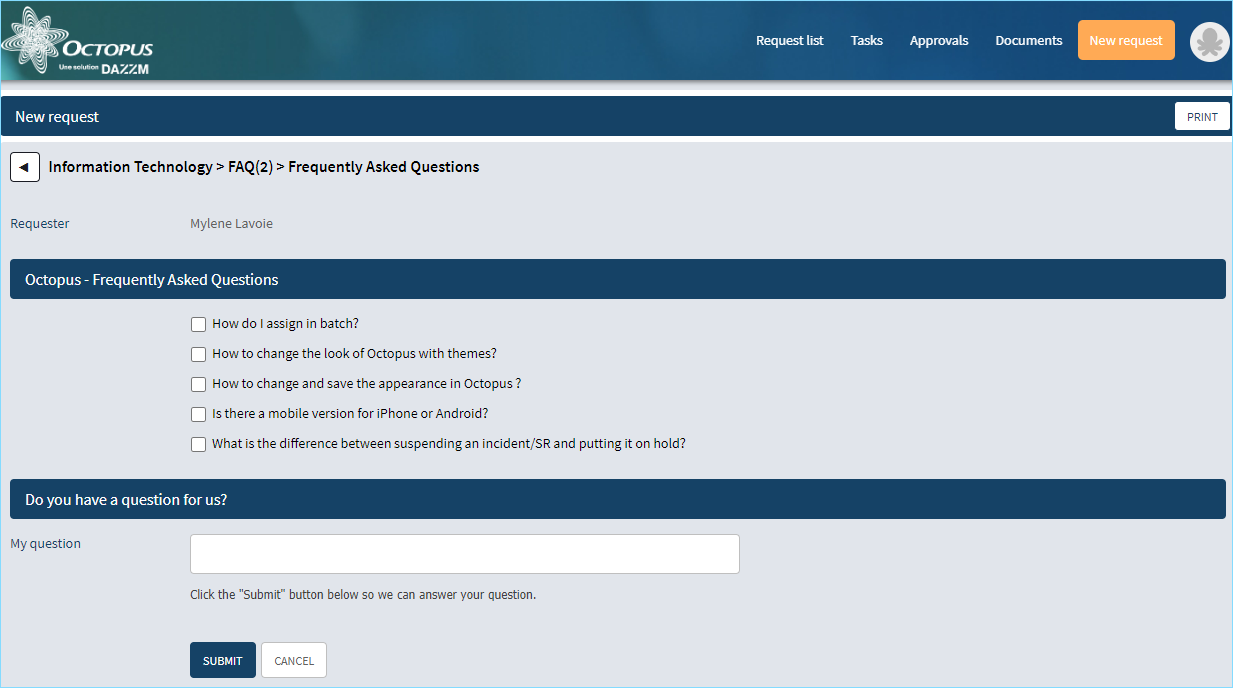
You can create a Frequently Asked Questions (FAQ) form using multiple field types.
With the method, the customer can submit the form to ask or suggest one or more questions to your team.
In this way, your FAQs can be updated on a regular basis.
Configuration
- Menu Tools > Reference data management
- Create a new category in Service Request
- Position your cursor on Type, right-click, then Add
- Select Category (Folder)
- Create a Frequently Asked Questions (FAQ) category to publish an independent tile on the Web portal
In this category, add a Service Request Type named Frequently Asked Questions (FAQ)
Creating the form
- Click on the Form tab
- In this window, click on Configure Form
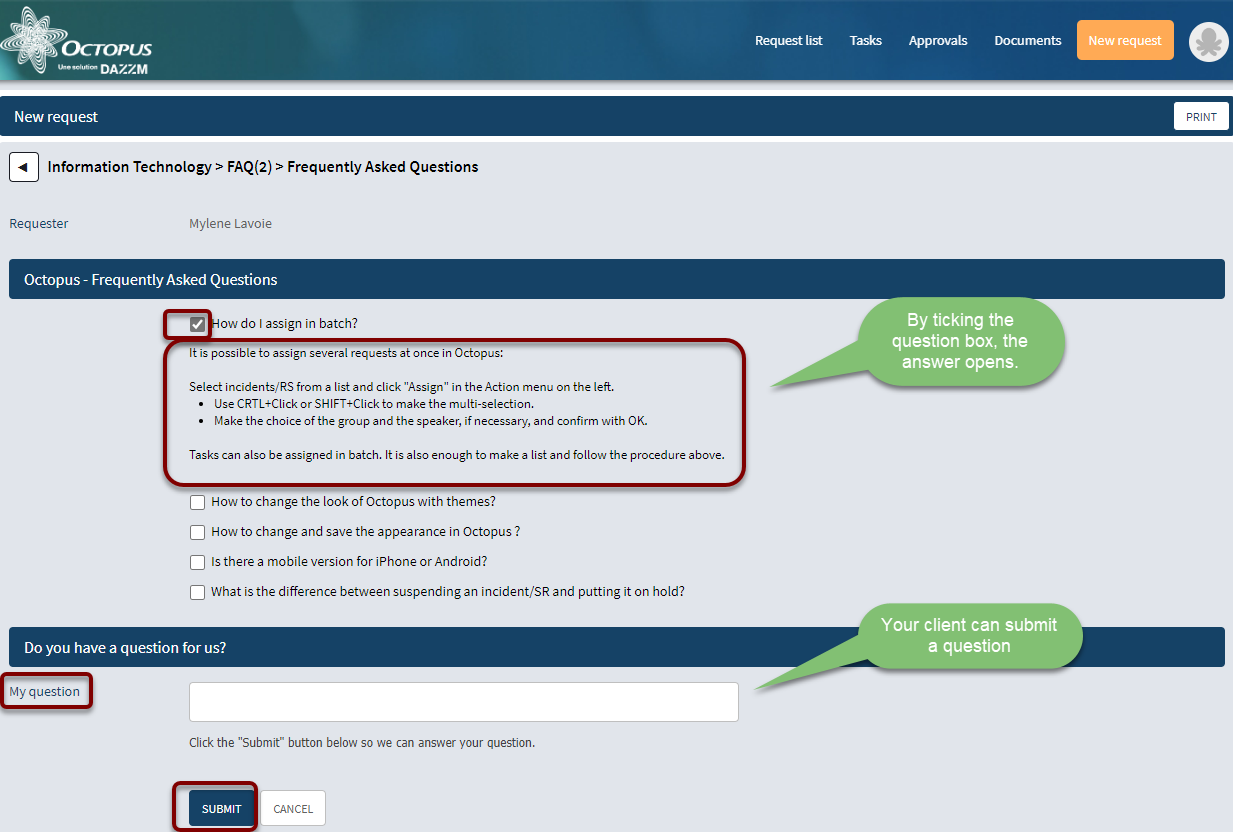
- In this method, you'll use Checkbox and Comment fields, conditions and a Text field.
You must :
- Create a Checkbox for each question.
- Create a Comment field containing the answer for each question.
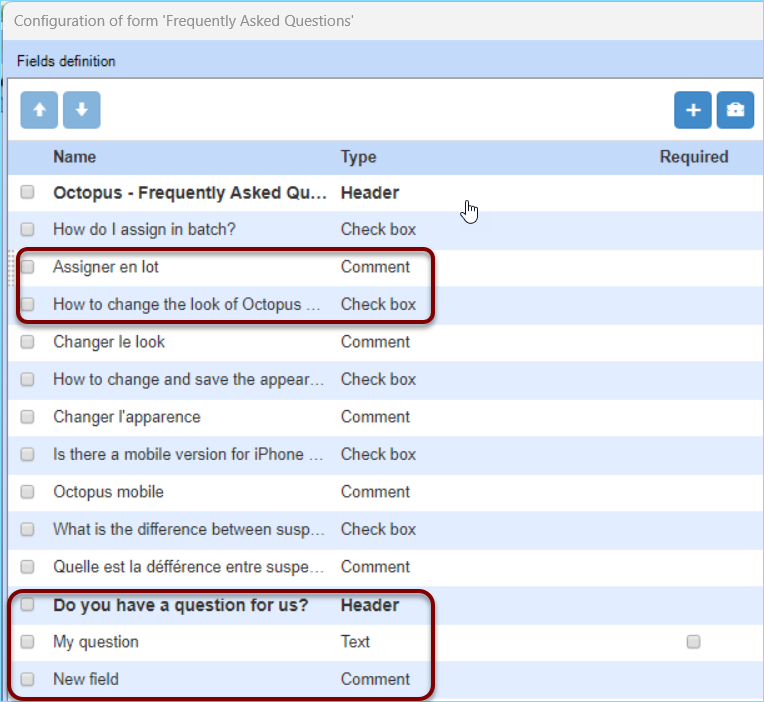
- In the Option section of each Comment field, set the display condition. For example: = Yes
/Condition%20d%27affichage.jpg)
- Your form will present the questions at the top and, by ticking a question, the Comment field will open to present the answer.
This form will allow you to see all the questions at once, concentrated at the top of the form, tick the question that interests the customer and submit a question to the Service Center.
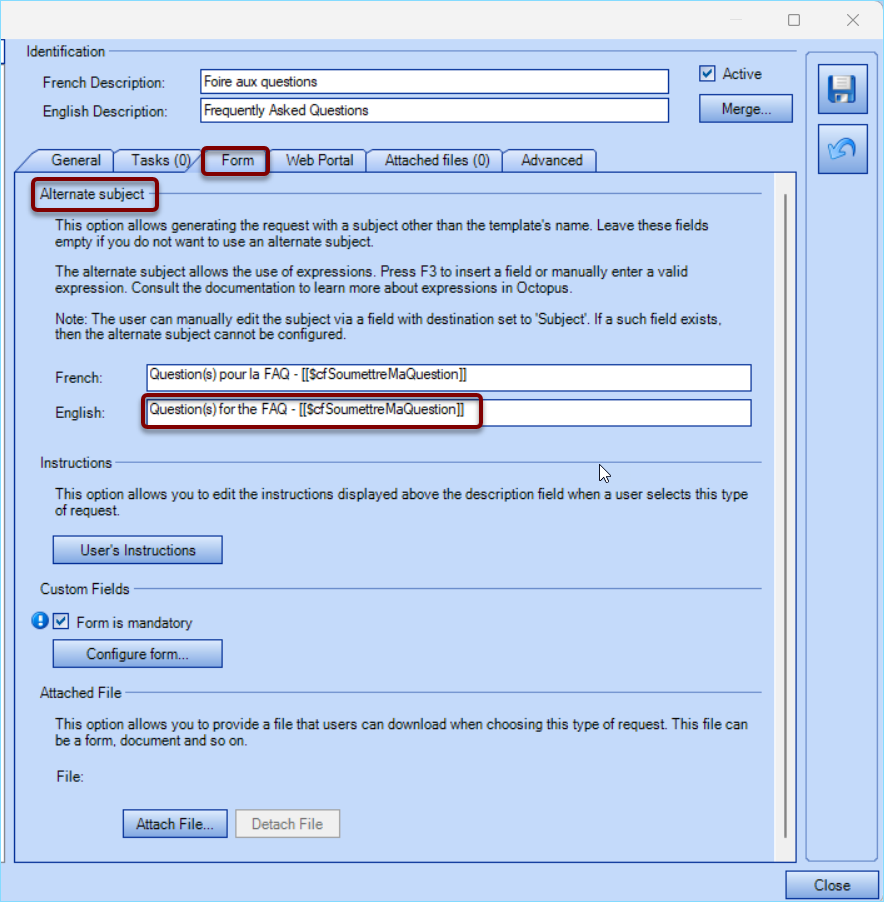
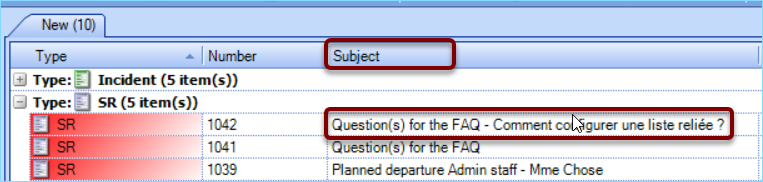
Alternative subject
To make it easier for stakeholders to categorize this type of request and to clearly identify the subject, we suggest you create an alternative subject.
In the space for entering the alternative subject in the Form tab, you can insert a variable using the F3 function.
This variable is a custom field, i.e. the Submit my question text field in the form shown in the following example (expand See image)
3rd method
This method consists in creating a form for each question and using the comment field.
Configuration
- Tools menu > Reference data management
- Create a new category in Service Request
- Position cursor on Type, right-click, then Add
- Select Category (Folder)
- Create a Frequently Asked Questions (FAQ) category to publish an independent tile on the Web portal.
- In this category, add a Service Request Type per question.
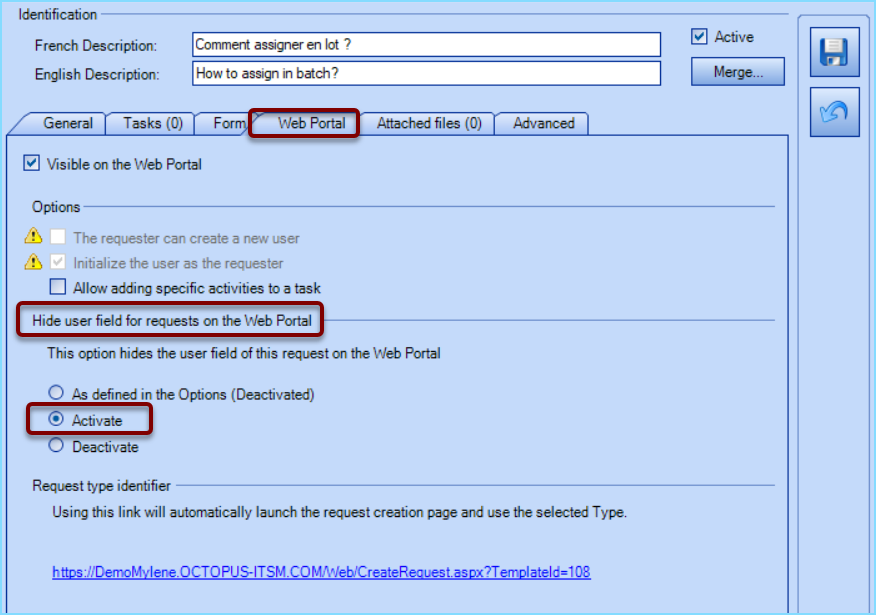
Creating the form
- Select the Form tab
- In this window, click on Configure form
- Create a form for each question
- Each form will contain only one Header field for the title and a single Comment field for the answer.
- We recommend that you hide the User field in each form of this method, as it is not necessary.
/R%C3%A9sultat_3.jpg)
/R%C3%A9sultat_3_v3.jpg)
4th method
A collection of public documents can be created on the Web portal.
These documents can be procedures, explanations, processes, policies and so on.
This can be a simple knowledge base, or it can take the form of frequently asked questions.
This method is only available to Team 1 of an Octopus database, often the IT team.
Consequently, only this team can publish documents on the portal.
Some documents may, however, be made visible to one or more specific departments or users within the company.
Requirements
- In order to publish documents on the modern Web portal, your IT team needs to send a request to the Octopus Service Desk to have the "Knowledge Base" added to your database.
You must have the required knowledge. A bank of hours is required in this case.
- Once installed, an additional button will be added to the Web portal's main menu.

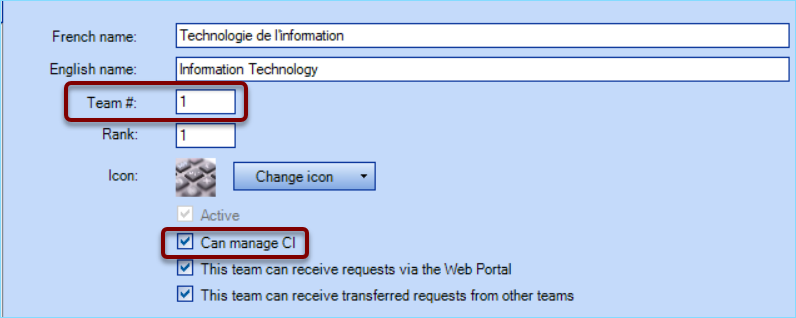
- The administrator must also check the Can manage CIs tab in Reference data management > General > Team > Information technology (Team 1).
FAQ CI configuration
To publish documents on the Octopus Web portal, you need to configure an FAQ CI type and complete the following steps:
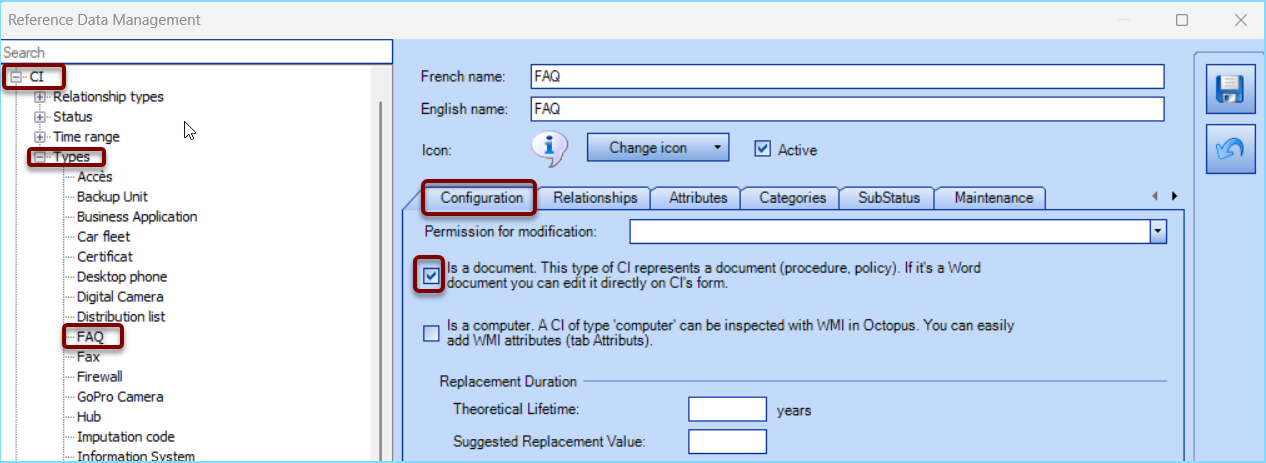
- From the Tools > Reference data management > CI > Types menu, add the FAQ CI type, which will enable you to publish your documents.
- In the CI configuration window, check Is a document
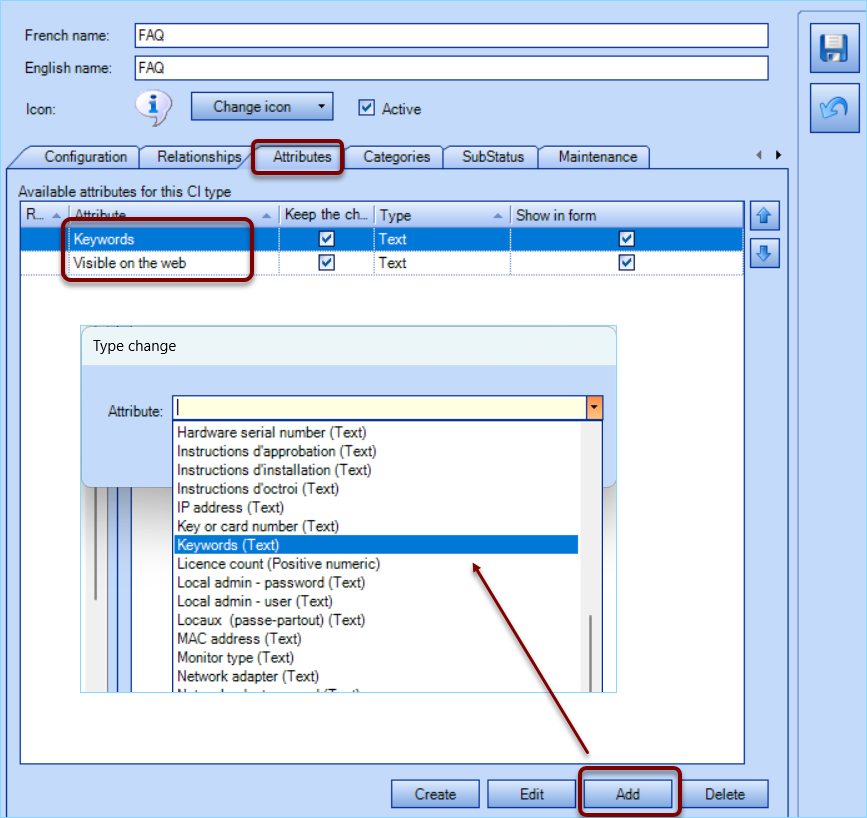
- Add the Keywords and Visible on the Web attributes
Configuration du CI
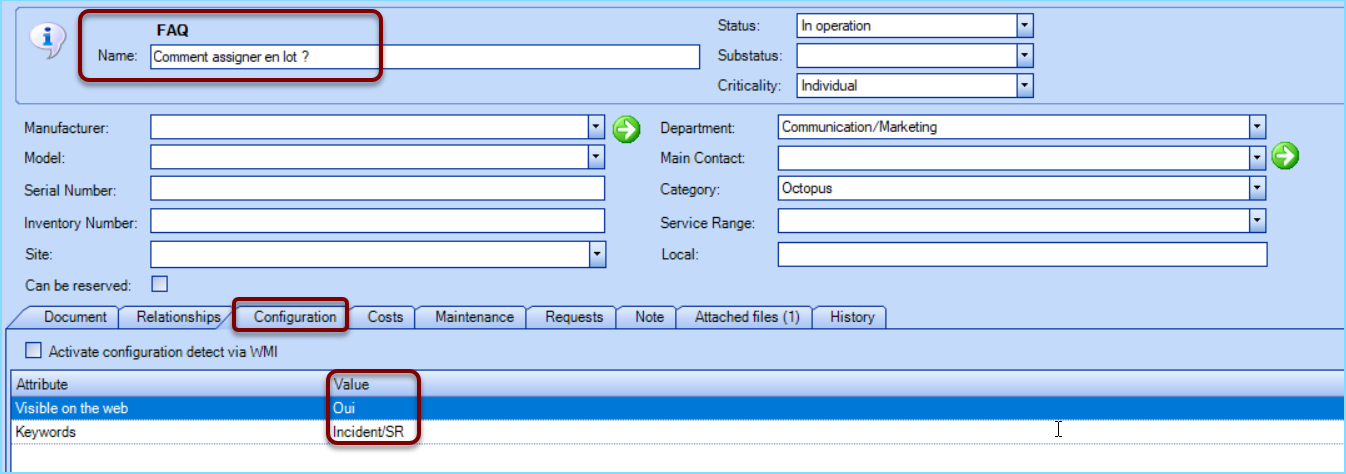
For CIs for which documents (attachments) must be visible:
- Put Yes in the Value field Visible on the Web
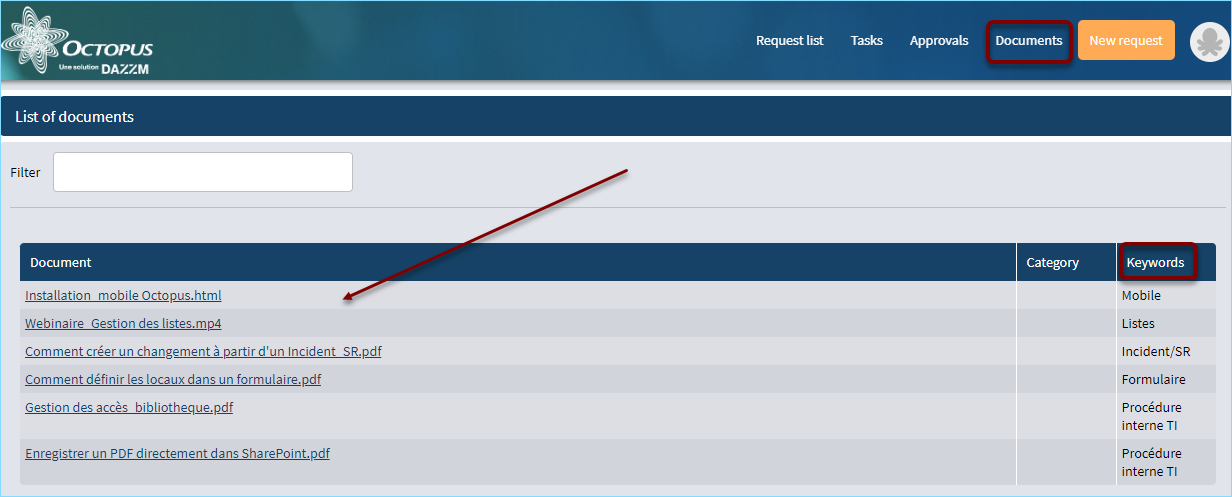
- Add keywords to help the user find the document quickly when using the Filter window, or to classify it by clicking on the Keywords column in the Web portal.
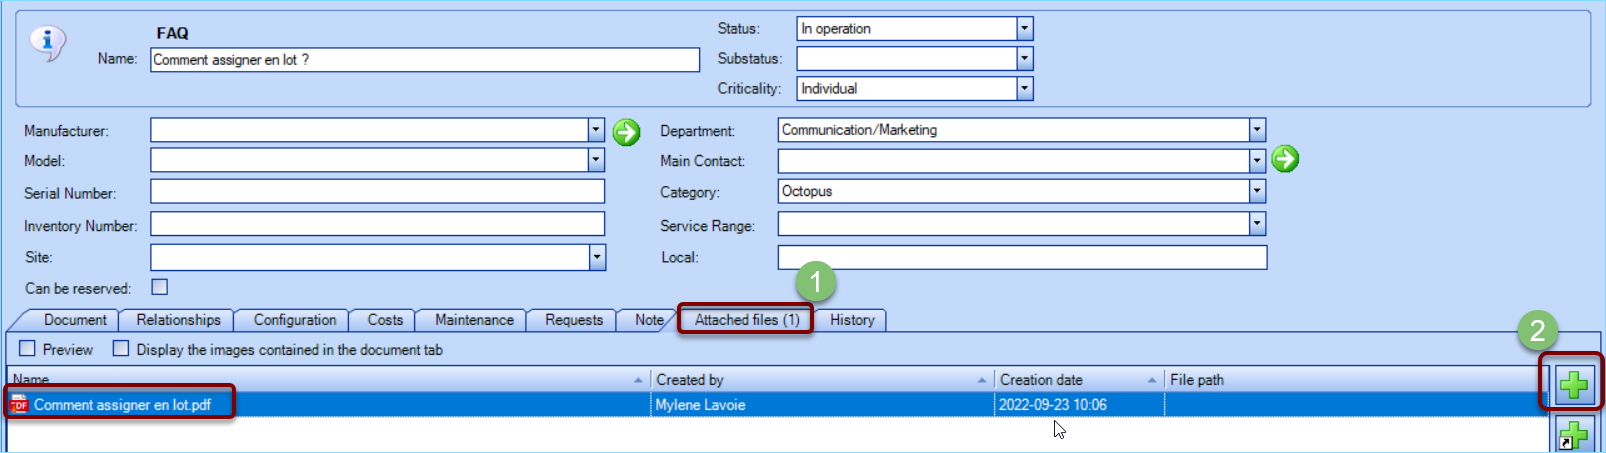
- Add one or more attachments to the file attachments tab as shown below
- Here is the list of possible file extensions: jpg, txt, doc, docx, rtf, png, gif, pdf, xls, xlsx, ppt, pptx, mp4, html
Manage document access
You can restrict access to certain documents.
There are a number of ways to do this.
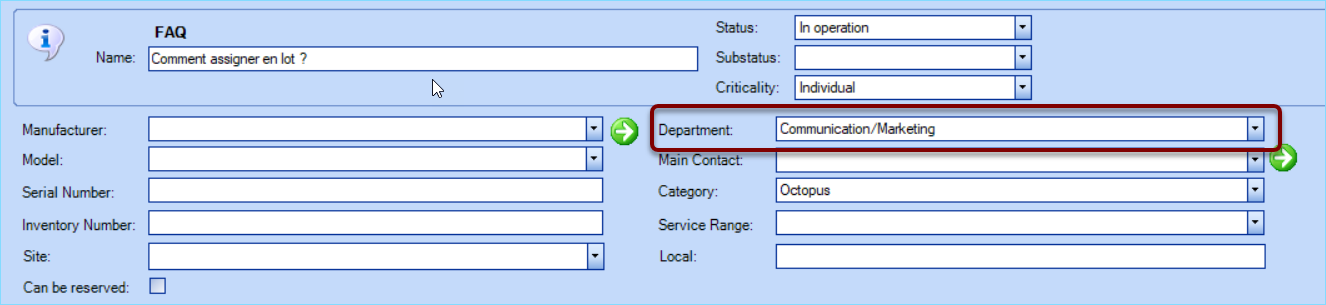
Restrict access to a department
For each document, you can restrict access to certain documents to a single department by assigning this department in the CI file.
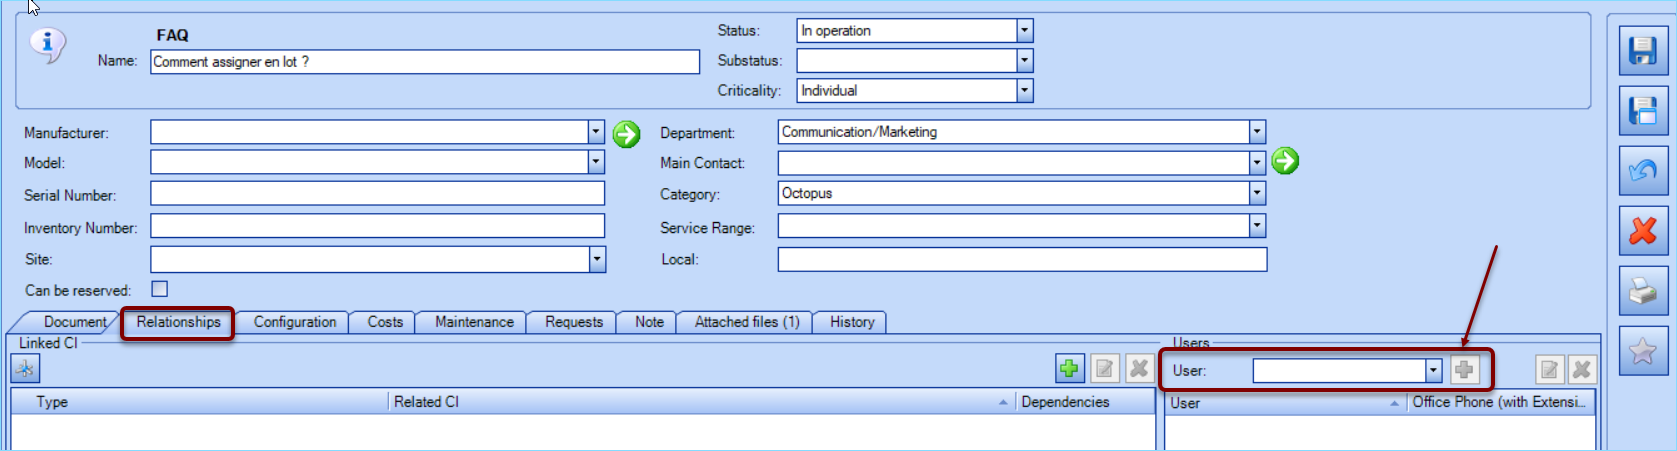
Restrict to a few people
To make a document visible to certain people only, from the Relationships tab, you need to add one or more users to the CI of the document in question.
You have two options:
- You can add a department to target the people associated with it AND add users from any other department.
- To associate several people who do not belong to a single department, but to several departments, leave the Department field blank and add users one by one.
You need to do this for each FAQ CI, as the configuration is specific to each one.
Visible to all
- To make it visible to all, simply leave the department field empty and do not add any users.
View documents on the Web portal
- Once connected to the web portal, a new Documents button is now accessible thanks to the installed "plugin".
- When you click on this button, all published documents, respecting the access rights configured for users, will be available in list form.
Video
An explanatory video can be viewed on You Tube
Thank you, your message has been sent.