Table of contents
Introduction
Octopus can connect to Microsoft Entra ID to facilitate access to the application.
Using an identity federator provides an integrated login experience to your Octopus environment. Your users and technicians won't need to create a new password to use Octopus applications.
Prerequisites
This article is a supplement to the main article on configuring Octopus for Microsoft Entra ID. Make sure you have completed the steps outlined in the Identity Federation - Microsoft Entra ID article.
If your Octopus environment is not configured to use Octopus Web, you can skip these steps and focus on the main article.
How it works
Octopus Web / REST API
These applications use OAuth2 authentication mode with JWT tokens, which is not compatible with the SAML enterprise application (which is required for the Windows client and web portal). For this reason, you must configure a second enterprise application in Entra ID.
Before continuing with this article, make sure you have configured the enterprise application for the Windows client and web portal as described in the article Identity federation - Microsoft Entra ID.
Configuring Microsoft Entra ID
To connect Octopus Web (or the REST API) and Microsoft Entra ID, an Enterprise Application must be properly configured.
Creating an enterprise application
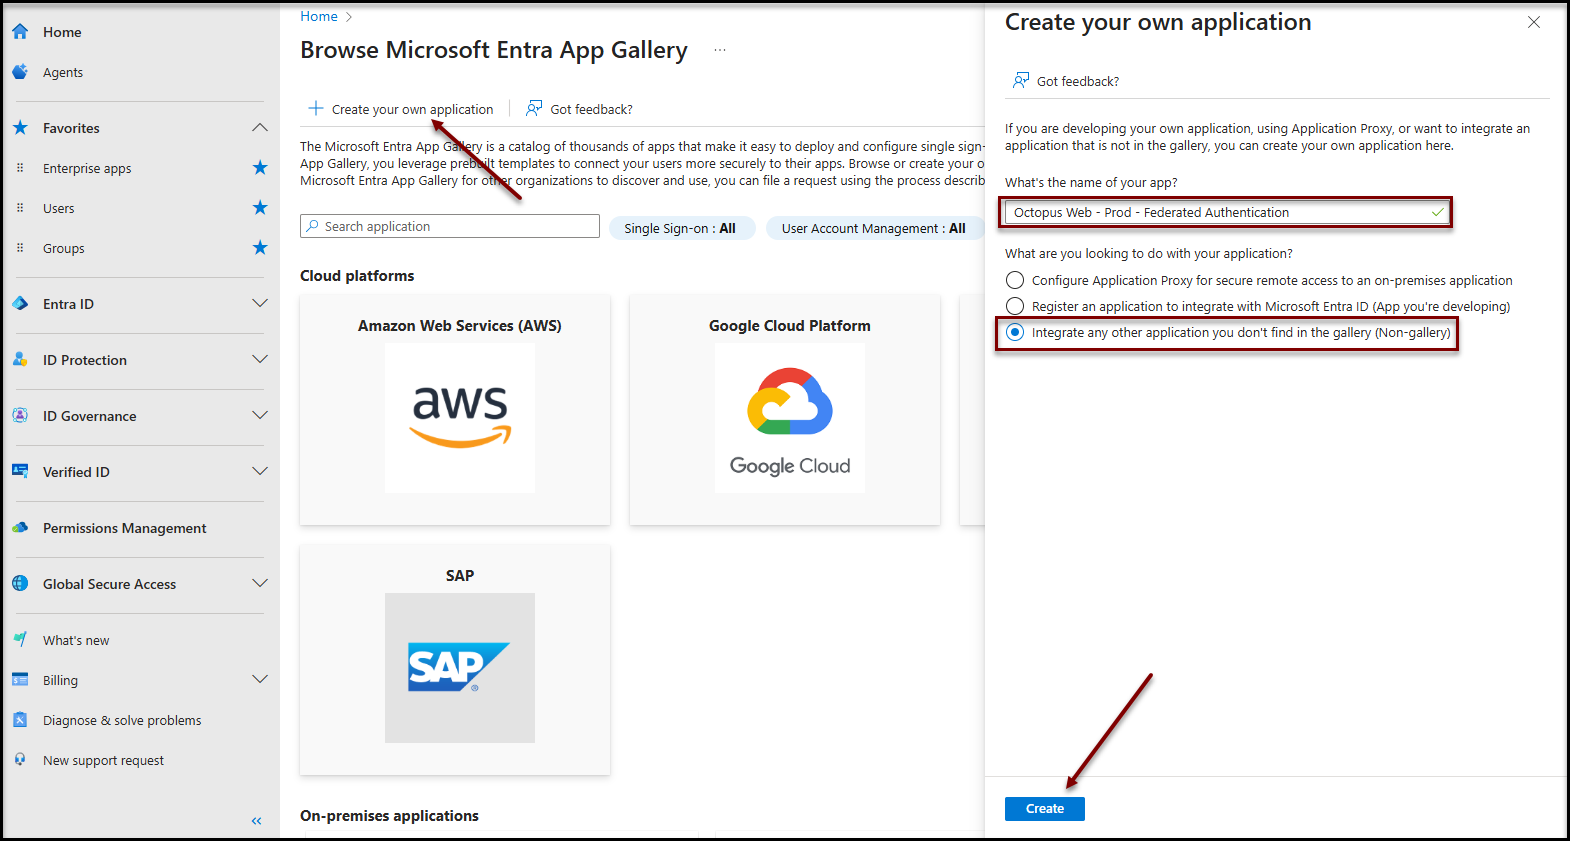
- Open the Microsoft Entra ID administration portal and navigate to the Enterprise Applications panel.
- Click on + Create your own application
- Enter a suitable name
- Select the option Integrate any other application you don't find in the gallery (Non-gallery)
- Press the Create button
Users authorization
Each user of your Microsoft Entra ID must be added to the newly created enterprise application. There are two possible choices:
- Autorization Authorization for all users in your company
- Manual user selection
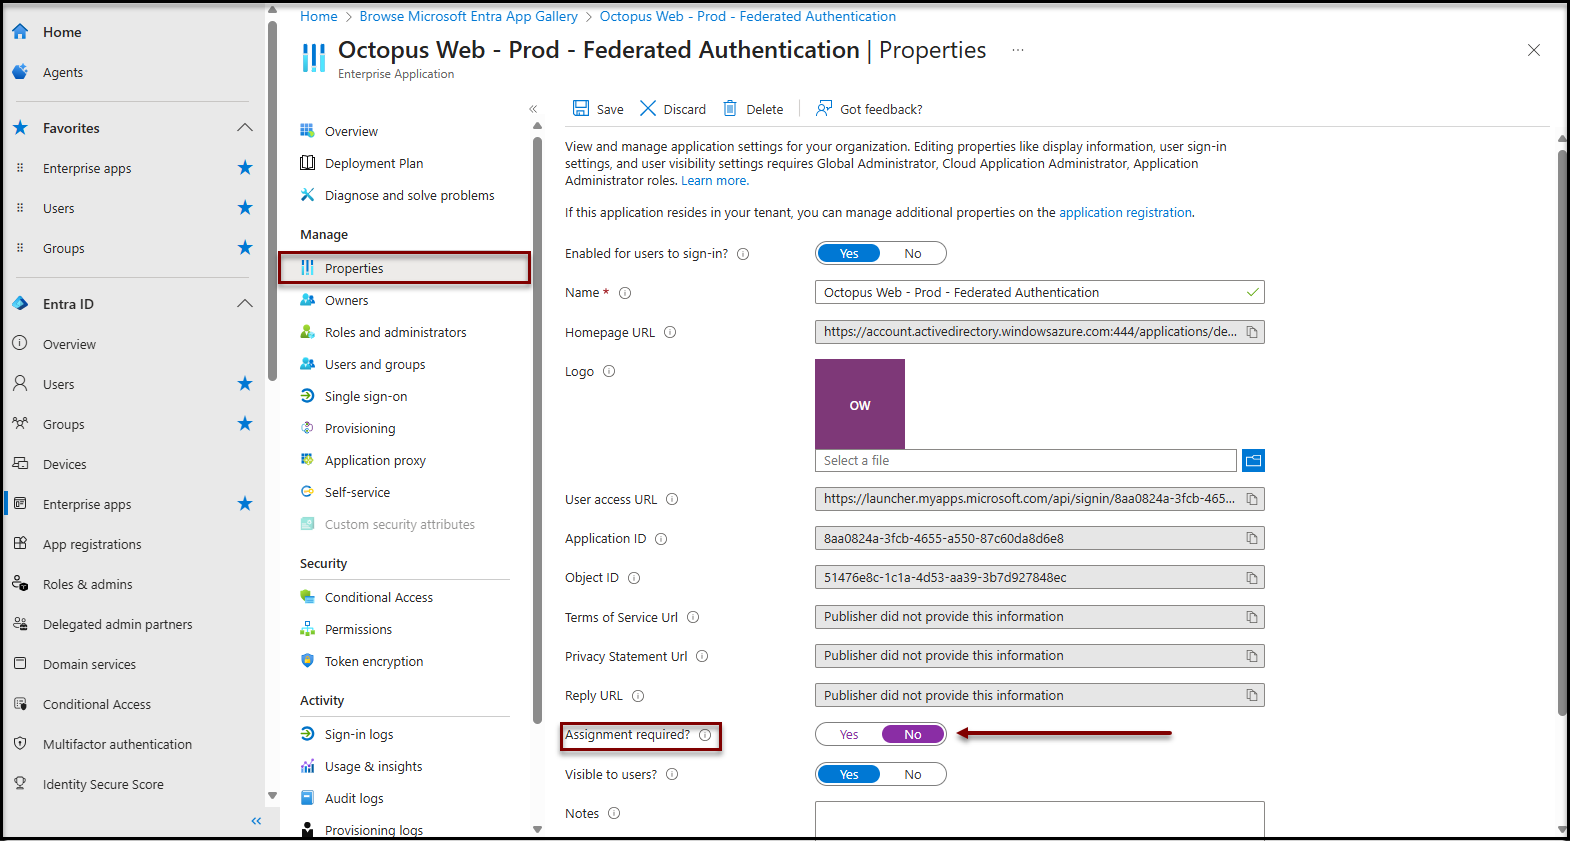
Authorization for all users in your company
To make this application available to all your users, you can disable the required user assignment for this applicfation``
- Click on the Properties item in the Manage section
- Change the value of the property Assignment required ? to No
It may take a few minutes for the configuration to be taken into account by the authentication system.
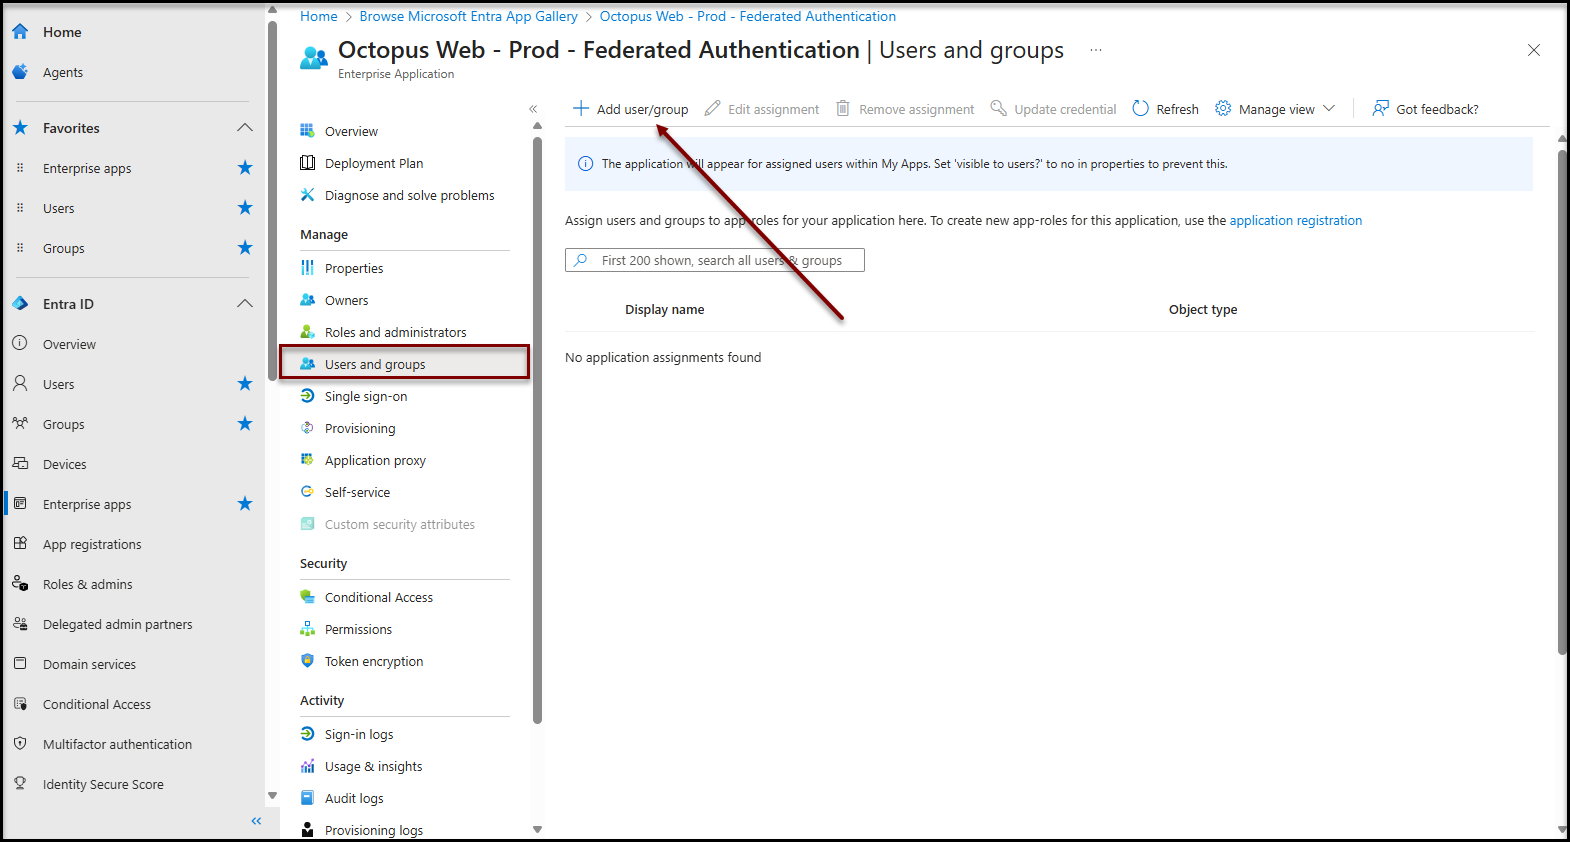
Manuel user selection
- Click on the Users and groups item in the Manage section
- Add users / groups according to your needs
It may take a few minutes for the configuration to be taken into account by the authentication system.
Application registration configuration
These configurations are necessary for the Octopus Web application (or REST API) to function correctly.
The following steps are performed from the application registration configuration page. You must therefore access the application registration (see the procedure in the annex).
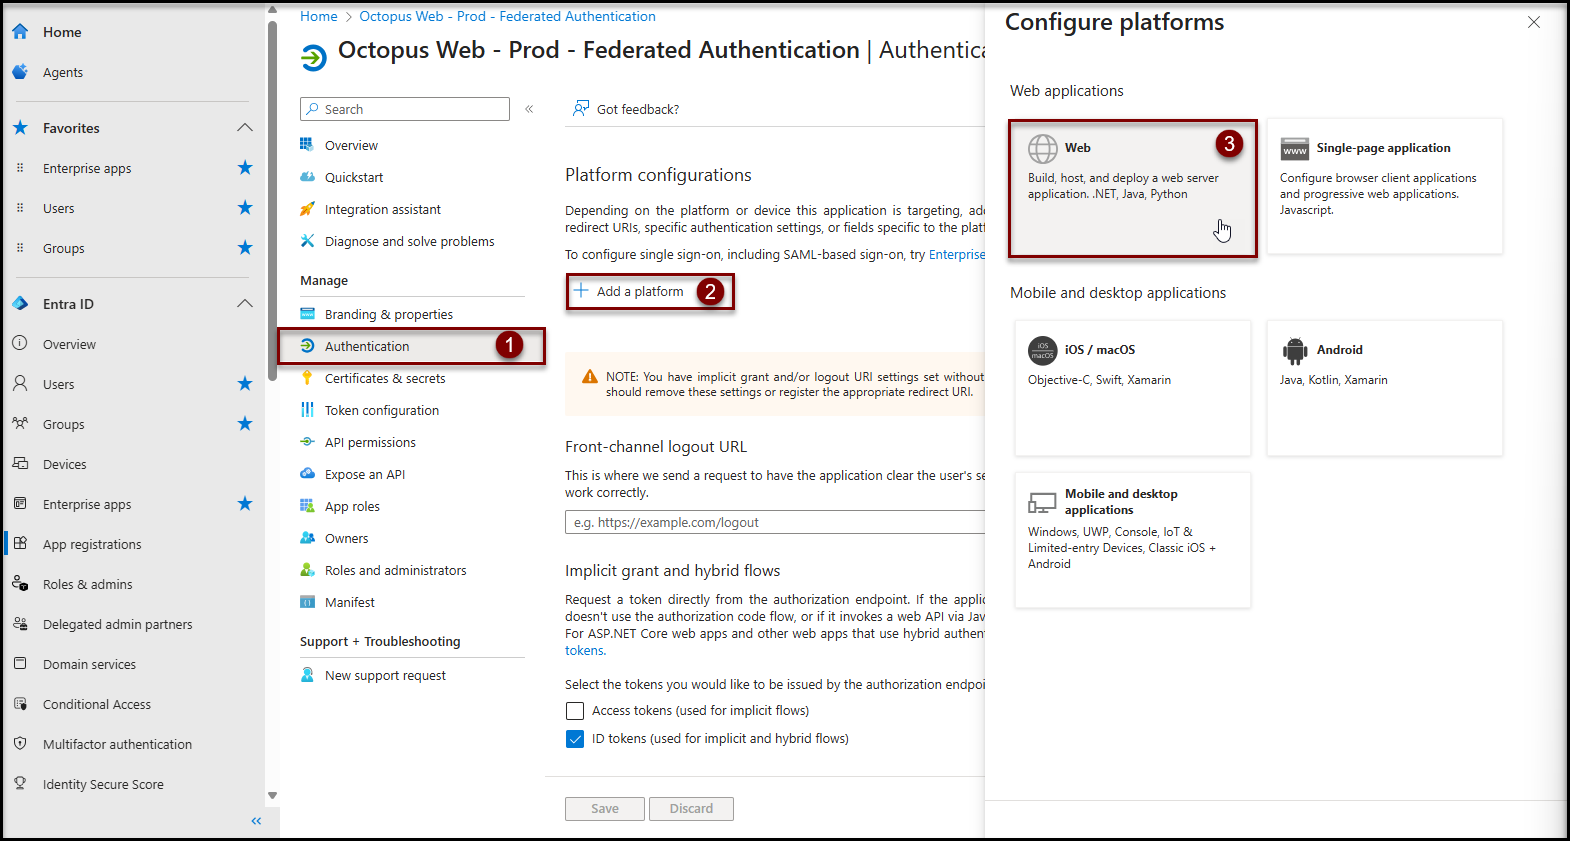
Authentication
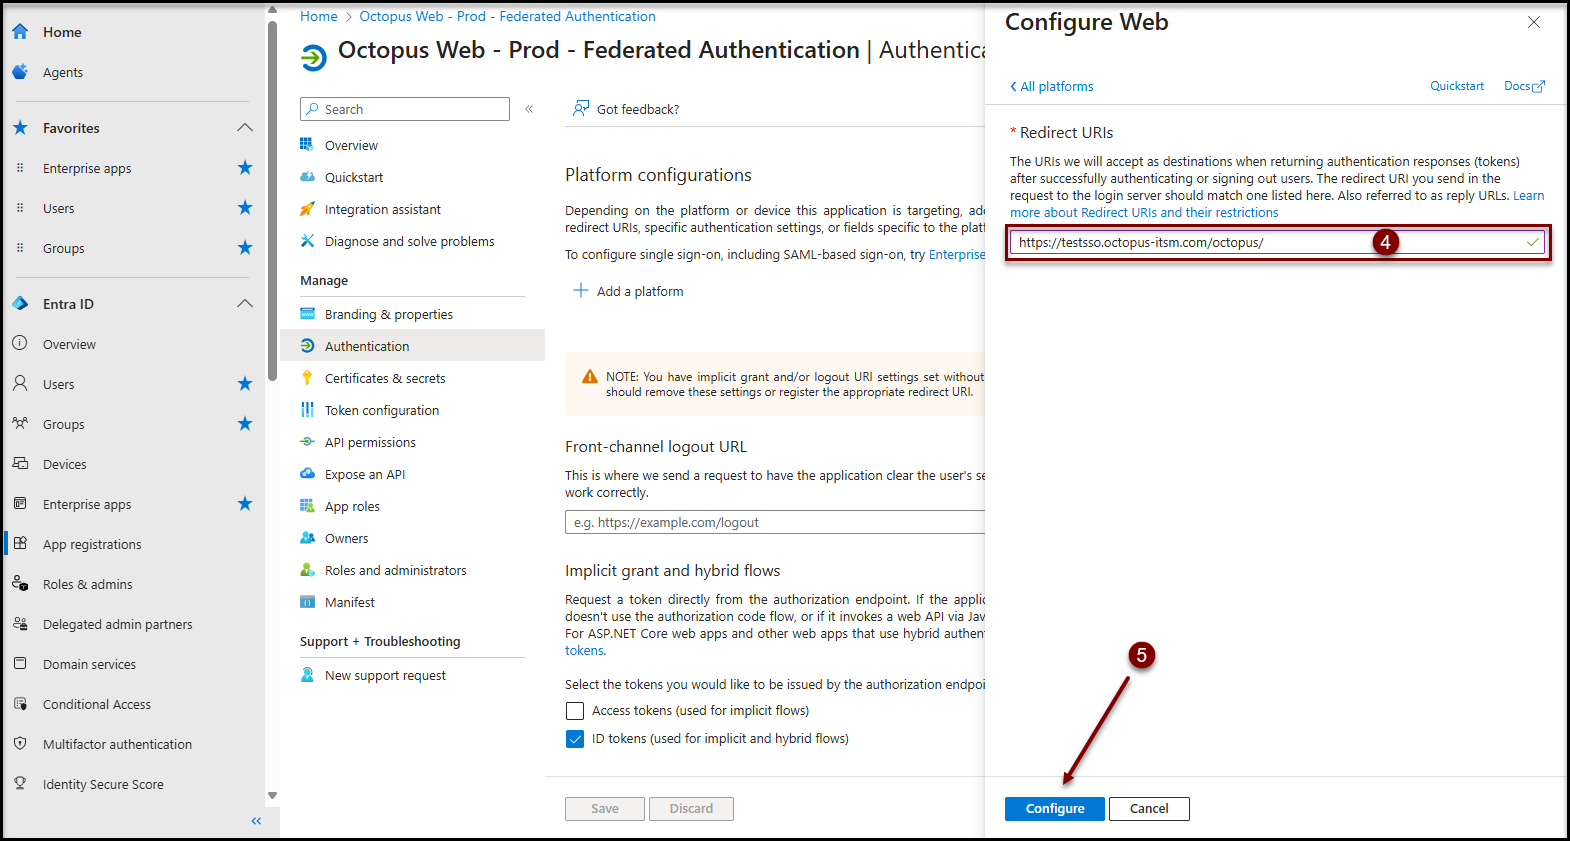
- Click on Authentication in the Manage section
- Click on + Add a platform
- Click on Web
- Enter the URL of your Octopus Web in the Redirect URIs field.
- This value takes the following form: https://[nameofyourenvironment].octopus-itsm.com/octopus/
- IMPORTANT:
Be sure to suffix the redirect URI with / at the end.
- Click on the Configure button
- Scroll down to the Advanced settings section
- Toggle the value of Allow public client flows to Yes
- Click on the Save button

Certificates & secrets
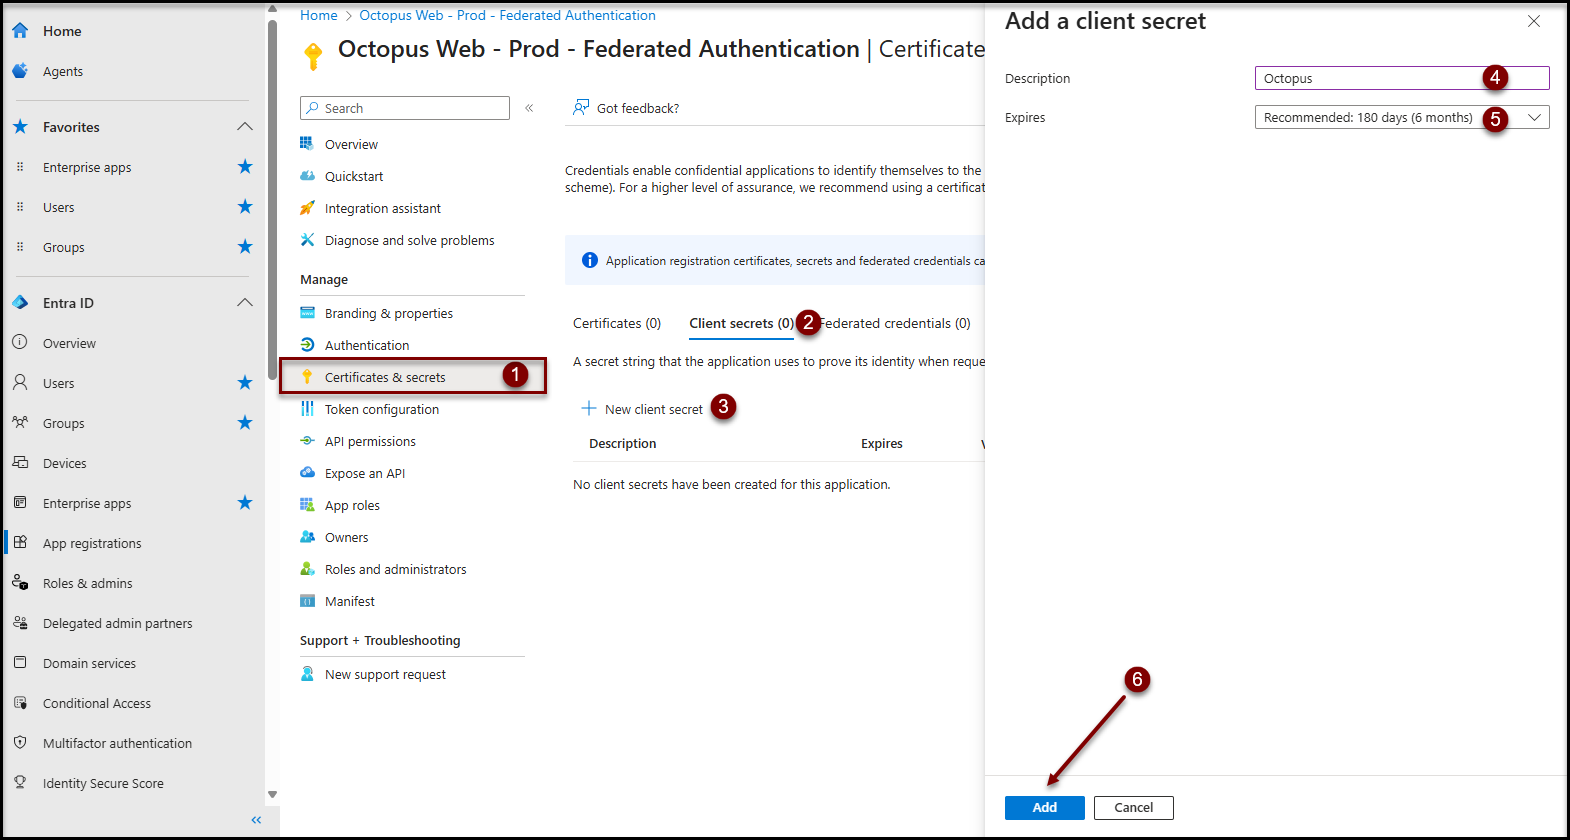
- Click on the Certificates & secrets item in the Manage section.
- Click on the Client Secrets (0) tab.
- Click on the + New client secret button.
- Enter a Description that is meaningful to you.
- Select the desired period according to your certificate and secret renewal policy in the Expires field
- An expired client secret will prevent all users from authenticating to the Octopus Web / REST API application.
- Be sure to make a note of the expiration date and renew the secret before it expires to avoid service interruption.
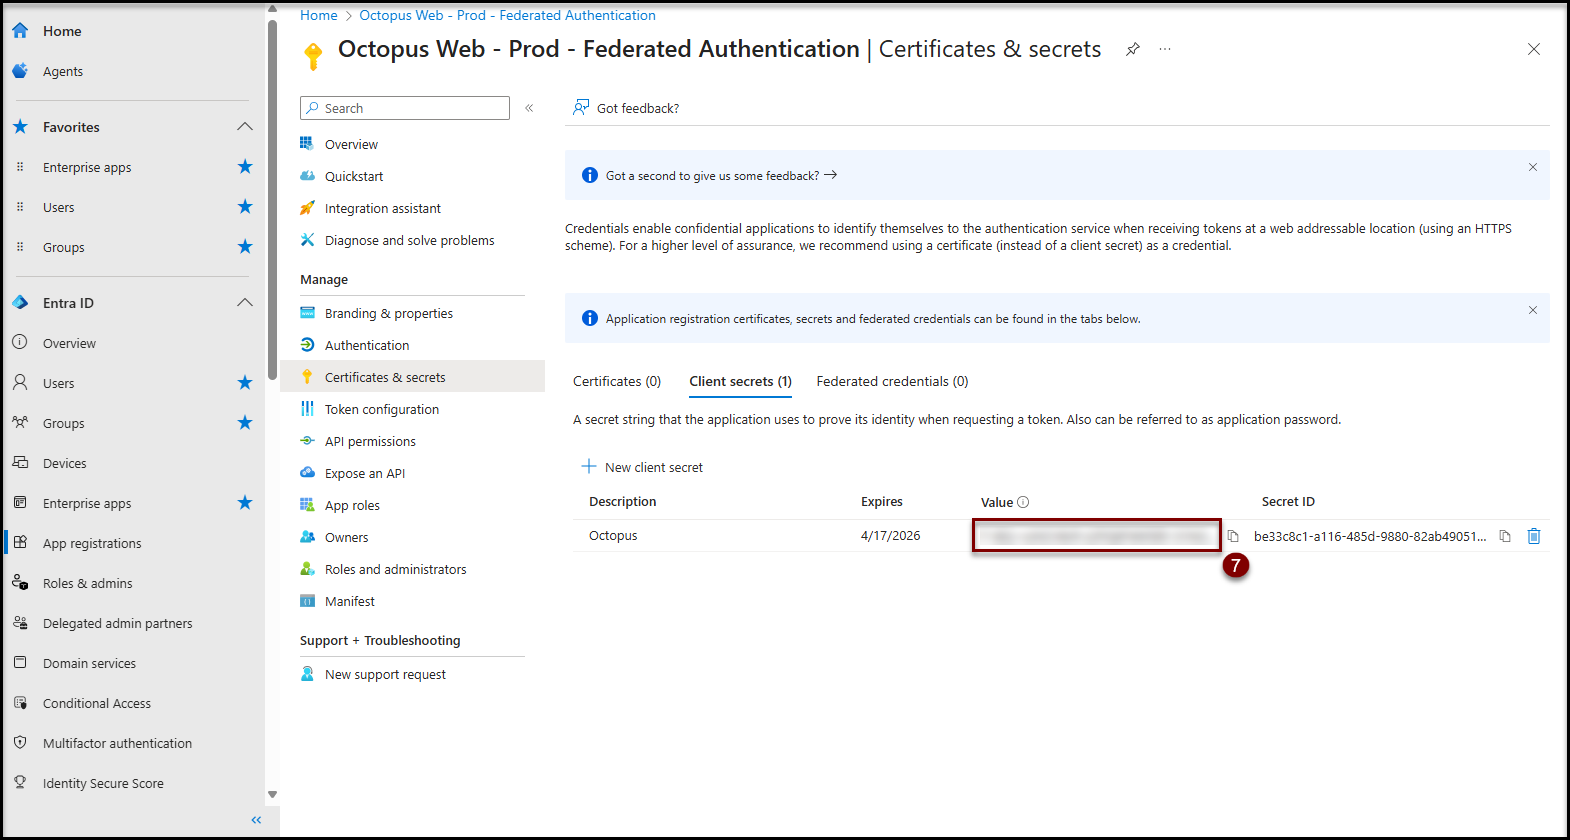
- Click the Add button.
- Keep the client secret value in a secure location. This value will need to be entered into Octopus in a subsequent step.
API permissions
Authorization configuration
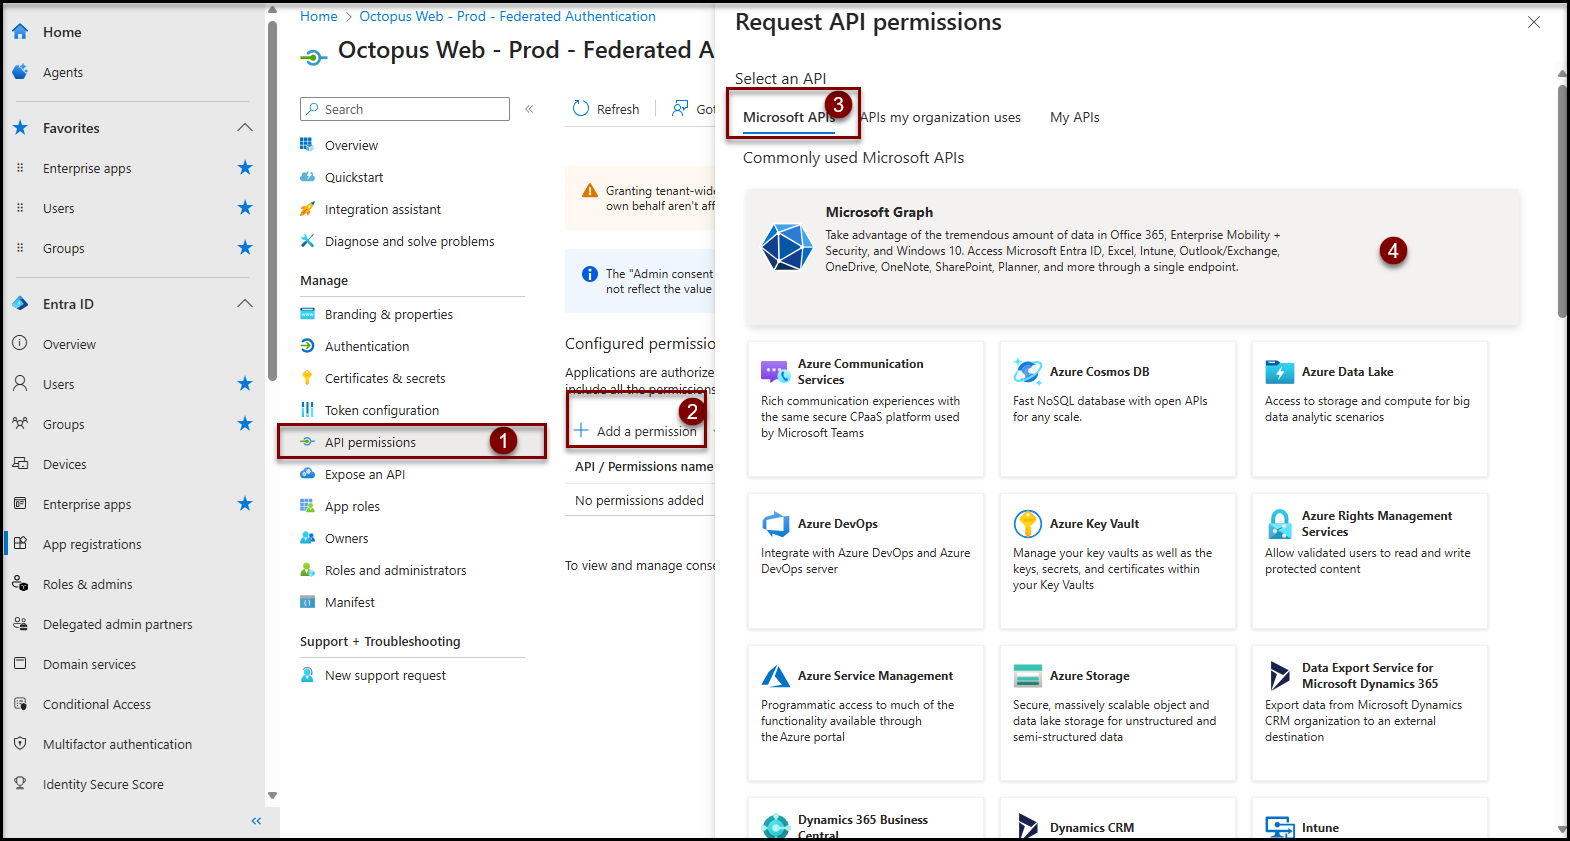
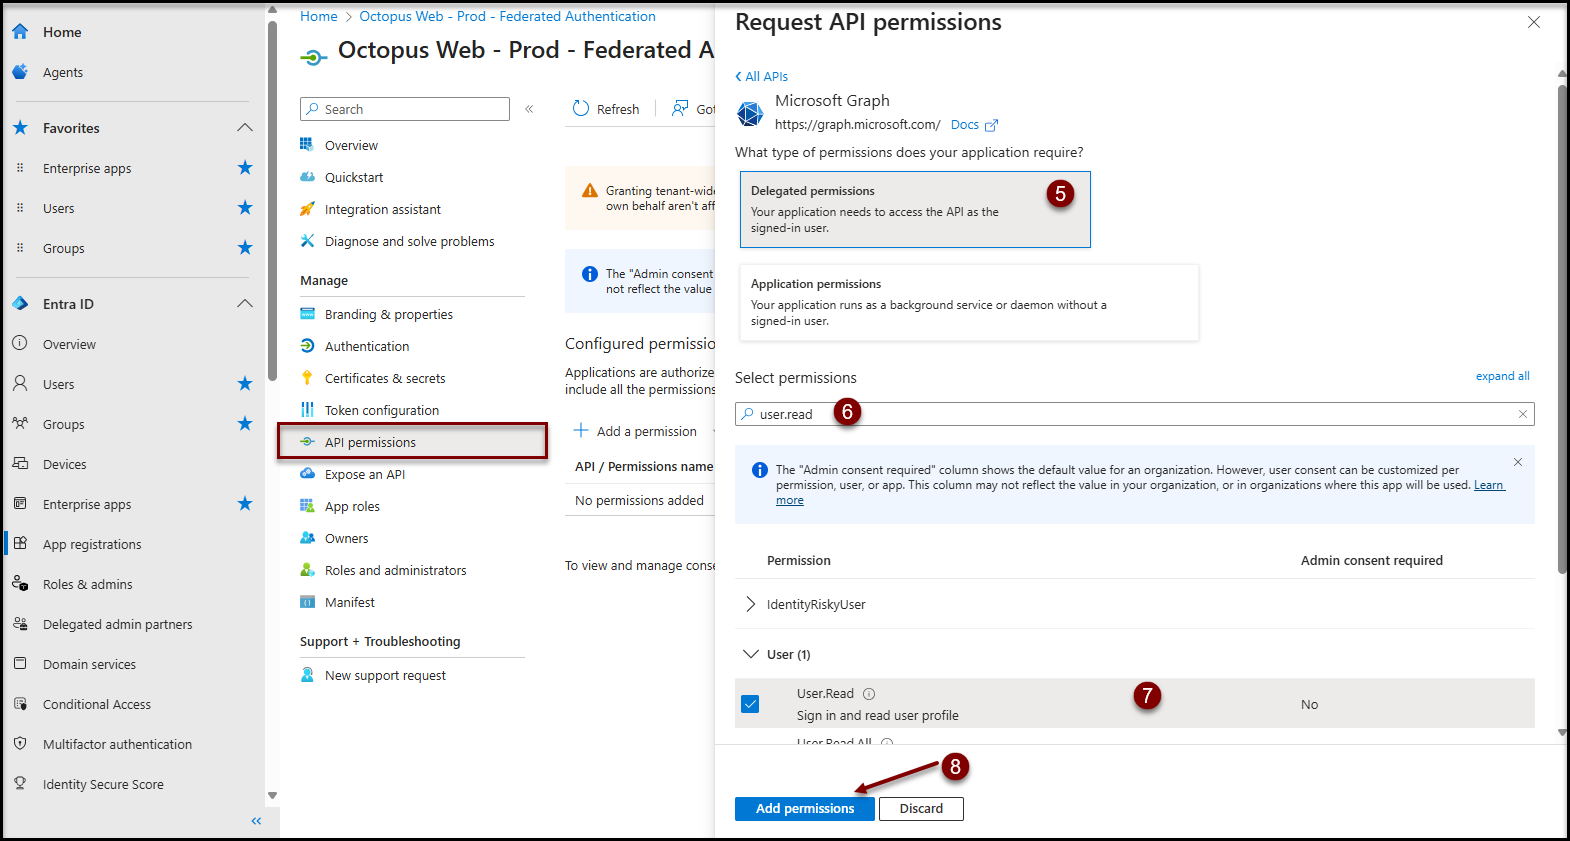
- Click on the API permissions item in the Manage section
- Click on the + Add a permission button
- Click on the Microsoft APIs tab
- Click on the Microsoft Graph button
- Click on Delegated Permissions button
- Type user.read in the filter text box
- In the results section
- Expand the User section\
- Check the User.Read permission
- Click on the Add permissions button
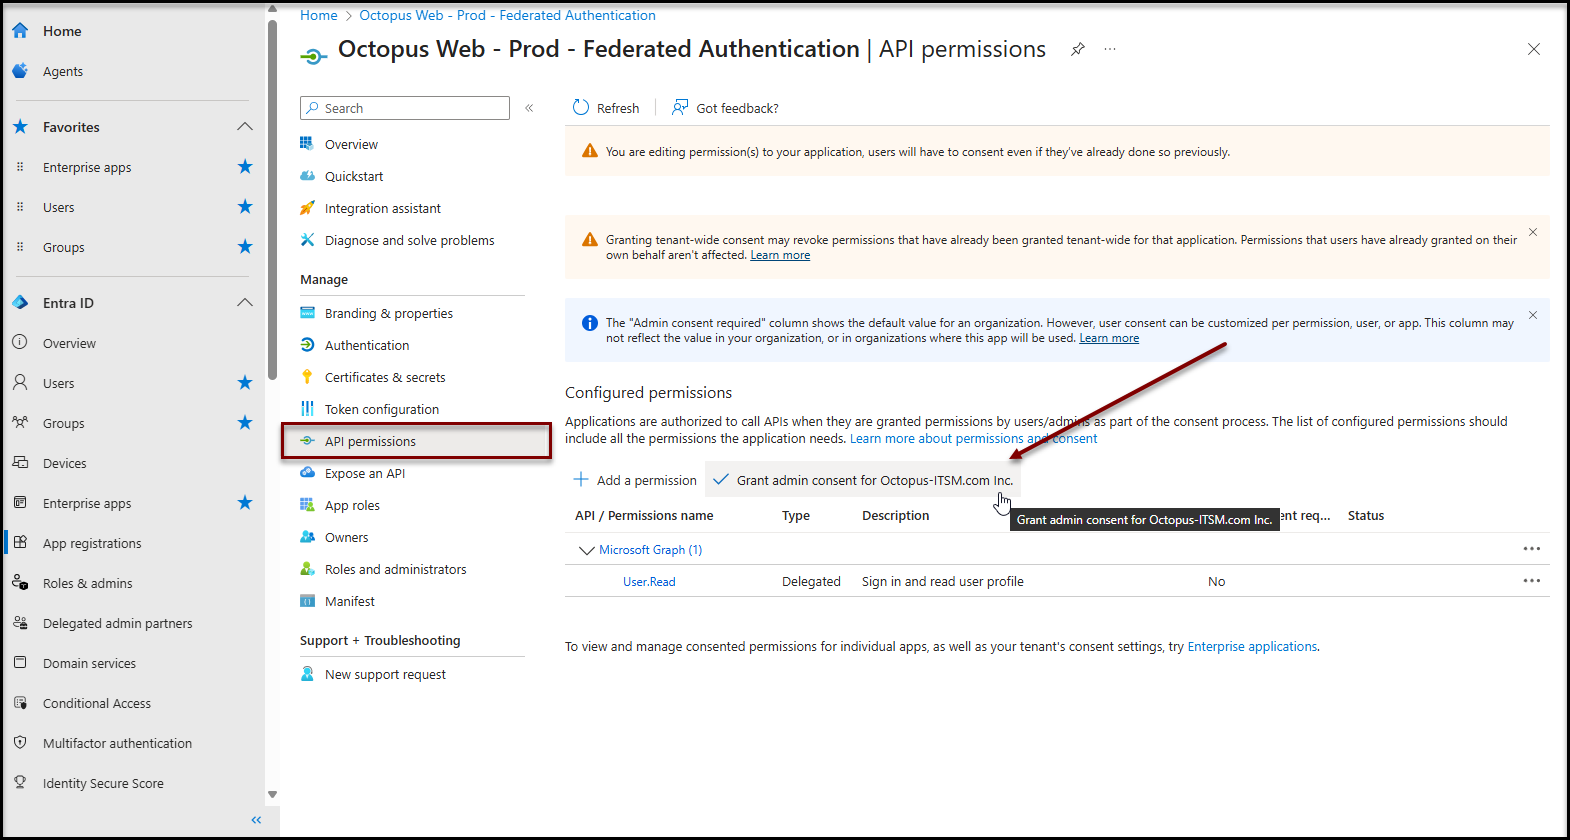
Grant admin consent
- Click on the Grant admin consent for [Your tenant name Entra ID] button
- Confirm consent
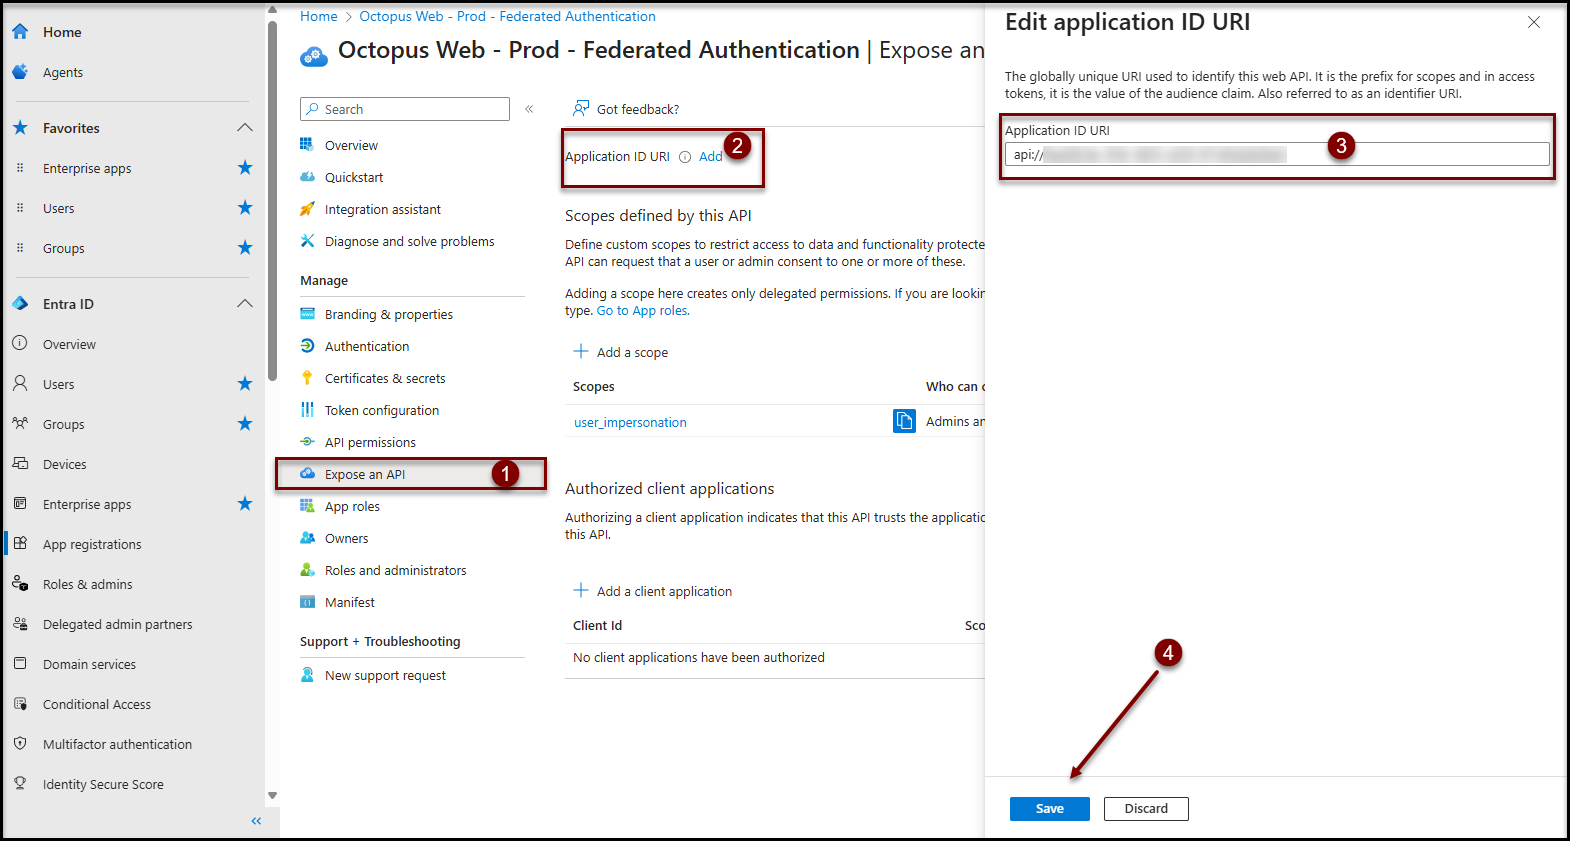
Expose an API
- Click on the Expose an API item in the Manage section
- Click on the Add link near the Application ID URI field at the top
- Confirm that the Application URI ID field looks like
- api://[Enterprise application ID]
- This value is the default value proposed by Entra ID
- Click the Save button
Octopus configuration
Prerequisites
Once your identity federation is in place, follow this procedure to finalize the setup with Octopus.
Enabling integrated authentication is only available if you have configured and tested your service federation server.
Only an Octopus administrator with the following access rights can complete the Octopus configuration:
- General - Administer Octopus.
- General - Modify common team data.
- Applications - Access the Web Portal.
- Applications - Access to Octopus.
- Applications - Access Web Tech.
Identity federation configuration
Validation
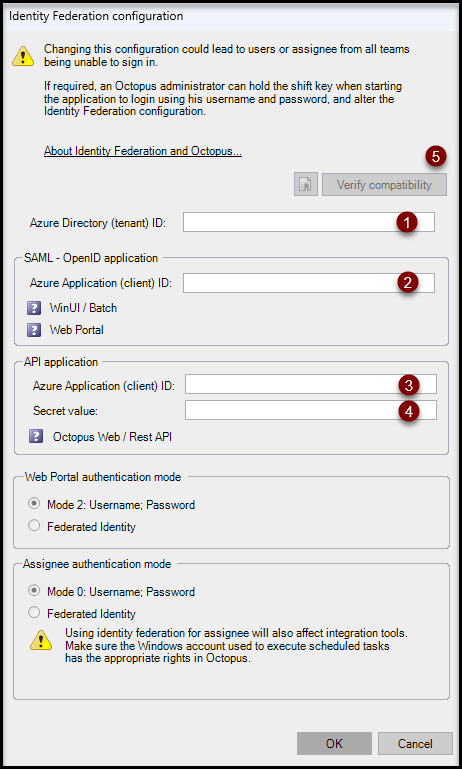
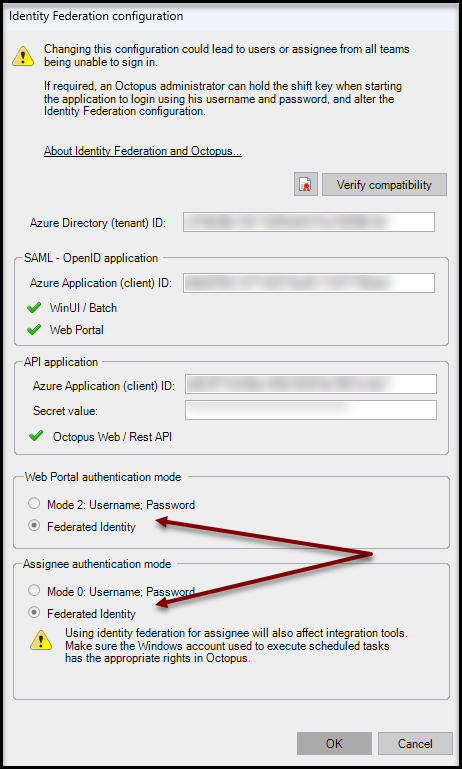
To start configuration, use the Tools > Identity federation configuration menu.
- Enter your Microsoft Entra Tenant ID in the Directory ID (tenant) field
- Enter the application ID that was created in the previous wiki article in the Application ID (client) field of the SAML - OpenID Application section
- Enter the application ID (noted above) in the Application ID (client) field of the API Application section
- Enter the secret value noted above in the Secret Value field
- Click Check Compatibility
- Your company's Microsoft Entra ID authentication window may appear. If so, select your account (it must have access to Octopus)
When the verification is complete, the status icons will change from a ? (Compatibility not verified) to a green check mark.
Authentication scope
Select the desired scope of federated authentication:
- Web portal authentication mode
- To have your end users authenticate automatically, select "Federated identity".
- You can return to the previous authentication mode at any time by selecting "Return to mode 2: Username; Password".
- Assignee authentication mode
- To have your technicians (using the Windows application) and Batch tools (MailIntegration, ADSIReader, DataImporter, etc.) authenticate themselves automatically, select "Federated Identity".
- You can return to the previous authentication mode at any time by selecting "Return to mode 0: Username; Password".
Annex
How to find the enterprise application
- Ouvrir Open the main Microsoft Entra ID administration console
- Microsoft Entra admin center (https://entra.microsoft.com)
- Expand the Entra ID section
- In the search box, enter the name used to create the enterprise application
- Select the desired enterprise application
How to find the app registration
-
Ouvrir Open the main Microsoft Entra ID administration console
-
Microsoft Entra admin center (https://entra.microsoft.com)
-
-
Expand the Entra ID section
- Click on the App registrations
- Click on All applications
- In the search box, enter the name used to create the enterprise application
- Select the desired enterprise application
Thank you, your message has been sent.