Table of contents
Related Articles
- How to reset a user's password
- Web Portal Authentication Modes
- Customizing the Home Page
- Restrict access to Web Portal to an IP address range
- URL Parameters of the Web Portal
- Web Portal for Building Maintenance Workers
Introduction
With Octopus, it is possible to use a Web Portal for your users and significantly reduce the number of calls to the service center. This self-service Web Portal not only allows users to make their requests (incidents and service requests), but also keep track of these requests, add comments to the journal report and receive messages from the service center .
Implementation
For the address of your self-service Web Portal, simply select Tools > Launch Web Portal menu in Octopus. The default authentication mode requires a user name and password. The username field is connected to the "Windows Username" field of the user file and the password will be emailed to the user when he registers for the service. For all authentication modes available, refer to the article Web Portal Authentication Modes.
First login - username and password
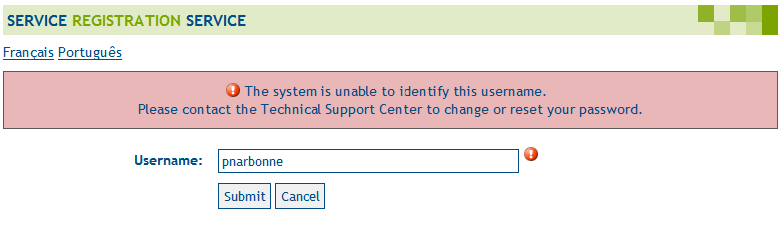
When the authentication mode is by user name and password, you must first register to the service to receive your password via email. Please note that usually, the username in Octopus is connected to the Windows username. In order for this connection method to work, users using the Web Portal must have a Windows Username and a valid email in their Octopus file. If a duplicate of these two fields is found in Octopus, the system will give an error message and the user will not be able to register to the Web Portal.
Registering steps
- From the home page of the Web Portal, click on the link Register to this service.
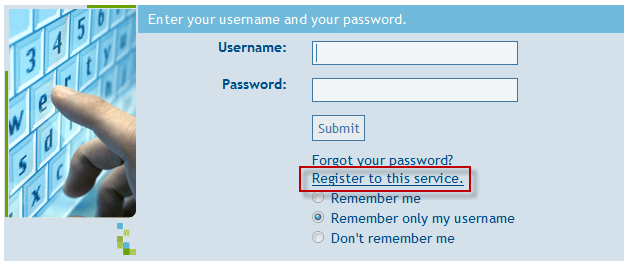
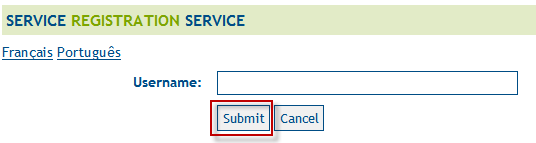
- In the next window, enter your username and click Submit. Generally, your username is the same as Windows. Otherwise, you must check with your service center to find out your username.
- Once registered, the system will send you a password by email within a few minutes.

You can now connect to the Web Portal using the password received by email and create your request. Please note that the once connected to the service, you can change your password to use one easier to remember.
Option to create a user account during registration
By default, a user must already exist in Octopus to be able to register. But in certain environments, for services to the population, for example, you will want the user to be able to create his account from the Web Portal.
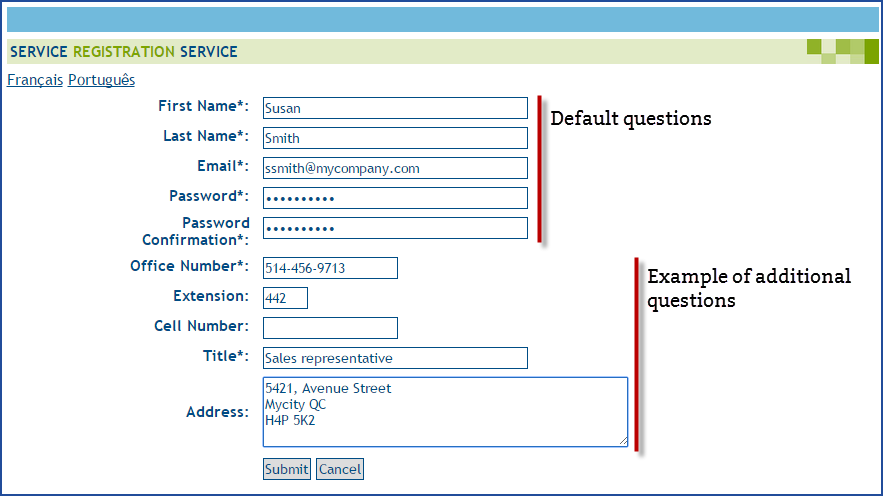
Once the option activated, the mandatory fields for the registration are the following:
- First Name
- Last Name
- Email
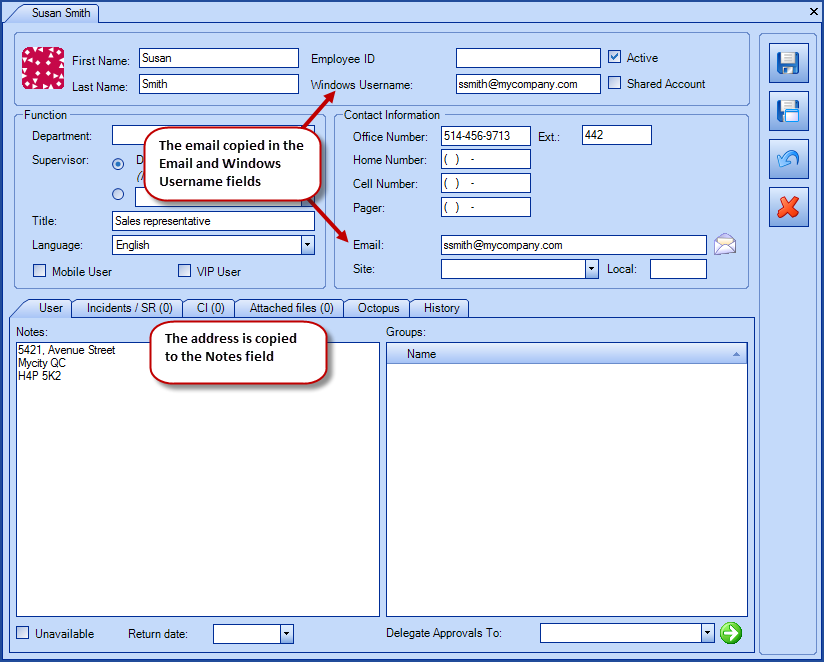
- The information added here will be copied to the Email and Windows Username fields.
- Password
- Password confirmation
The following fields can also be added and determined if they are mandatory or not:
- Office Number
- Extension
- Home Number
- Cell Number
- Pager
- Title
- Requester and User (visible if the "See only my requests" option is unchecked) Access to view requests from other departments and other sites is required.
- Address
- The information will be copied into the Notes field of the user.
This option only works with the Username and Password mode and must be activated through the Octopus Service Center.
Fill in a form on our Web Portal or communicate with the Service Center for more information or to activate this option.
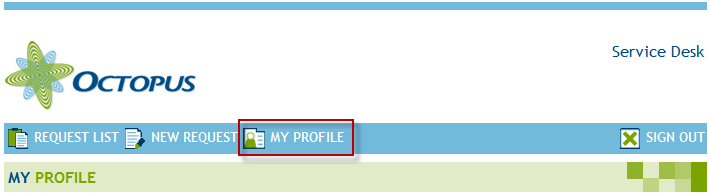
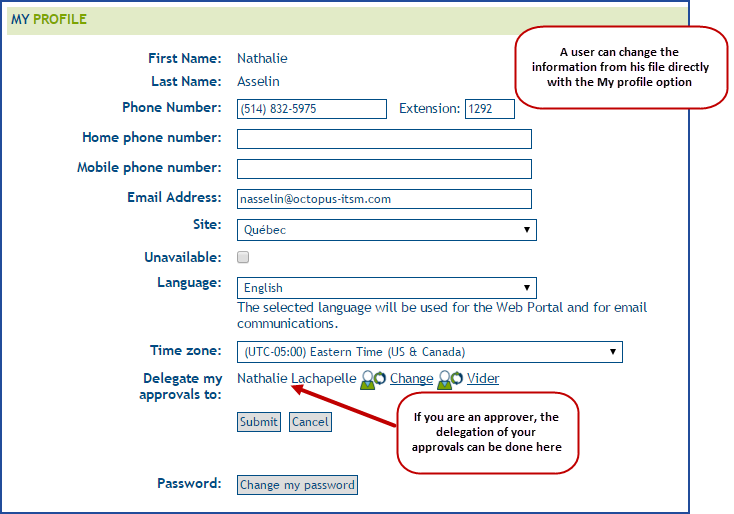
My profile
From the main page of the Web Portal, you can click on My profile to change the information on your profile or password.
To change your password, you must then click on Change My Password. As the password received by e-mail often contains special characters, you can copy/paste it in the space provided for this purpose to avoid errors.
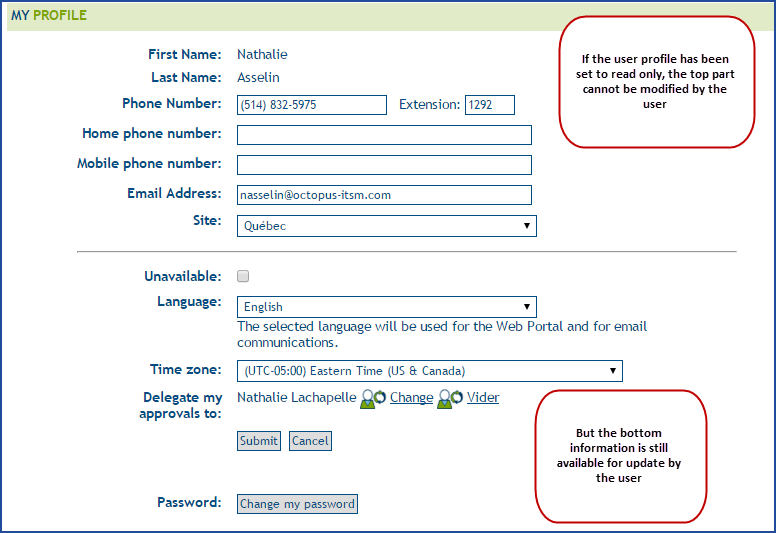
It is possible that the My profile option could be in read-only. If this is the case, you can only use the Change My Password option and the Delegates Approvals To in certain cases.
Activation/Deactivation of the Profile Modification
The profile can be either in read-only or editable to users, by default it can be edited. To modify this option, contact us and submit you request via our Web Portal with the form "Configuration / Data Modification" to say if:
- The profile is editable by users
- The Site should be in read-only
- The profile is in read-only
Please note that if you update the user information via a synchronization to an external source, we recommend that the profile be in read-only as the changes done by the users would be overwritten at the next import.
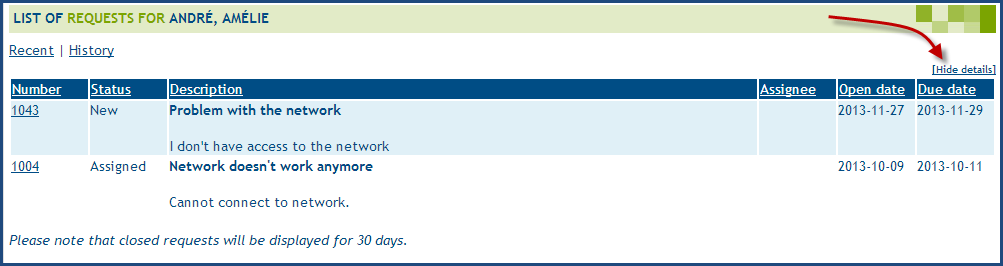
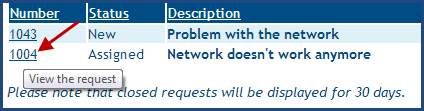
Request list
The Web Portal opens on the list of request that have been submitted to the service center. The list is displayed without the details, for a quick overview of the current requests. You can click on the link View details for more details.

Please note that by default, closed requests will be posted for 30 days after the closing date to avoid having an endless list of requests.
Recent
The 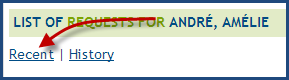 link allows to see the active and closed requests.
Please note that by default, closed requests will be posted for 30 days after the closing date.
History
The 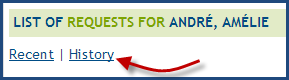 link allows to see all your requests.
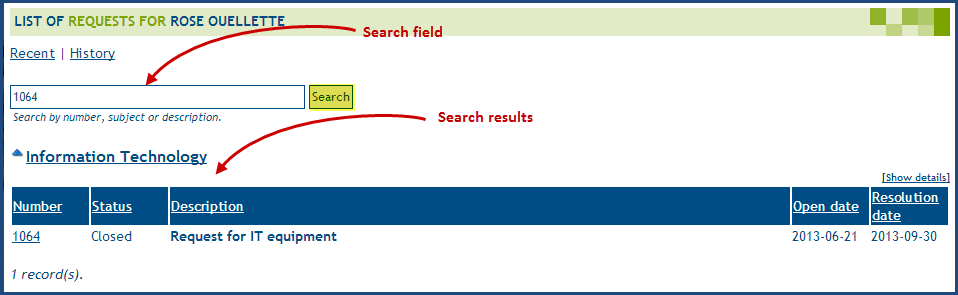
Search
It is possible to search a particular request among the request history.
The search is done with the following fields:
- Request number
- Subject
- Description
To do a search, enter the information in the field provided to this effect and then select the [Search] button.
Visibility of cancelled requests
By default, requests that have been canceled are not visible on the Web Portal. But this behavior can be changed from the Tools > Options > Visibility of canceled requests via the Web Portal menu.
To modify the options an Octopus user need the following permission:
- Administer Octopus


Journal entry
From the request list, you can add information to the journal. This information will be forwarded to the assignee or group responsible for your request.
- To add a journal entry, you must click on request number to open it.
- Then, simply add the information in the Message field and click Submit to add your message to the request. If necessary, you also can add an attachment to your new message.

- Once added, your message is now visible as a new journal entry.

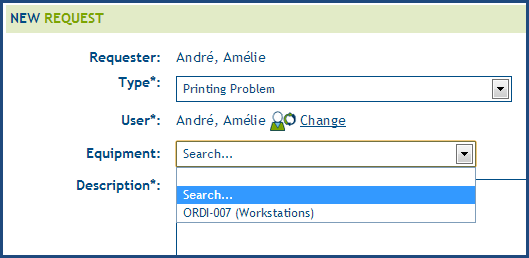
New request
To make a new request to your service center, you must click on the link New Request and select the appropriate request type from the drop-down list.

Other fields could be visible, depending on your environment, like the service or site. The service concept will be discussed later in this article.
Link an Equipment
After you select your request type, other fields could appear that would need to be filled, like the Equipment field. This field can be, for example, connected to the computer you use. In this case, you simply pick it from the list.

Search an Equipment
To relate other types of equipment besides your computer, like a printer you can search to find this equipment.
To search:
- Select Search... from the drop down list
- Enter the name of the equipment to search
- Click on the magnifying glass to search
- If more than one result is found during your search, select correct equipment in the next window and click on Select
- Then you can finish filling out your request.
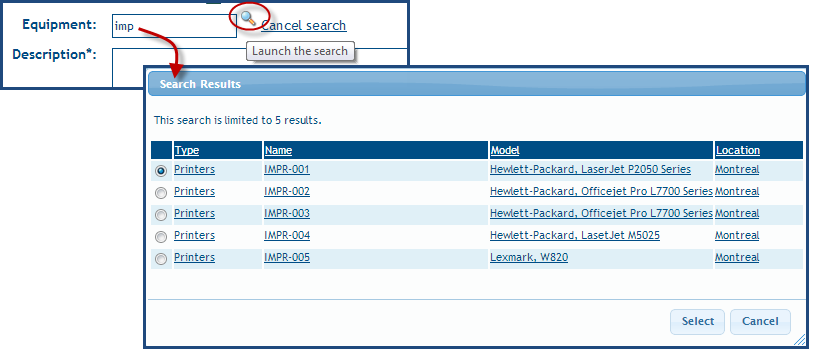

You can see the name of the selected equipment and also, the site and local are displayed (if configured in the equipment file).
Criteria: The string that was entered in the web portal by the user
Basic search
- The criterion is always searched in the following fields:
- Name
- Serial number
- Inventory number
* We always exclude the Retired CIs
Advanced filters according to the environment configuration
- If the setting WebUI.CreateRequest.CIList.Source = "UserDepartment
- We add as a criterion that the Department of the CI is the same as that of the user
- If the user does not have a department: No result
- END !
- If the setting ExternalSupportMode.Enabled = "True
- If the user does not have a site: No result
- We add as a criterion that the CI's Site is the same as the user's
- However, if ExternalSupportMode.AllowRootSiteCISearch = "True", then we allow to find CIs in the Root site of the user's site
- END!
- If a site has been selected in the web portal
- First, we search for CIs in this Site
- Then, we search for CIs in the other Sites
- END!
- If the user has a Site configured
- First, we look for the CIs of the user's site
- Then, we look for CIs in the other Sites
- END!
- If not
We search for all CIs, regardless of the Site / Department
Web form
Some request types may have a Web form. These forms can contain text fields, drop-down list, check box, calendar, etc.. Also, the fields marked with an asterisk (*) are mandatory fields. You cannot submit your request without answering these fields.
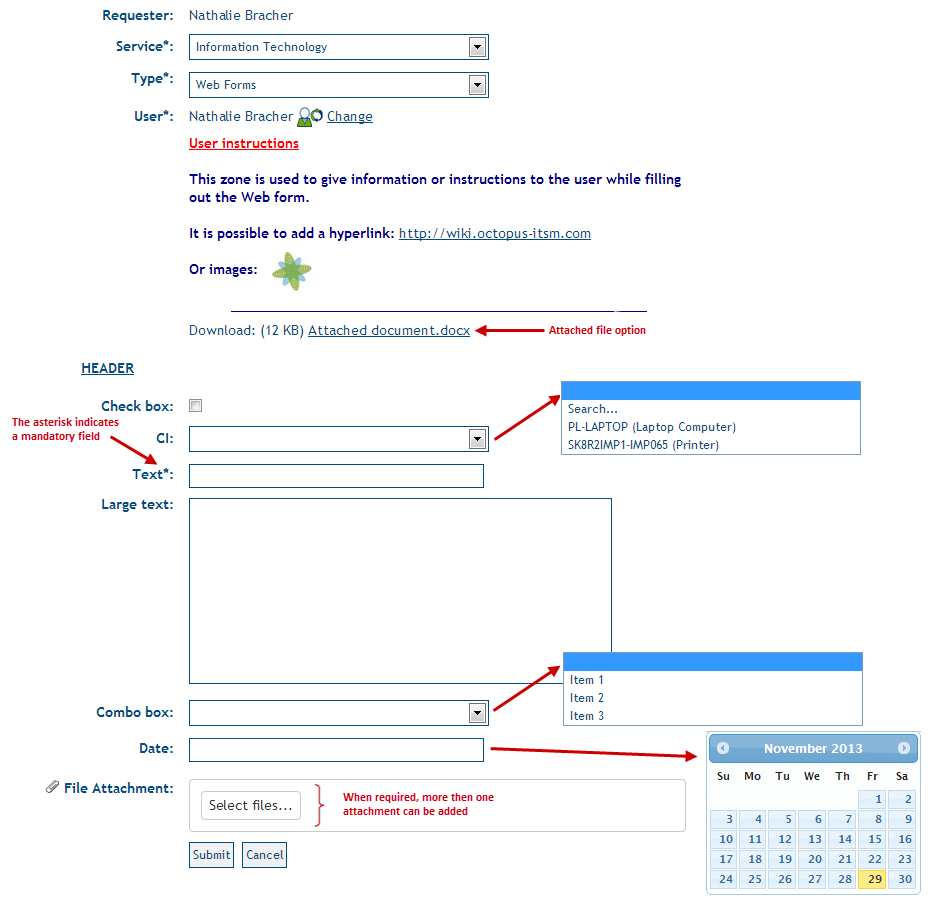
Attachment operations
- The selection of multiple attachment is supported
- Attachments stay there even if the user is changed
- A limit of 100 Mb applies to the group of attachments
You can add an attached file in different ways:
- By using the Select files button
- By sliding the file to the section
- From the clipboard with the CRTL + V key combination
Cette option n'est pas supporter avec Internet Explorer.

Web Portal for Different Services
In an environment where the Web portal is already used to make requests to the IT department, it is possible to activate it for other service, like the building facilities (or any other service available in Octopus). Once logged in, the user needs to choose the service to submit a request.
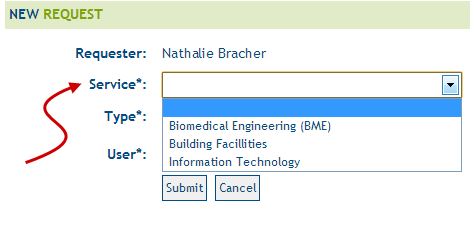
Once the service is selected, the request types for this service will be available.
Requests List
If your environment contains more than one service on the Web, your list of requests will be grouped by service.


Thank you, your message has been sent.